> ## Documentation Index
> Fetch the complete documentation index at: https://vibecodeapp-push-notifications-guide.mintlify.site/llms.txt
> Use this file to discover all available pages before exploring further.
# Push Notifications
> Complete step-by-step guide to adding push notifications to your Vibecode app
Push notifications let your app send messages to your users even when they're not using it — like reminders, alerts, or updates. This guide walks you through the entire process, from building your app to receiving your first test notification.
Create a push notification app in Vibecode
Build and submit via Expo Launch
Set up APNs in Apple Developer portal
Connect your APNs key to your Expo project
Add slug and project ID to your app
Send your first push notification
## Before You Start
You'll need the following:
1. **Apple Developer Program Membership** (\$99/year)
* Sign up at [developer.apple.com/programs](https://developer.apple.com/programs/)
2. **Expo Account** (free)
* Create one at [expo.dev/signup](https://expo.dev/signup)
3. **A Physical iPhone or iPad**
* Push notifications don't work on simulators — you need a real device
4. **TestFlight App** installed on your device
* Download from the [App Store](https://apps.apple.com/app/testflight/id899247664)
Push notifications **require a native build** submitted to the App Store. They won't work in the Vibecode preview or Expo Go — you must go through the full build and TestFlight process described below.
***
## Part 1: Build Your App in Vibecode
### Step 1: Describe What You Want
Open Vibecode and describe the push notification functionality you need. Here's an example prompt that works well:
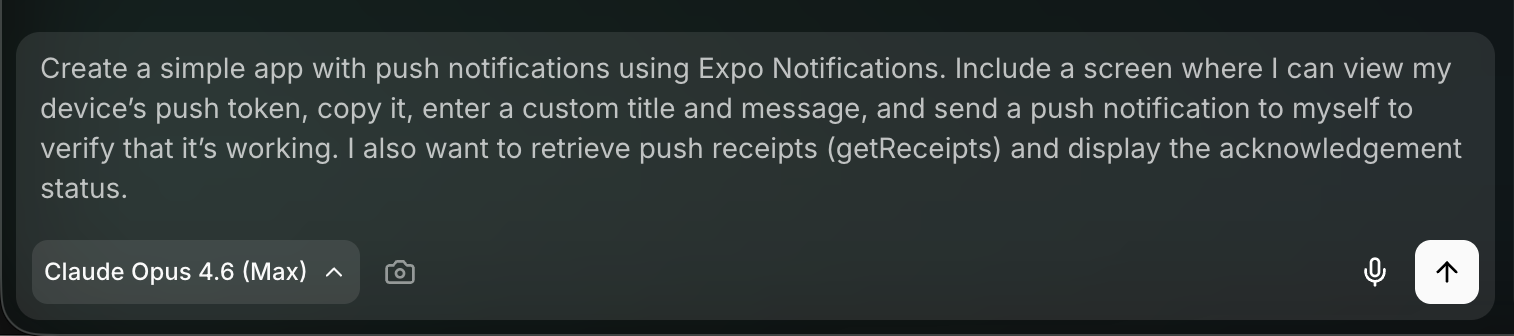 You can ask for something simple like:
> "Create an app with push notifications. Include a screen where I can view my push token, send a test notification to myself, and verify it's working."
Or describe push notifications as part of a larger app:
> "Build a task manager app that sends push notification reminders when tasks are due."
### Step 2: Let the AI Build It
Vibecode's AI will generate your app with all the push notification code already wired up. This includes the notification handler, token registration, permission requests, and the send/receive logic.
You can ask for something simple like:
> "Create an app with push notifications. Include a screen where I can view my push token, send a test notification to myself, and verify it's working."
Or describe push notifications as part of a larger app:
> "Build a task manager app that sends push notification reminders when tasks are due."
### Step 2: Let the AI Build It
Vibecode's AI will generate your app with all the push notification code already wired up. This includes the notification handler, token registration, permission requests, and the send/receive logic.
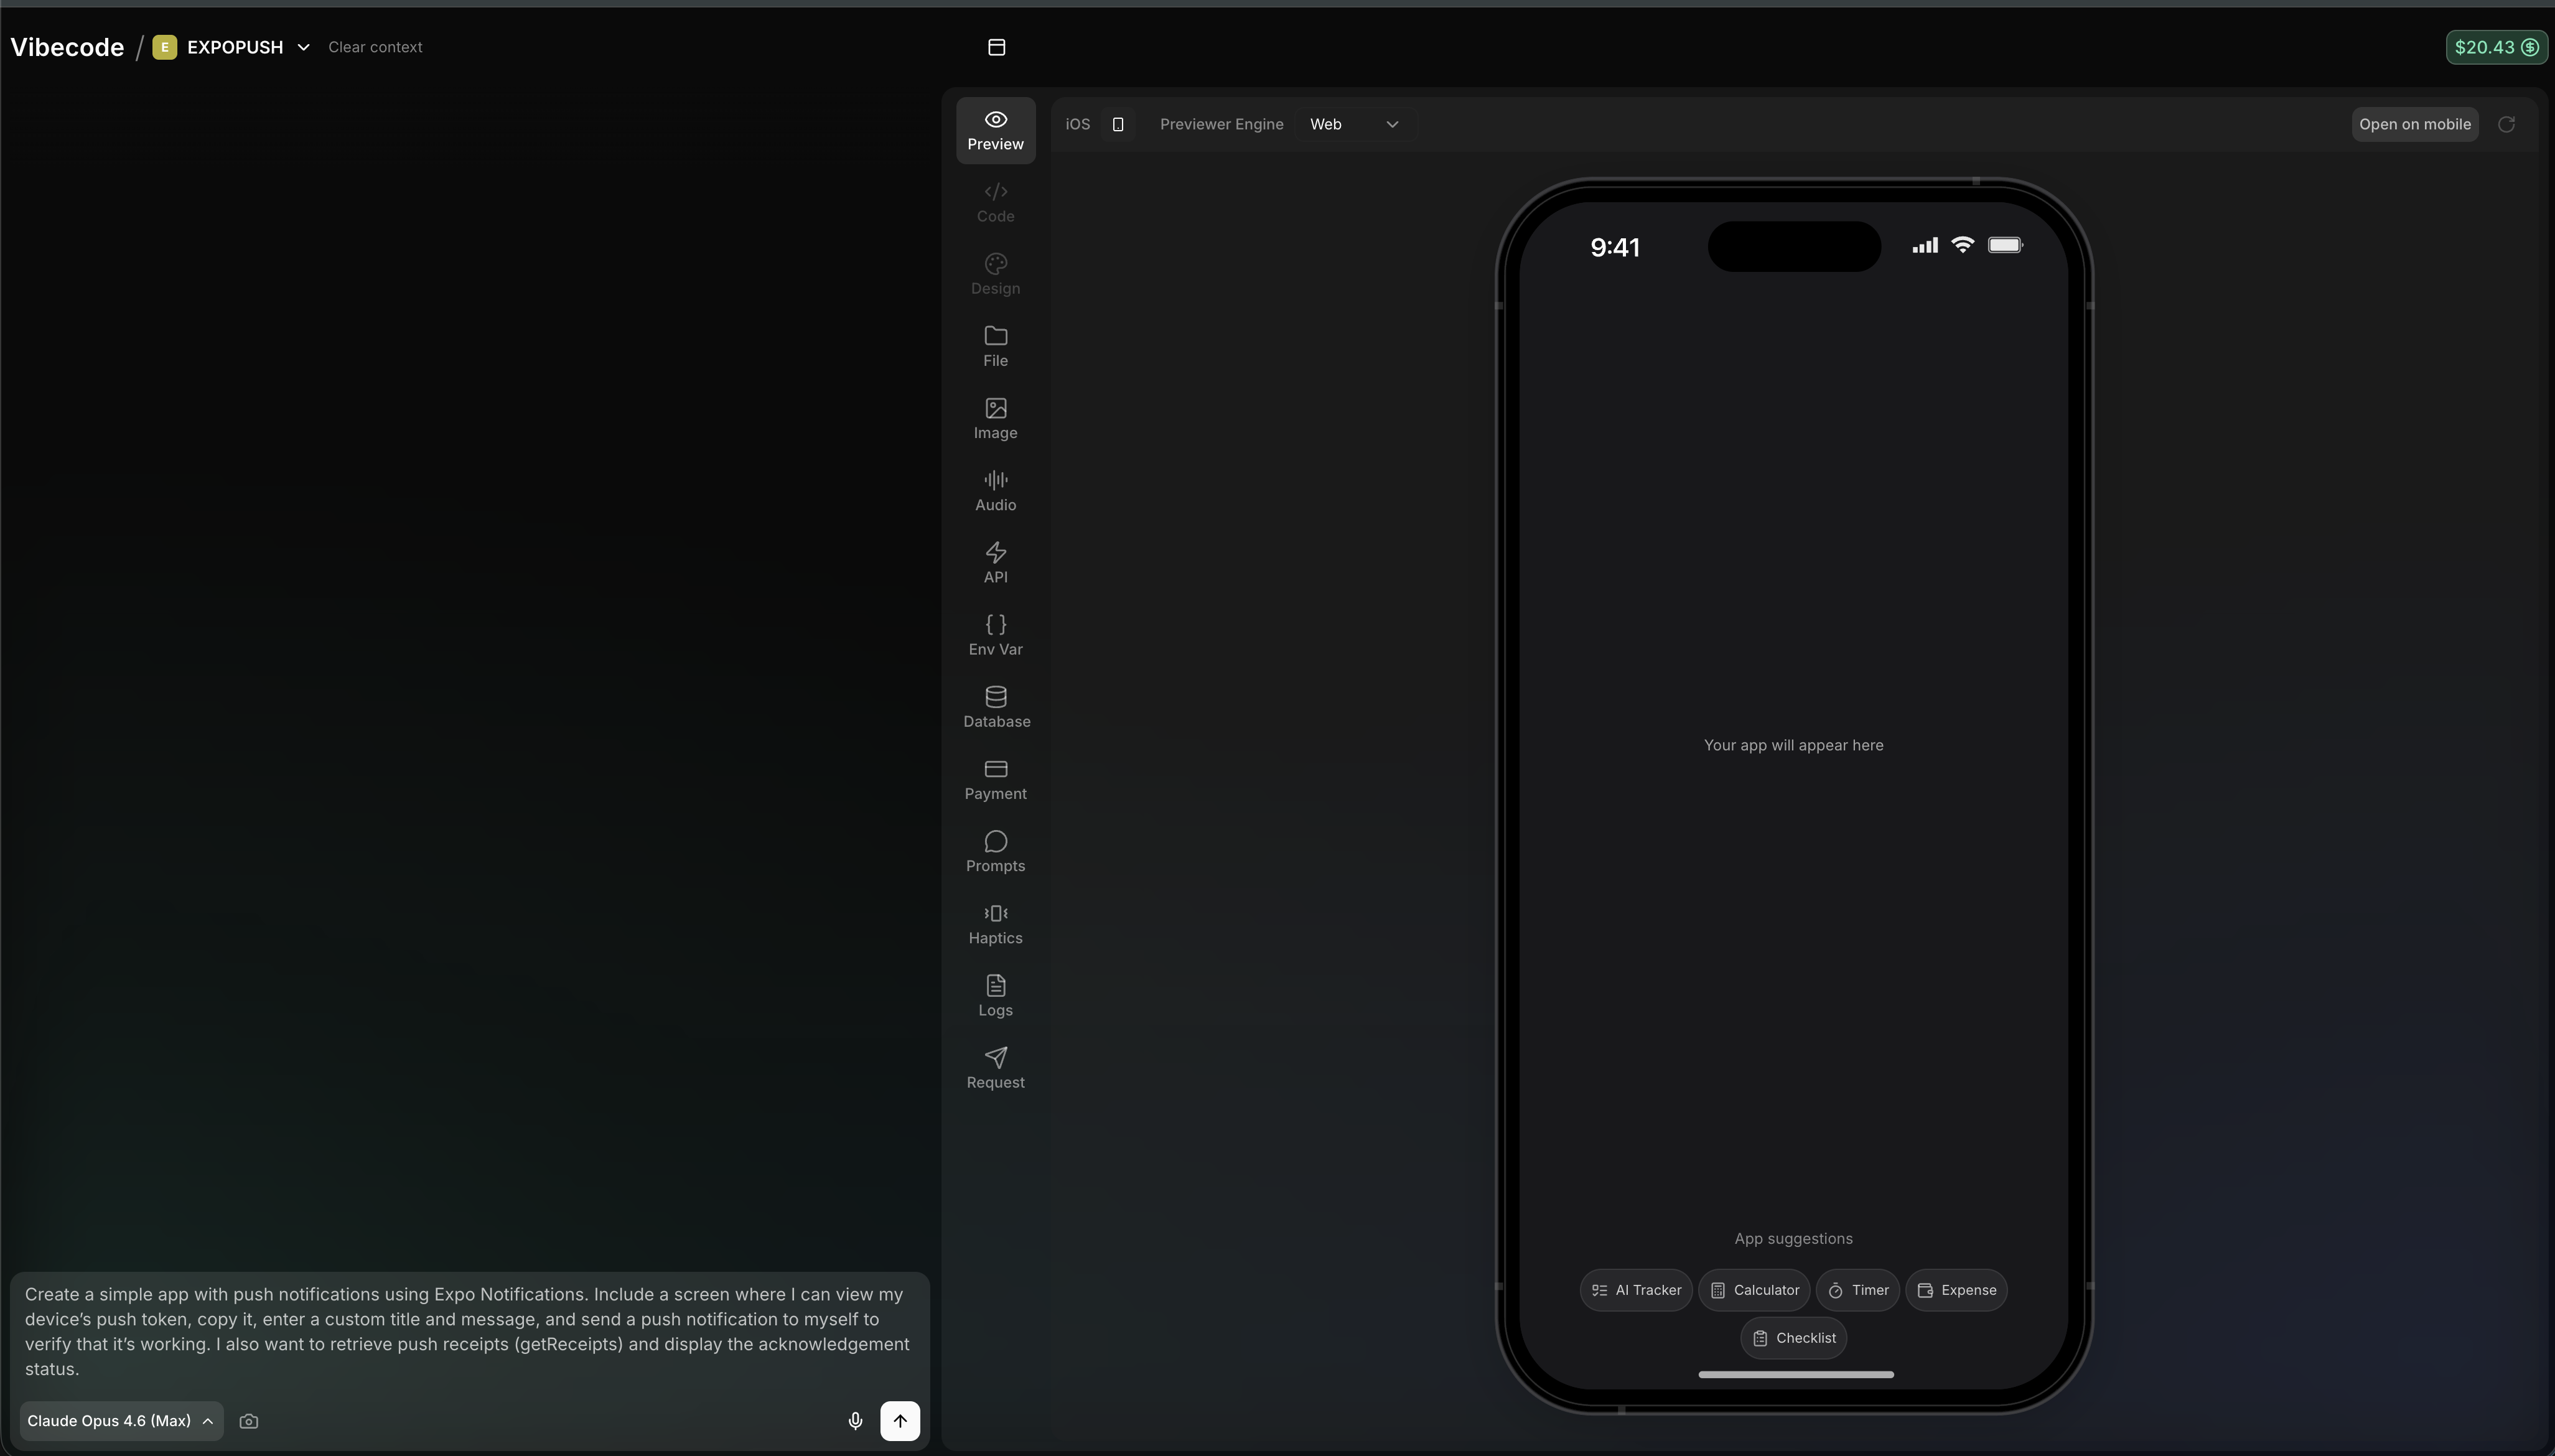 Wait for the AI to finish building. It will set up everything automatically — you don't need to write any code.
### Step 3: Review the Generated App
Once done, you'll see your app in the preview panel. The AI handles all the technical details:
* **Notification handler** — tells the OS to show notifications even when the app is open
* **Token registration** — gets a unique push token for your device
* **Permission requests** — asks the user to allow notifications
* **Send function** — sends notifications via the Expo Push API
Wait for the AI to finish building. It will set up everything automatically — you don't need to write any code.
### Step 3: Review the Generated App
Once done, you'll see your app in the preview panel. The AI handles all the technical details:
* **Notification handler** — tells the OS to show notifications even when the app is open
* **Token registration** — gets a unique push token for your device
* **Permission requests** — asks the user to allow notifications
* **Send function** — sends notifications via the Expo Push API
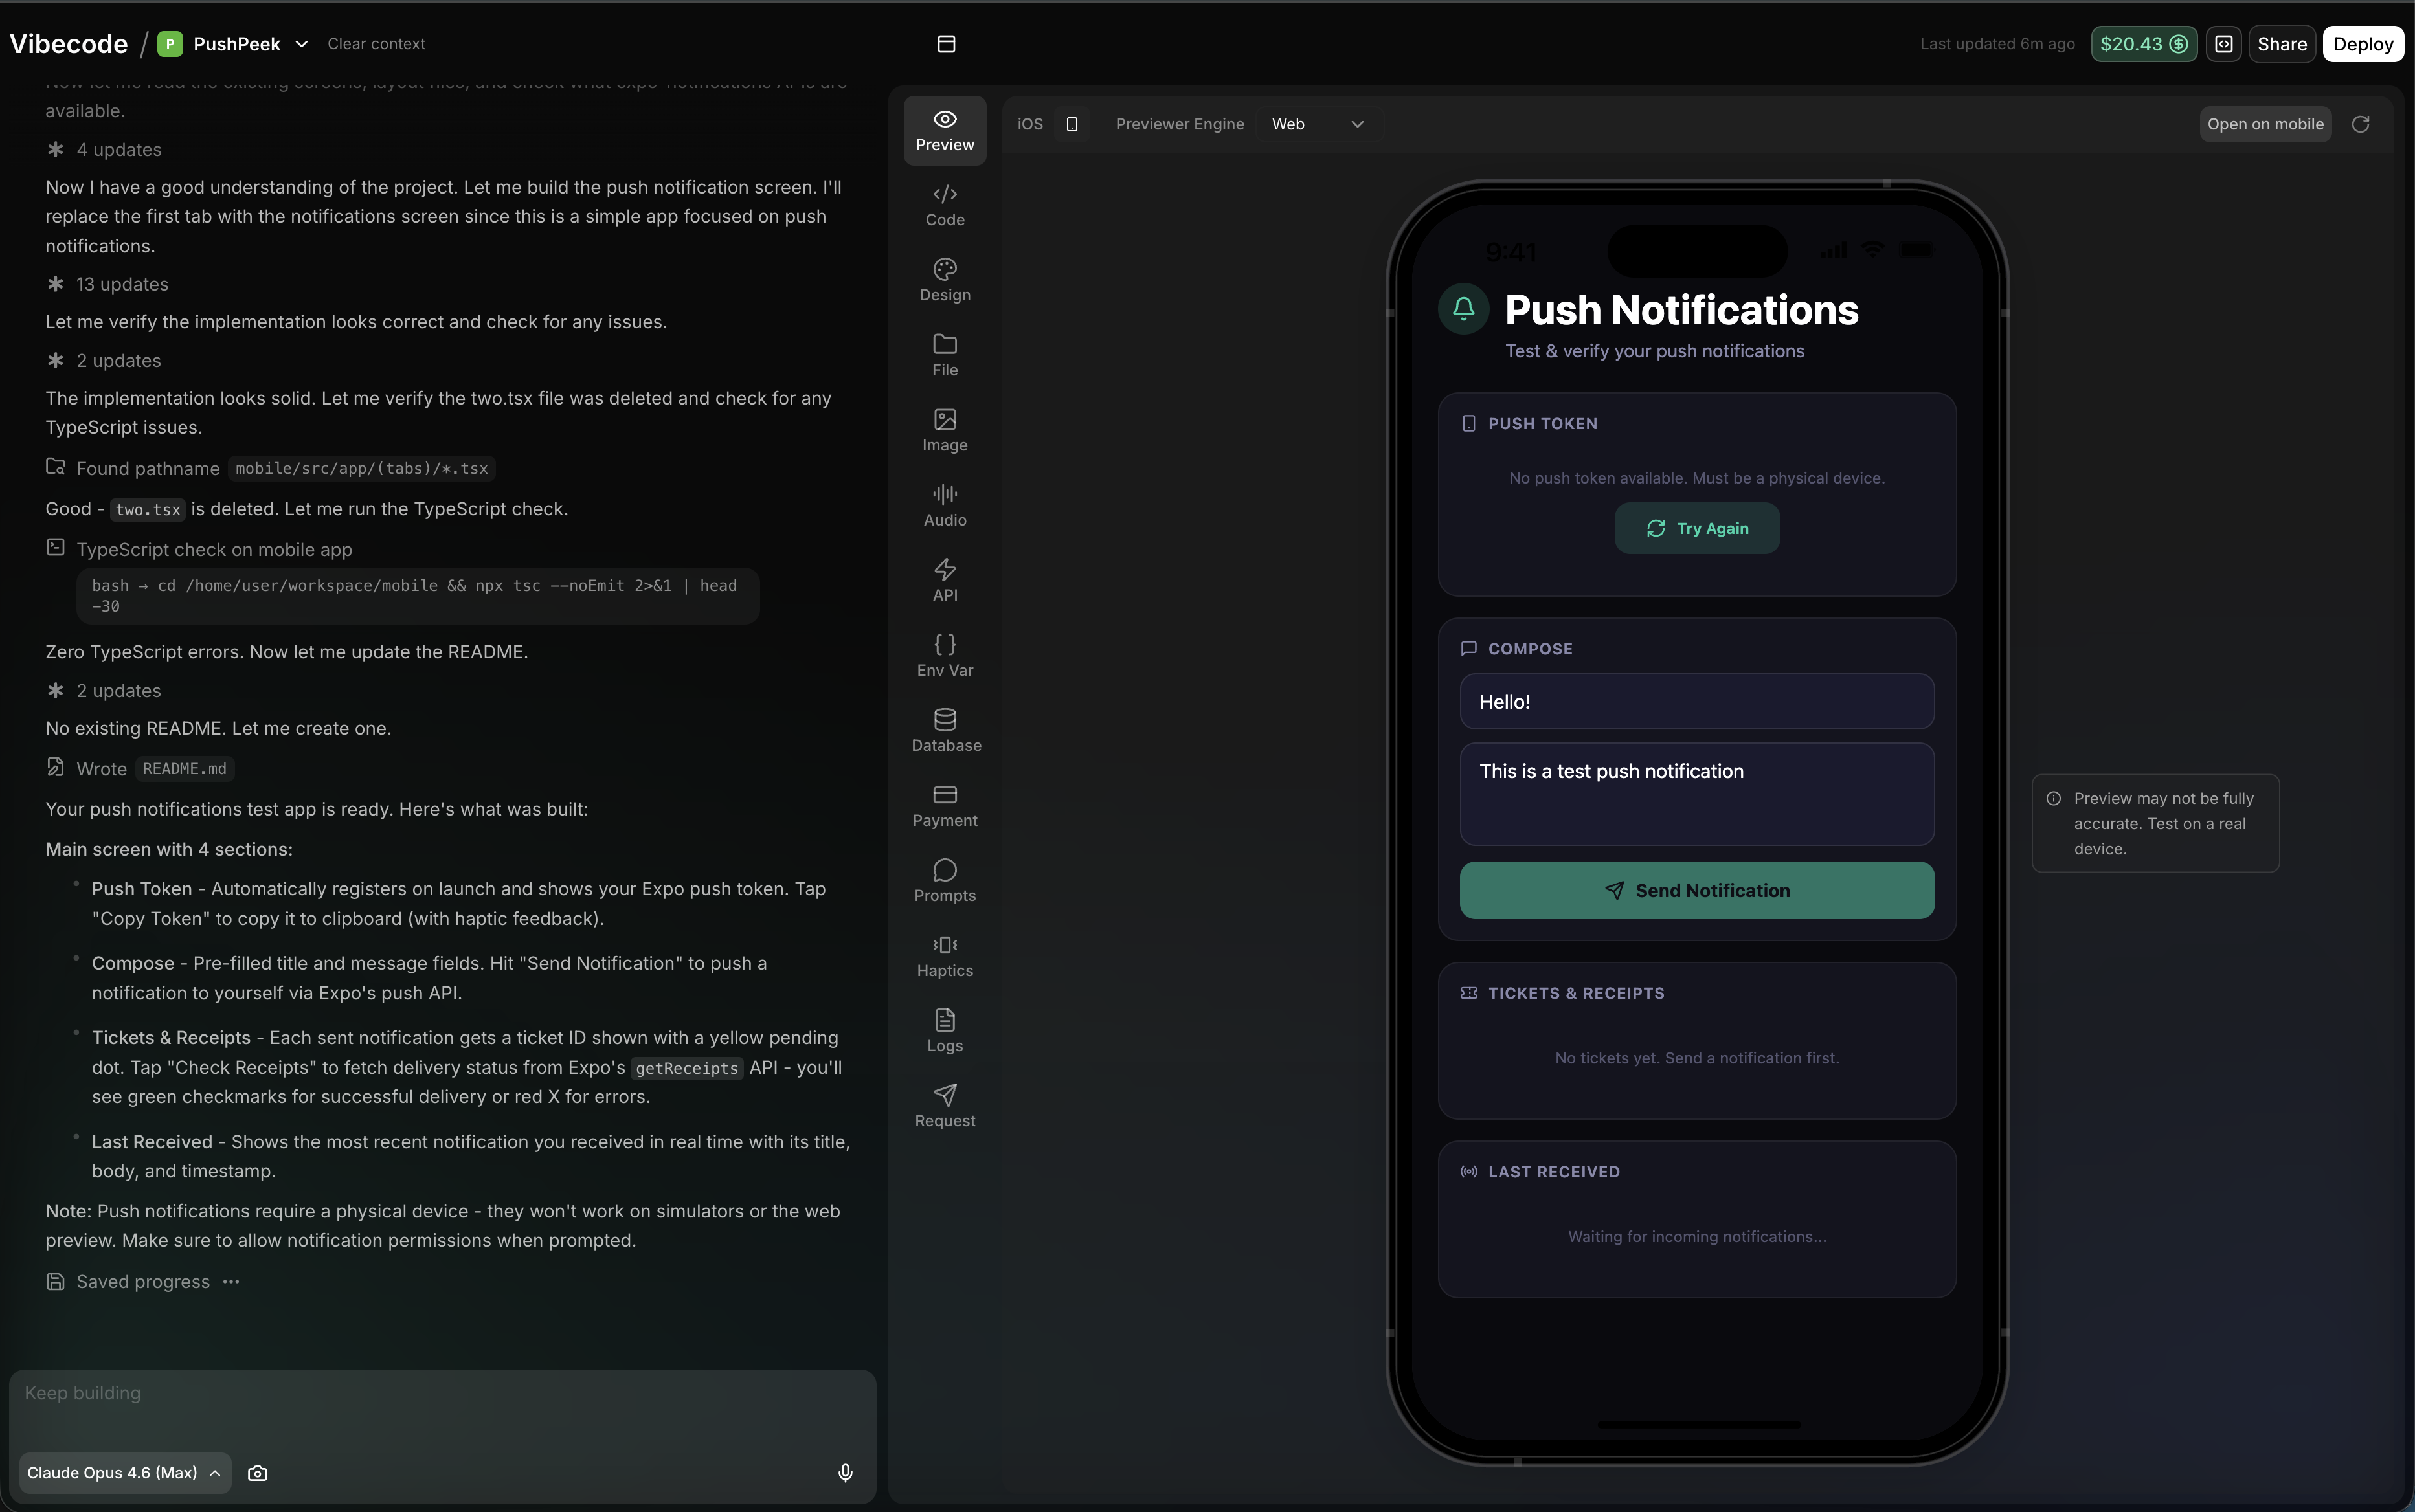 The app preview won't show a real push token yet — that only works on a physical device after building. Don't worry if you see "No push token available" in the preview.
***
## Part 2: Submit to the App Store
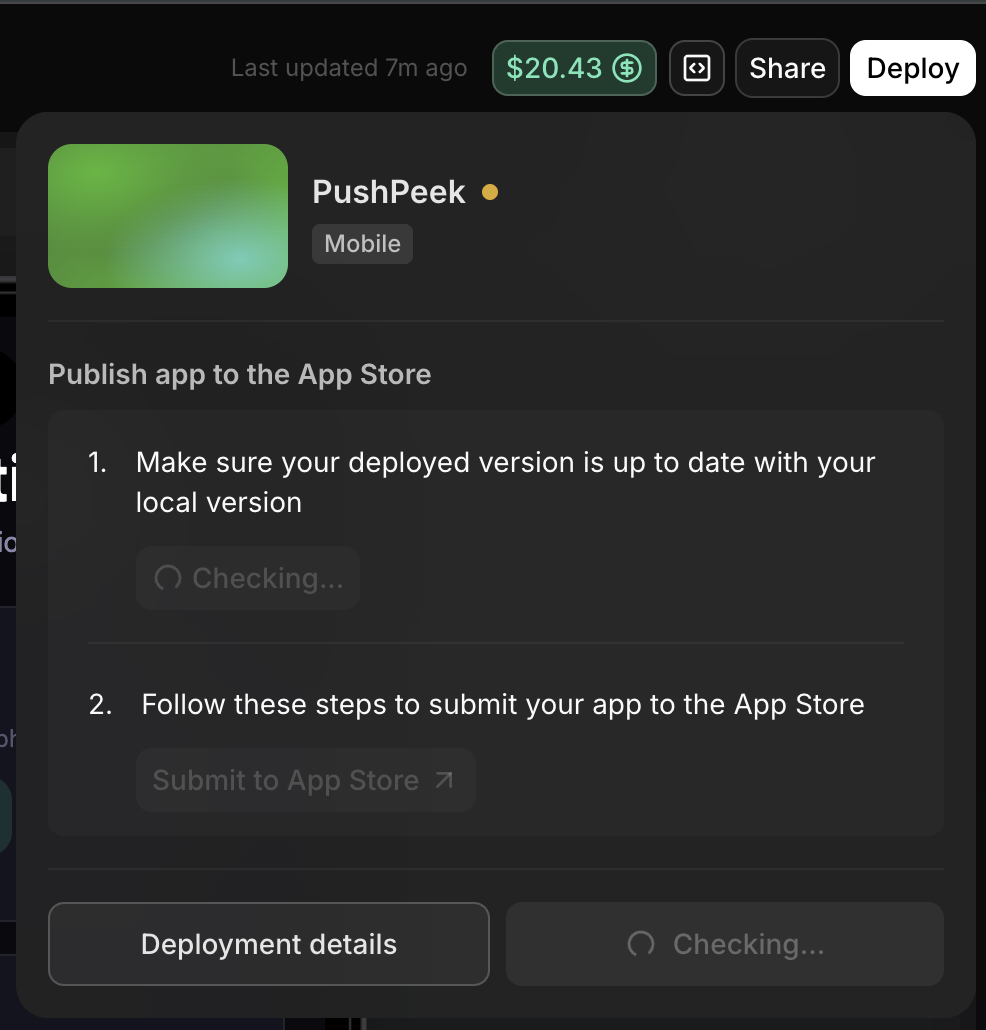
Push notifications require a native iOS build. The easiest way to do this in Vibecode is through the **Submit to App Store** flow, which uses Expo Launch to handle everything.
### Step 4: Start the Submission
Click **Share** in the top-right corner of Vibecode, then select **Submit to App Store**.
The app preview won't show a real push token yet — that only works on a physical device after building. Don't worry if you see "No push token available" in the preview.
***
## Part 2: Submit to the App Store
Push notifications require a native iOS build. The easiest way to do this in Vibecode is through the **Submit to App Store** flow, which uses Expo Launch to handle everything.
### Step 4: Start the Submission
Click **Share** in the top-right corner of Vibecode, then select **Submit to App Store**.
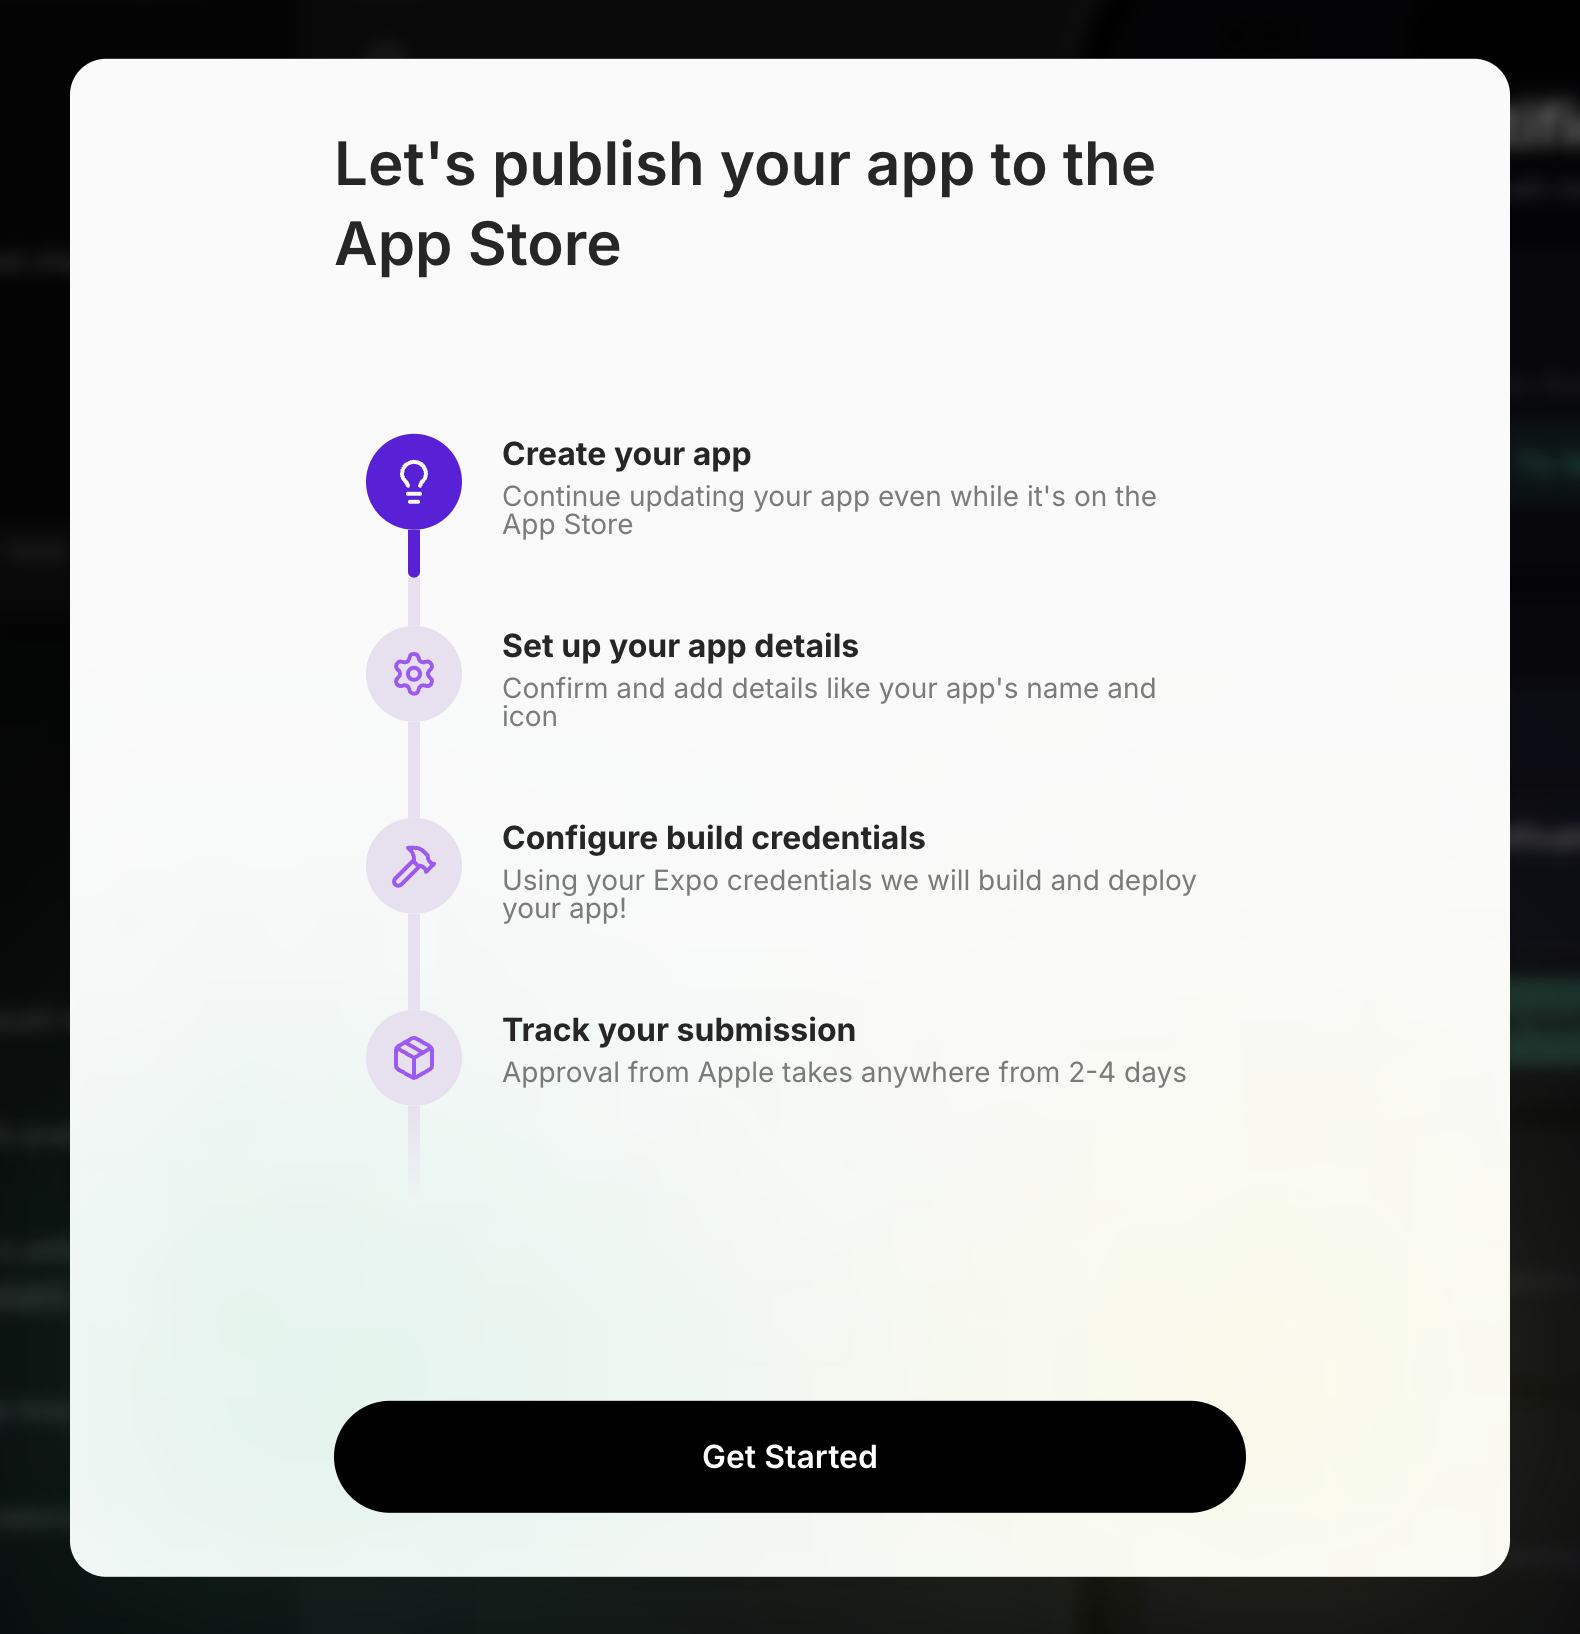
 ### Step 5: Walk Through the Setup Wizard
The wizard guides you through four steps. Click **Get Started** to begin.
### Step 5: Walk Through the Setup Wizard
The wizard guides you through four steps. Click **Get Started** to begin.
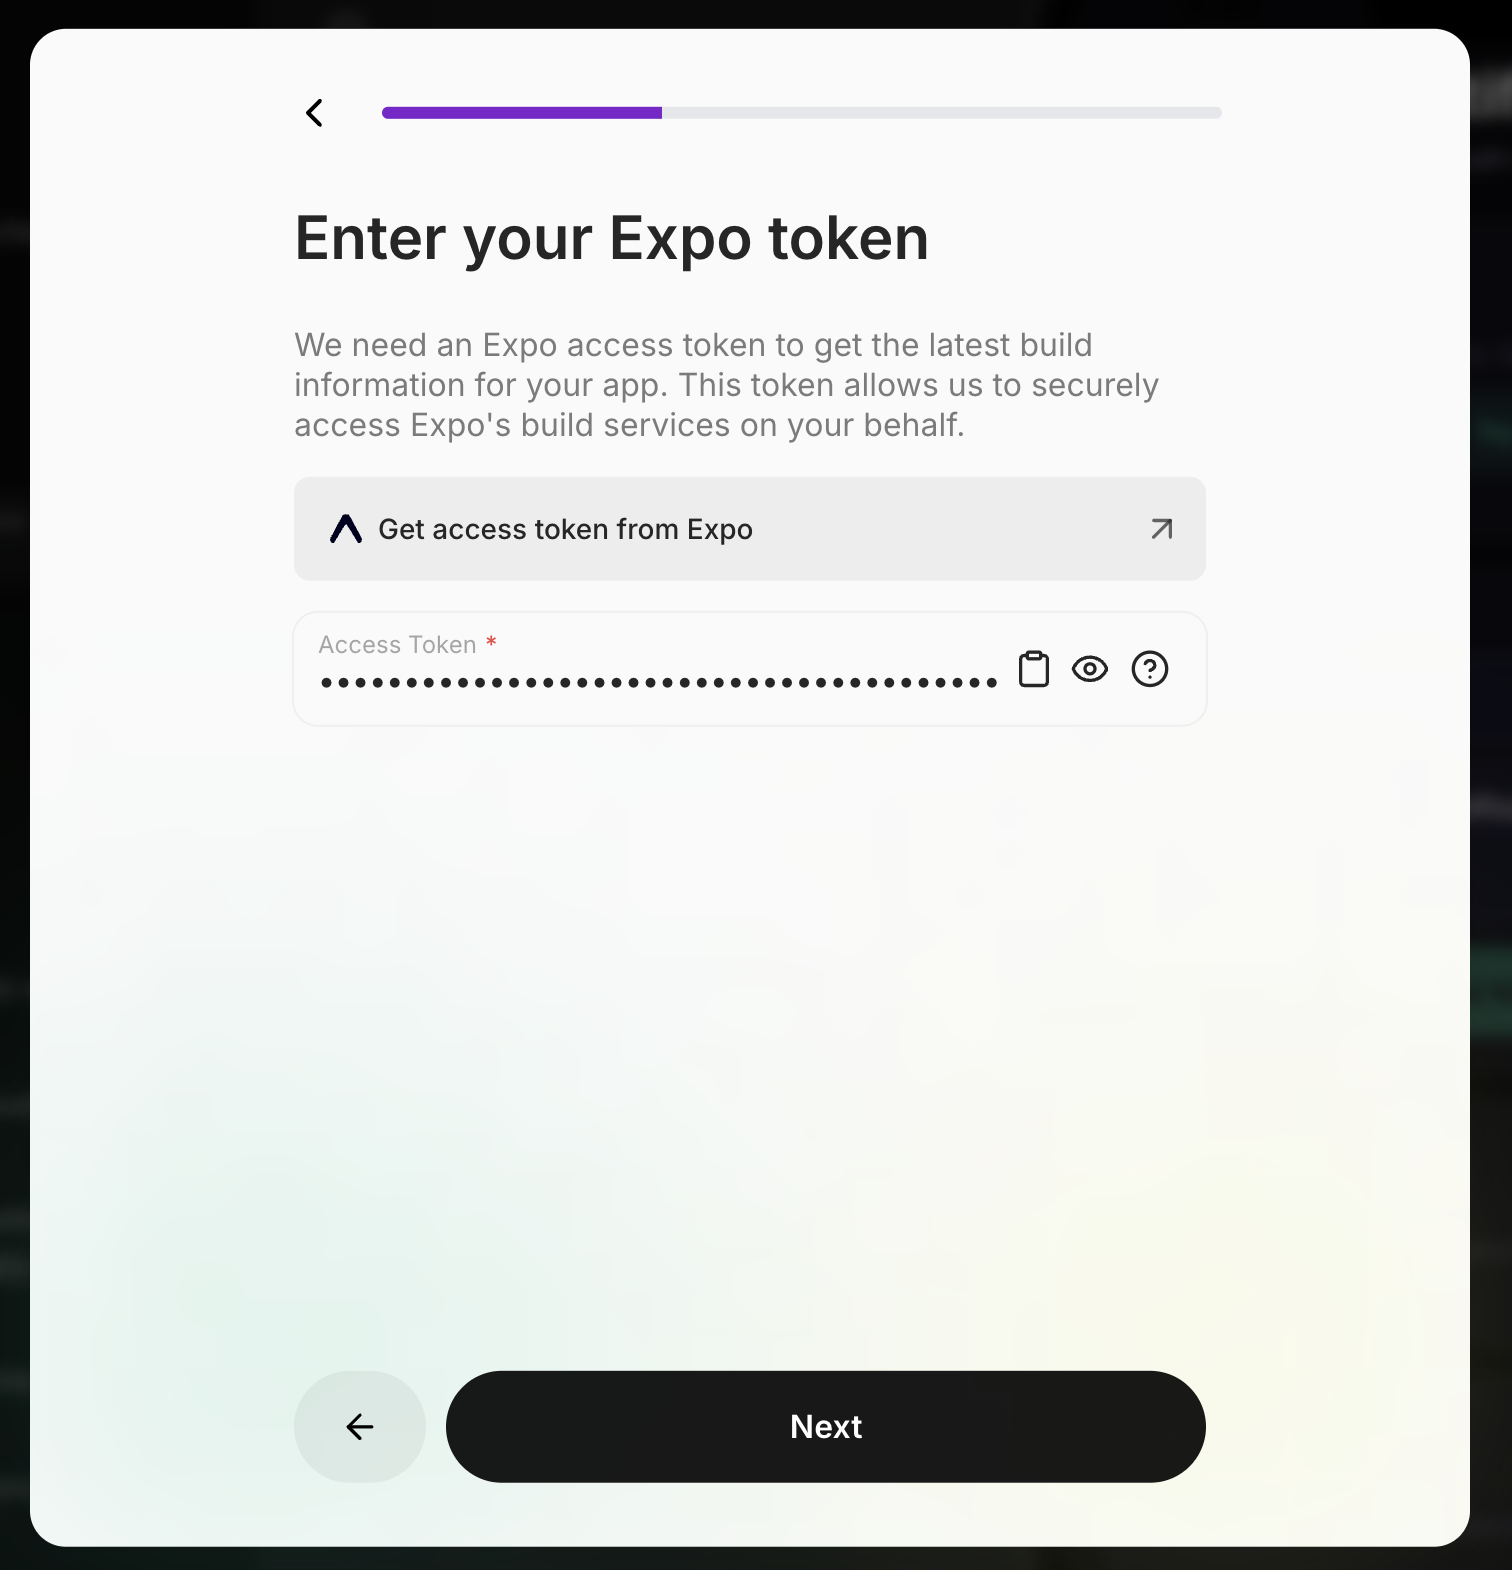
 ### Step 6: Enter Your Expo Access Token
You need an Expo access token so Vibecode can build your app.
1. Click **Get access token from Expo** to open the Expo dashboard
2. Go to **Settings → Access Tokens**
3. Create a new token, copy it
4. Paste it into the field
### Step 6: Enter Your Expo Access Token
You need an Expo access token so Vibecode can build your app.
1. Click **Get access token from Expo** to open the Expo dashboard
2. Go to **Settings → Access Tokens**
3. Create a new token, copy it
4. Paste it into the field
 ### Step 7: Confirm Your App Details
Review your app name, version number, and bundle ID. These are auto-generated — you usually don't need to change them.
### Step 7: Confirm Your App Details
Review your app name, version number, and bundle ID. These are auto-generated — you usually don't need to change them.
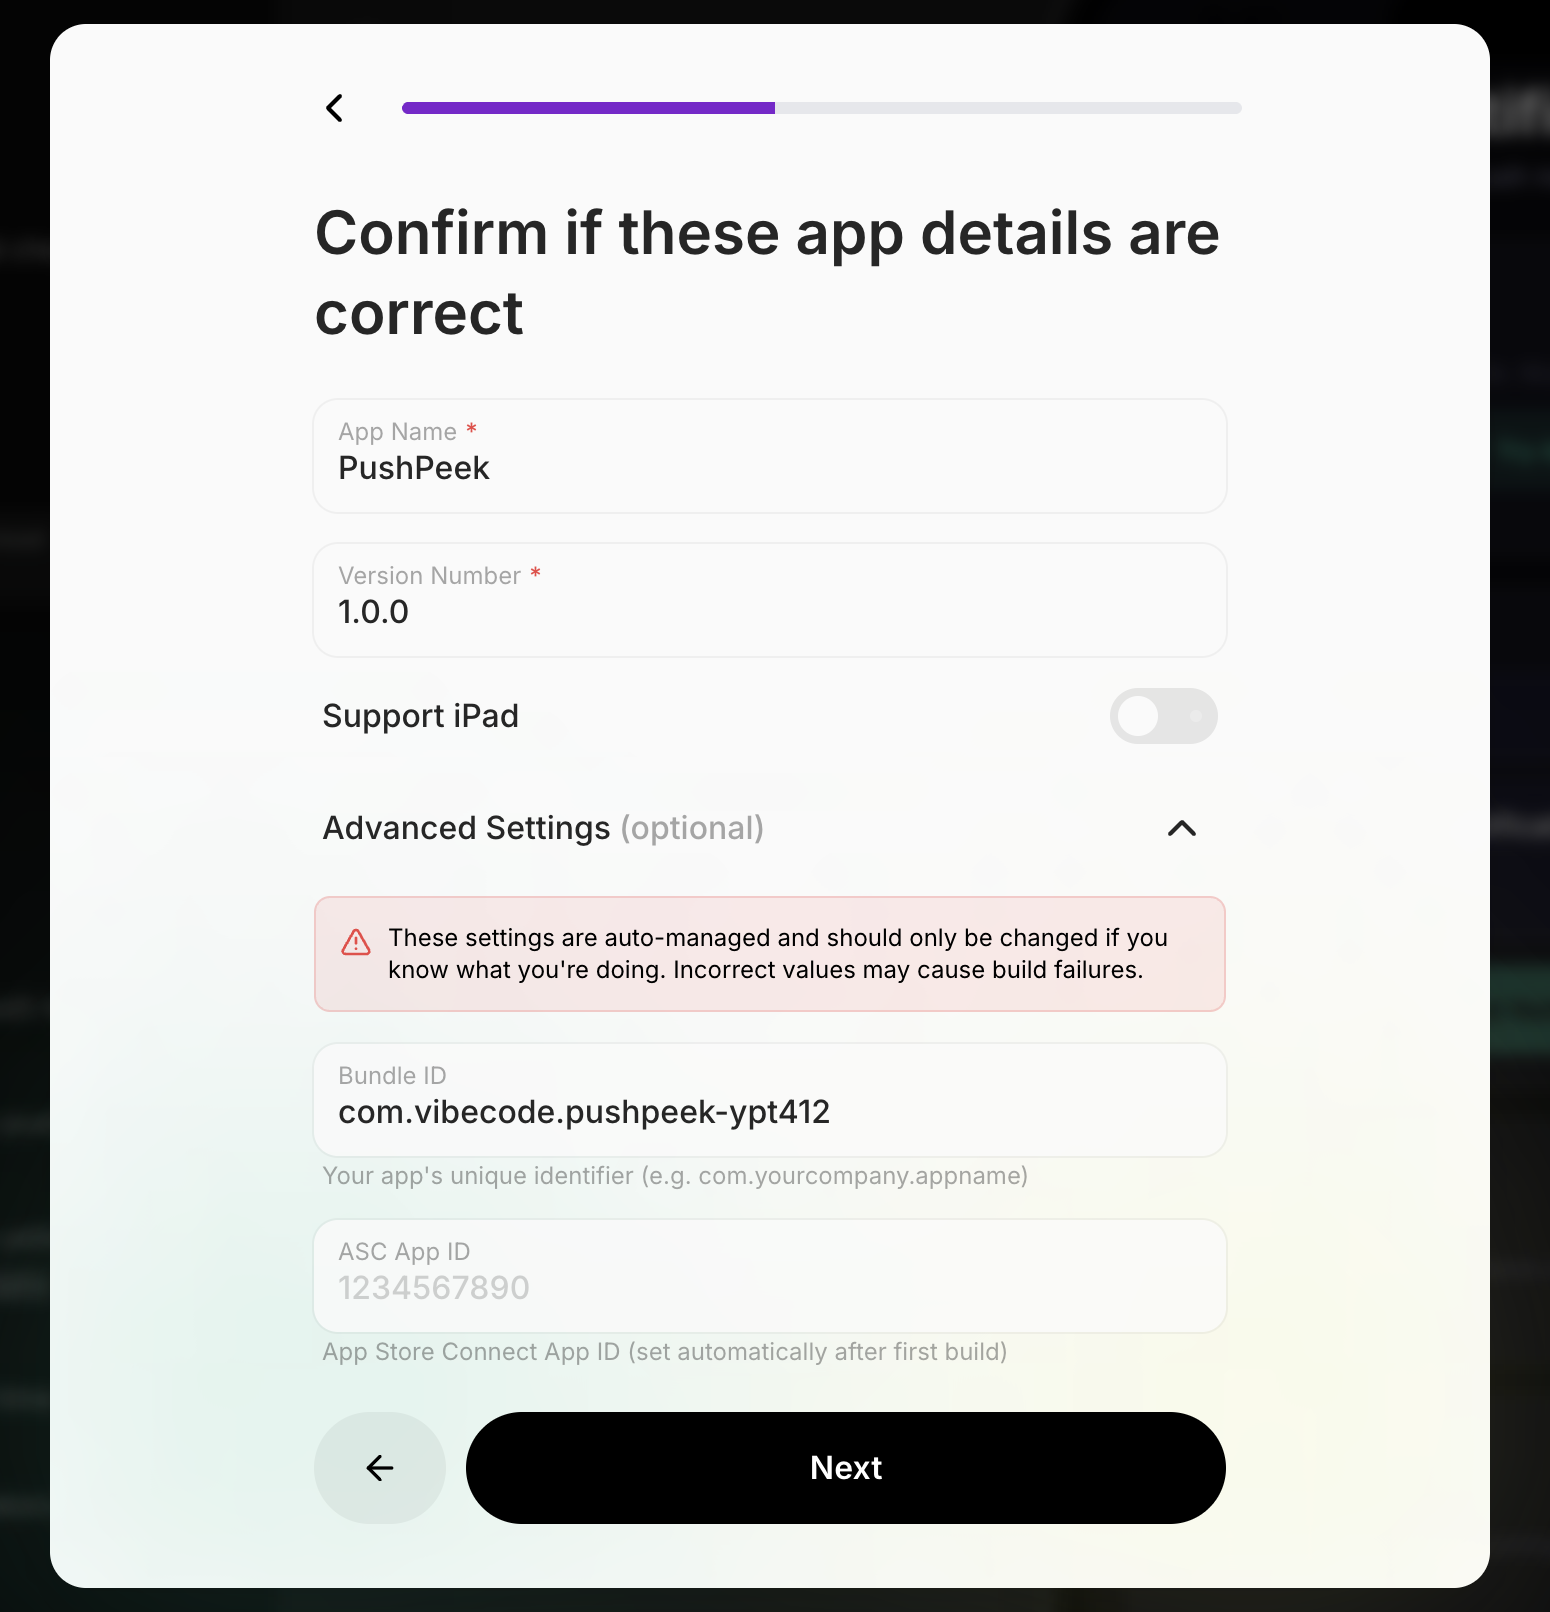 The **bundle ID** (like `com.vibecode.yourapp`) is permanent after your first build. Make sure you're happy with it.
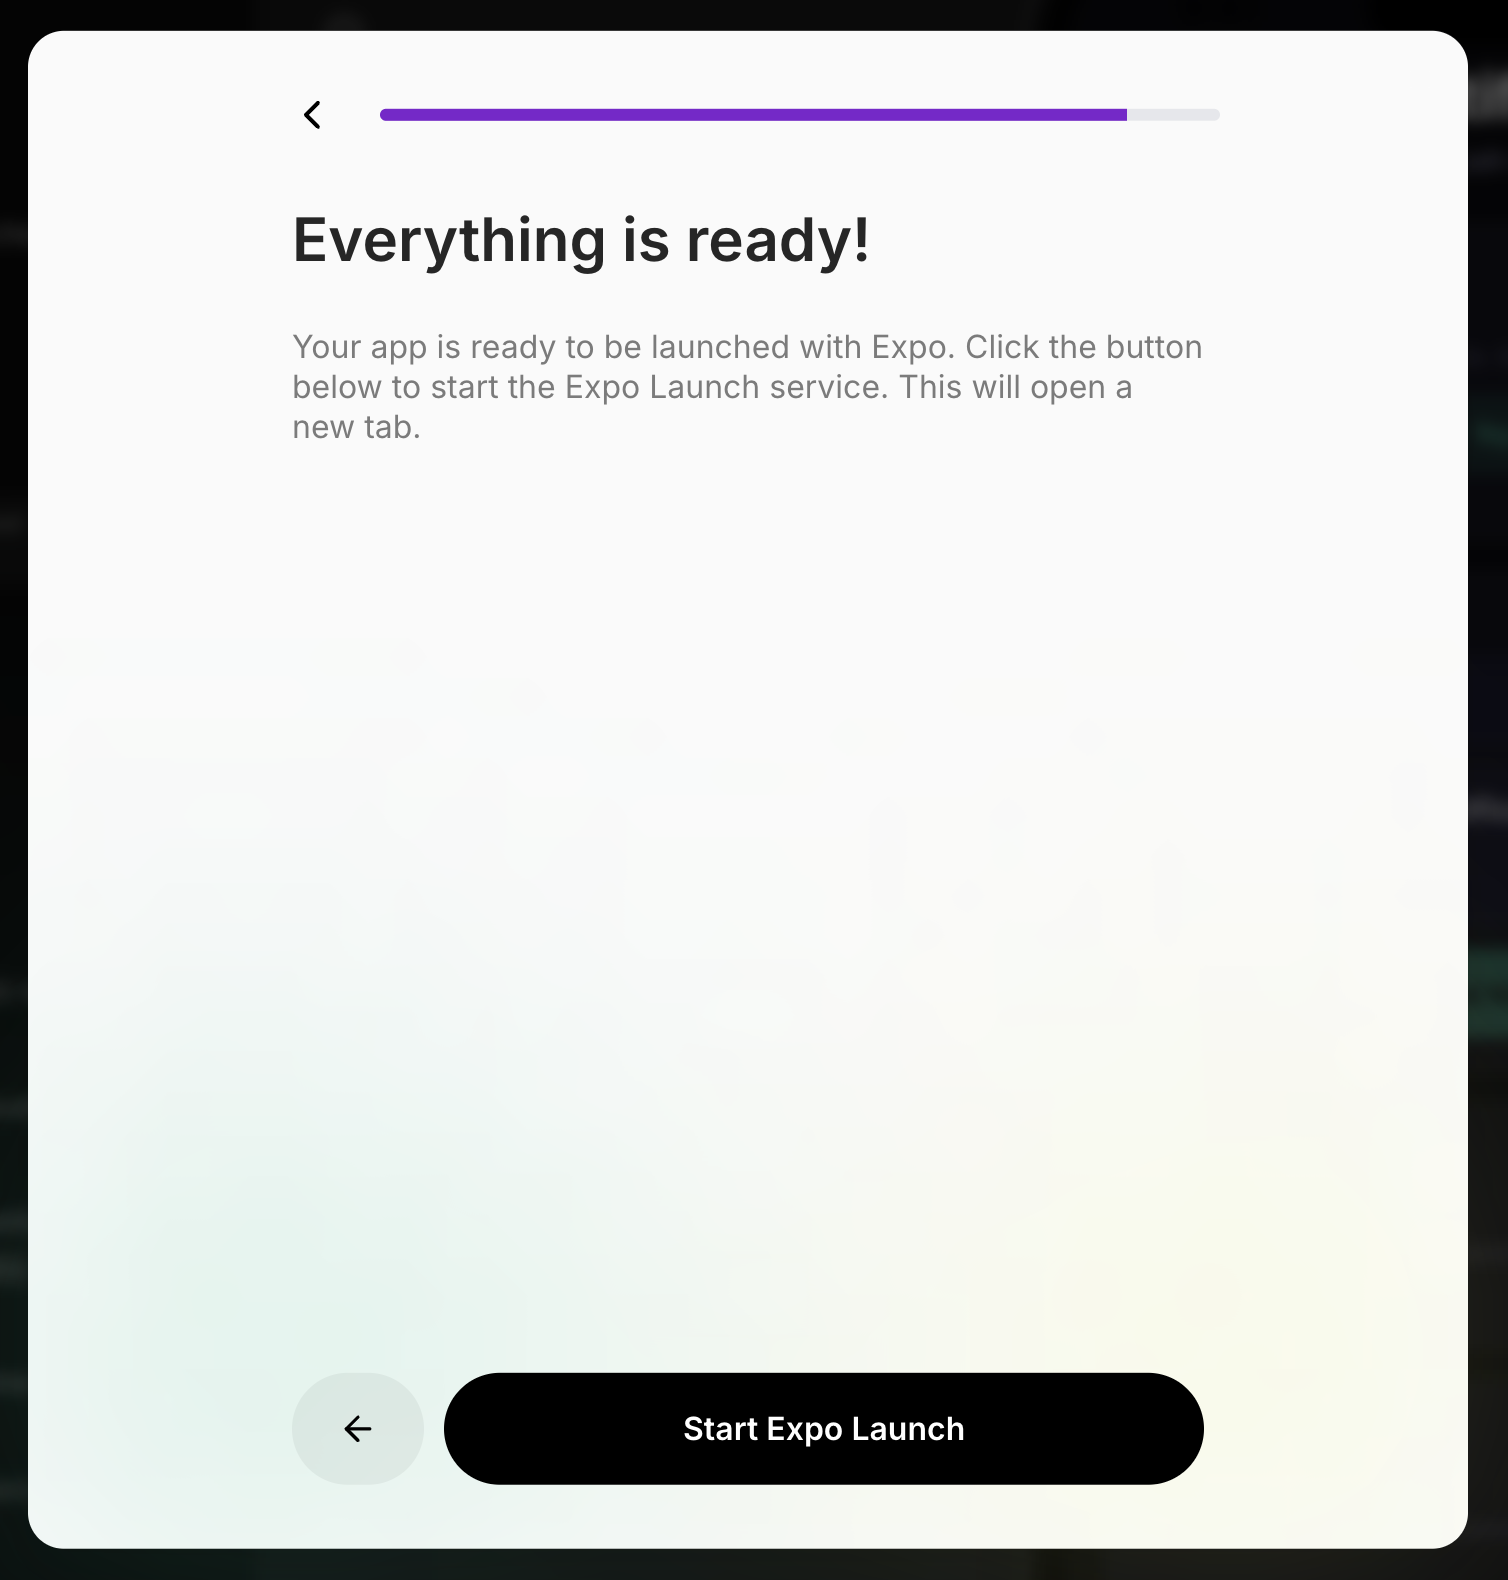
### Step 8: Complete the Setup
Once everything is verified, you'll see the "Everything is ready!" screen. Click **Start Expo Launch** to begin the build process.
The **bundle ID** (like `com.vibecode.yourapp`) is permanent after your first build. Make sure you're happy with it.
### Step 8: Complete the Setup
Once everything is verified, you'll see the "Everything is ready!" screen. Click **Start Expo Launch** to begin the build process.
 ### Step 9: Expo Launch — Choose Your Project
Expo Launch opens in a new tab. Walk through each step:
1. **Sign in with Expo** — uses your Expo account
2. **Choose Expo project** — select the project that was created for your app
### Step 9: Expo Launch — Choose Your Project
Expo Launch opens in a new tab. Walk through each step:
1. **Sign in with Expo** — uses your Expo account
2. **Choose Expo project** — select the project that was created for your app
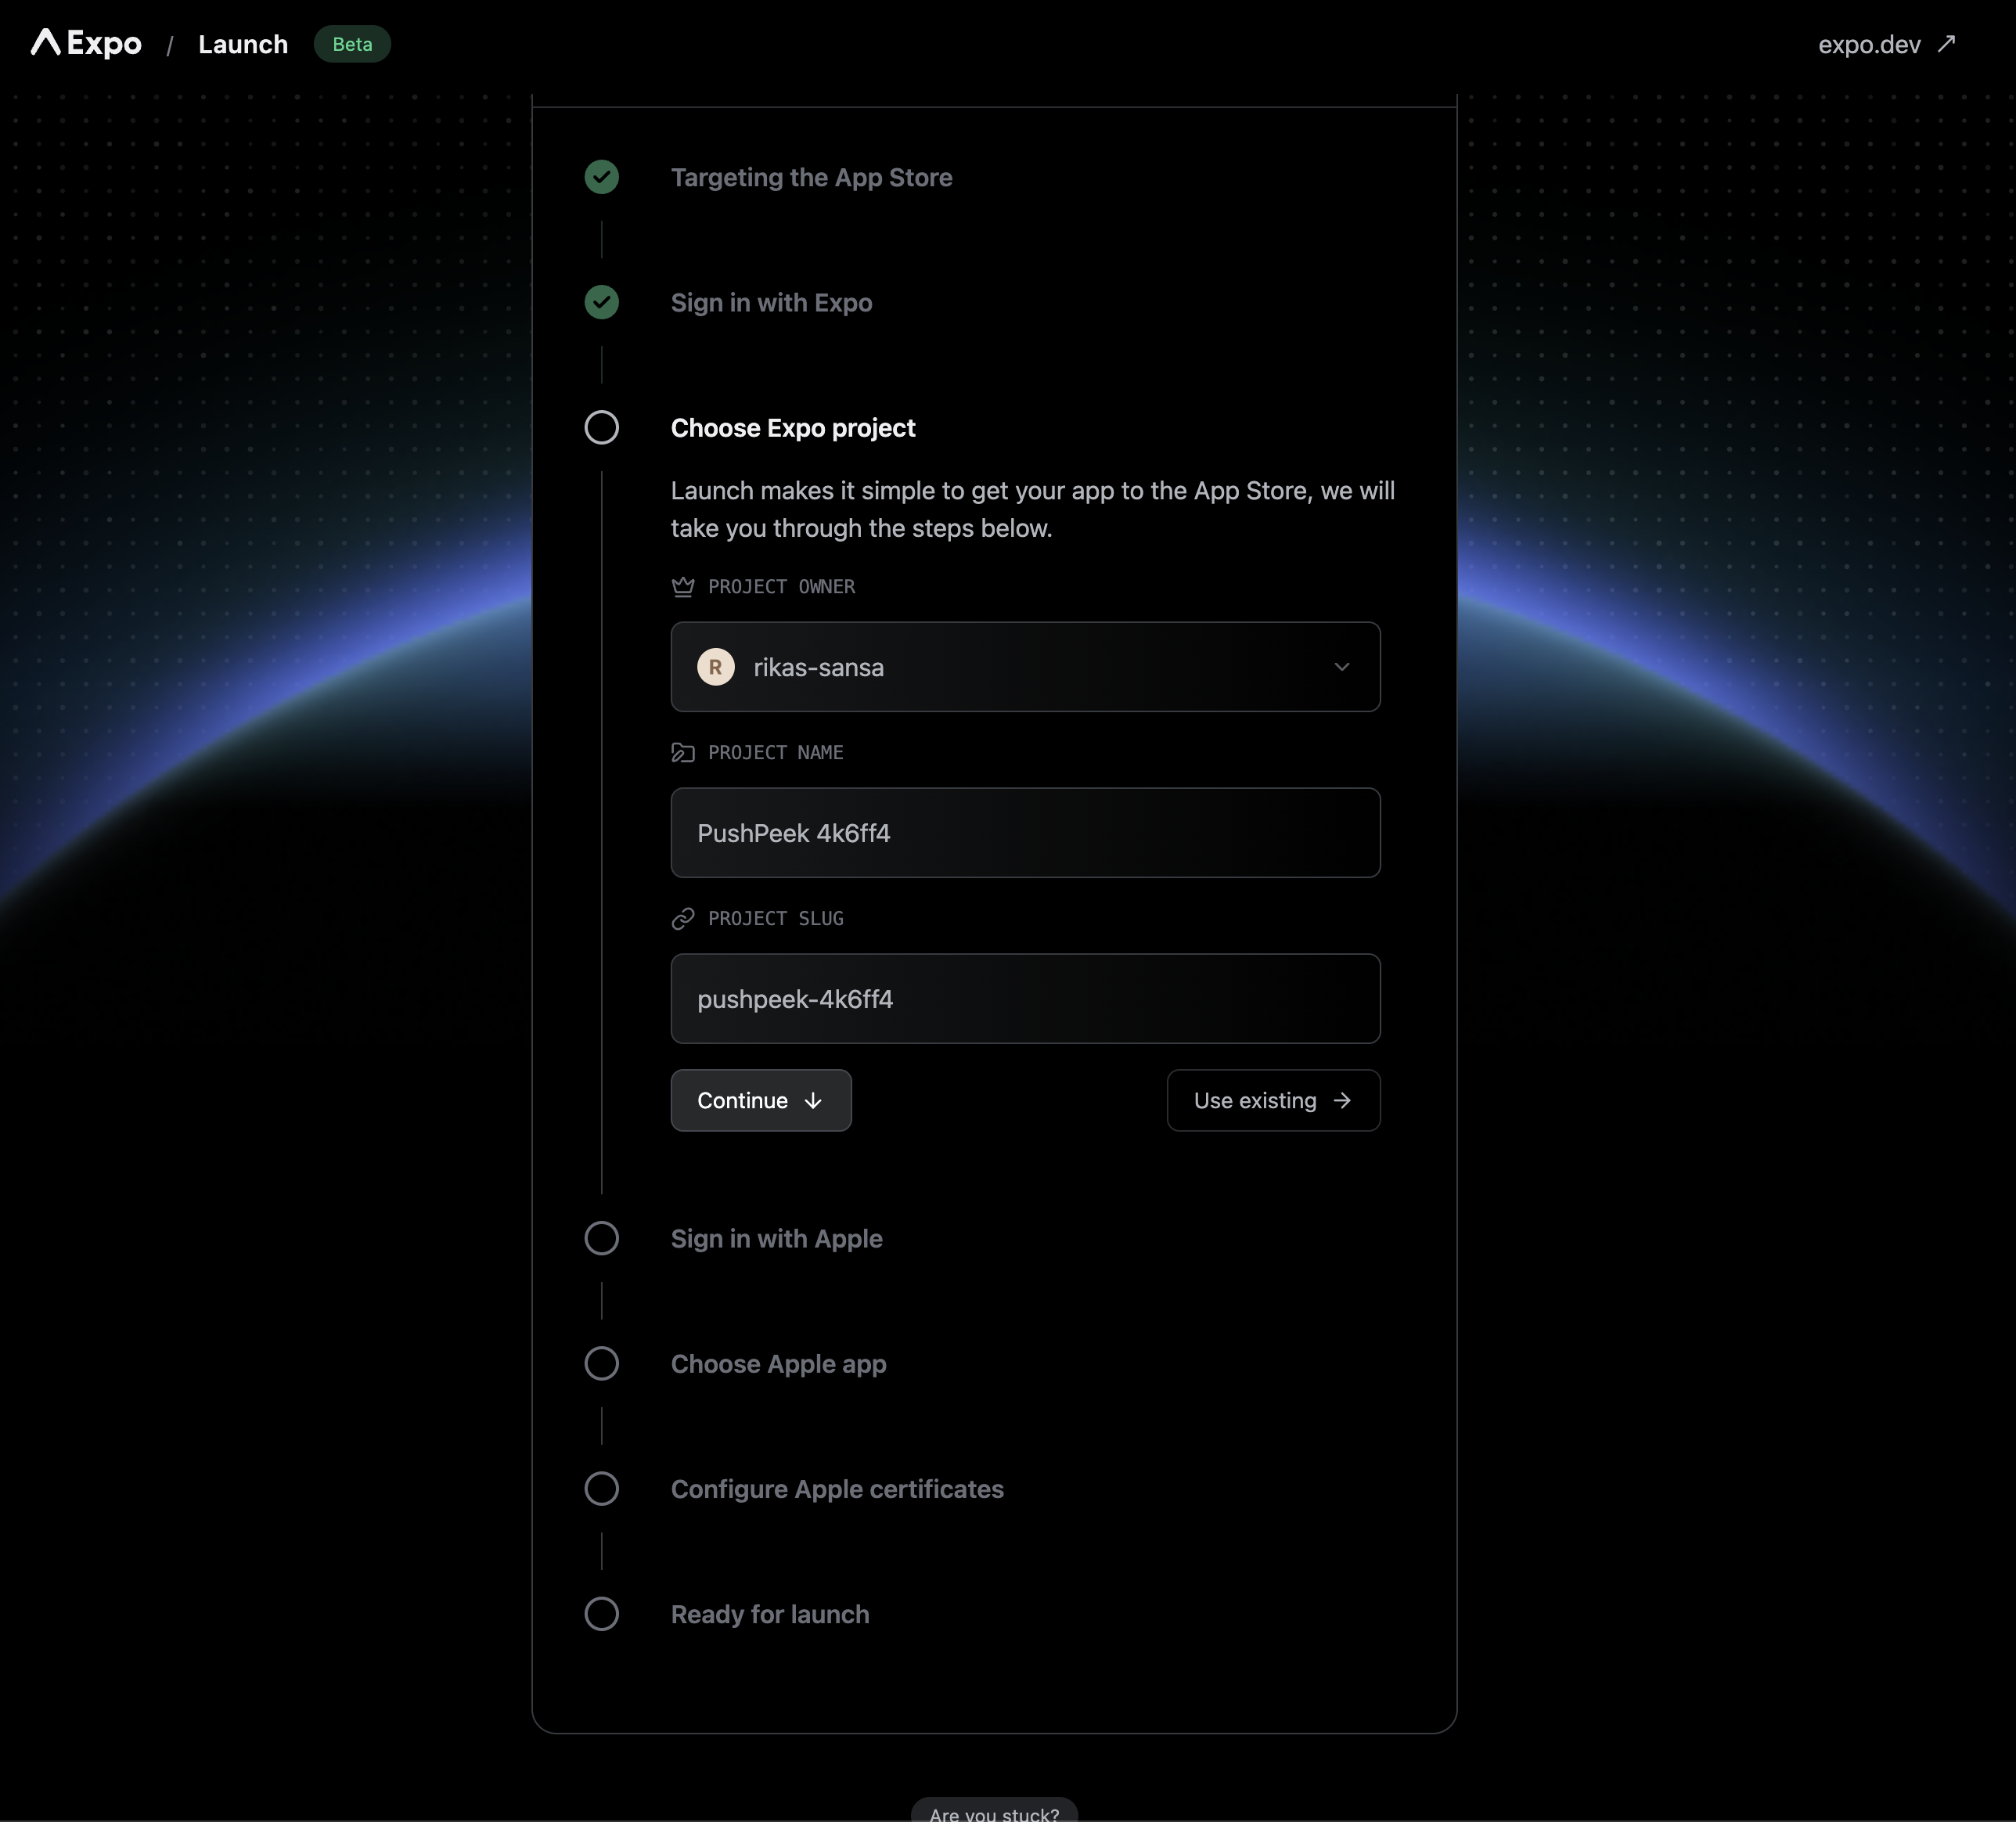 **Important:** Take note of the **Project Slug** shown here (e.g., `pushpeek-4k6ff4`). You'll need it in [Part 5](#part-5-configure-your-project) when configuring your app.
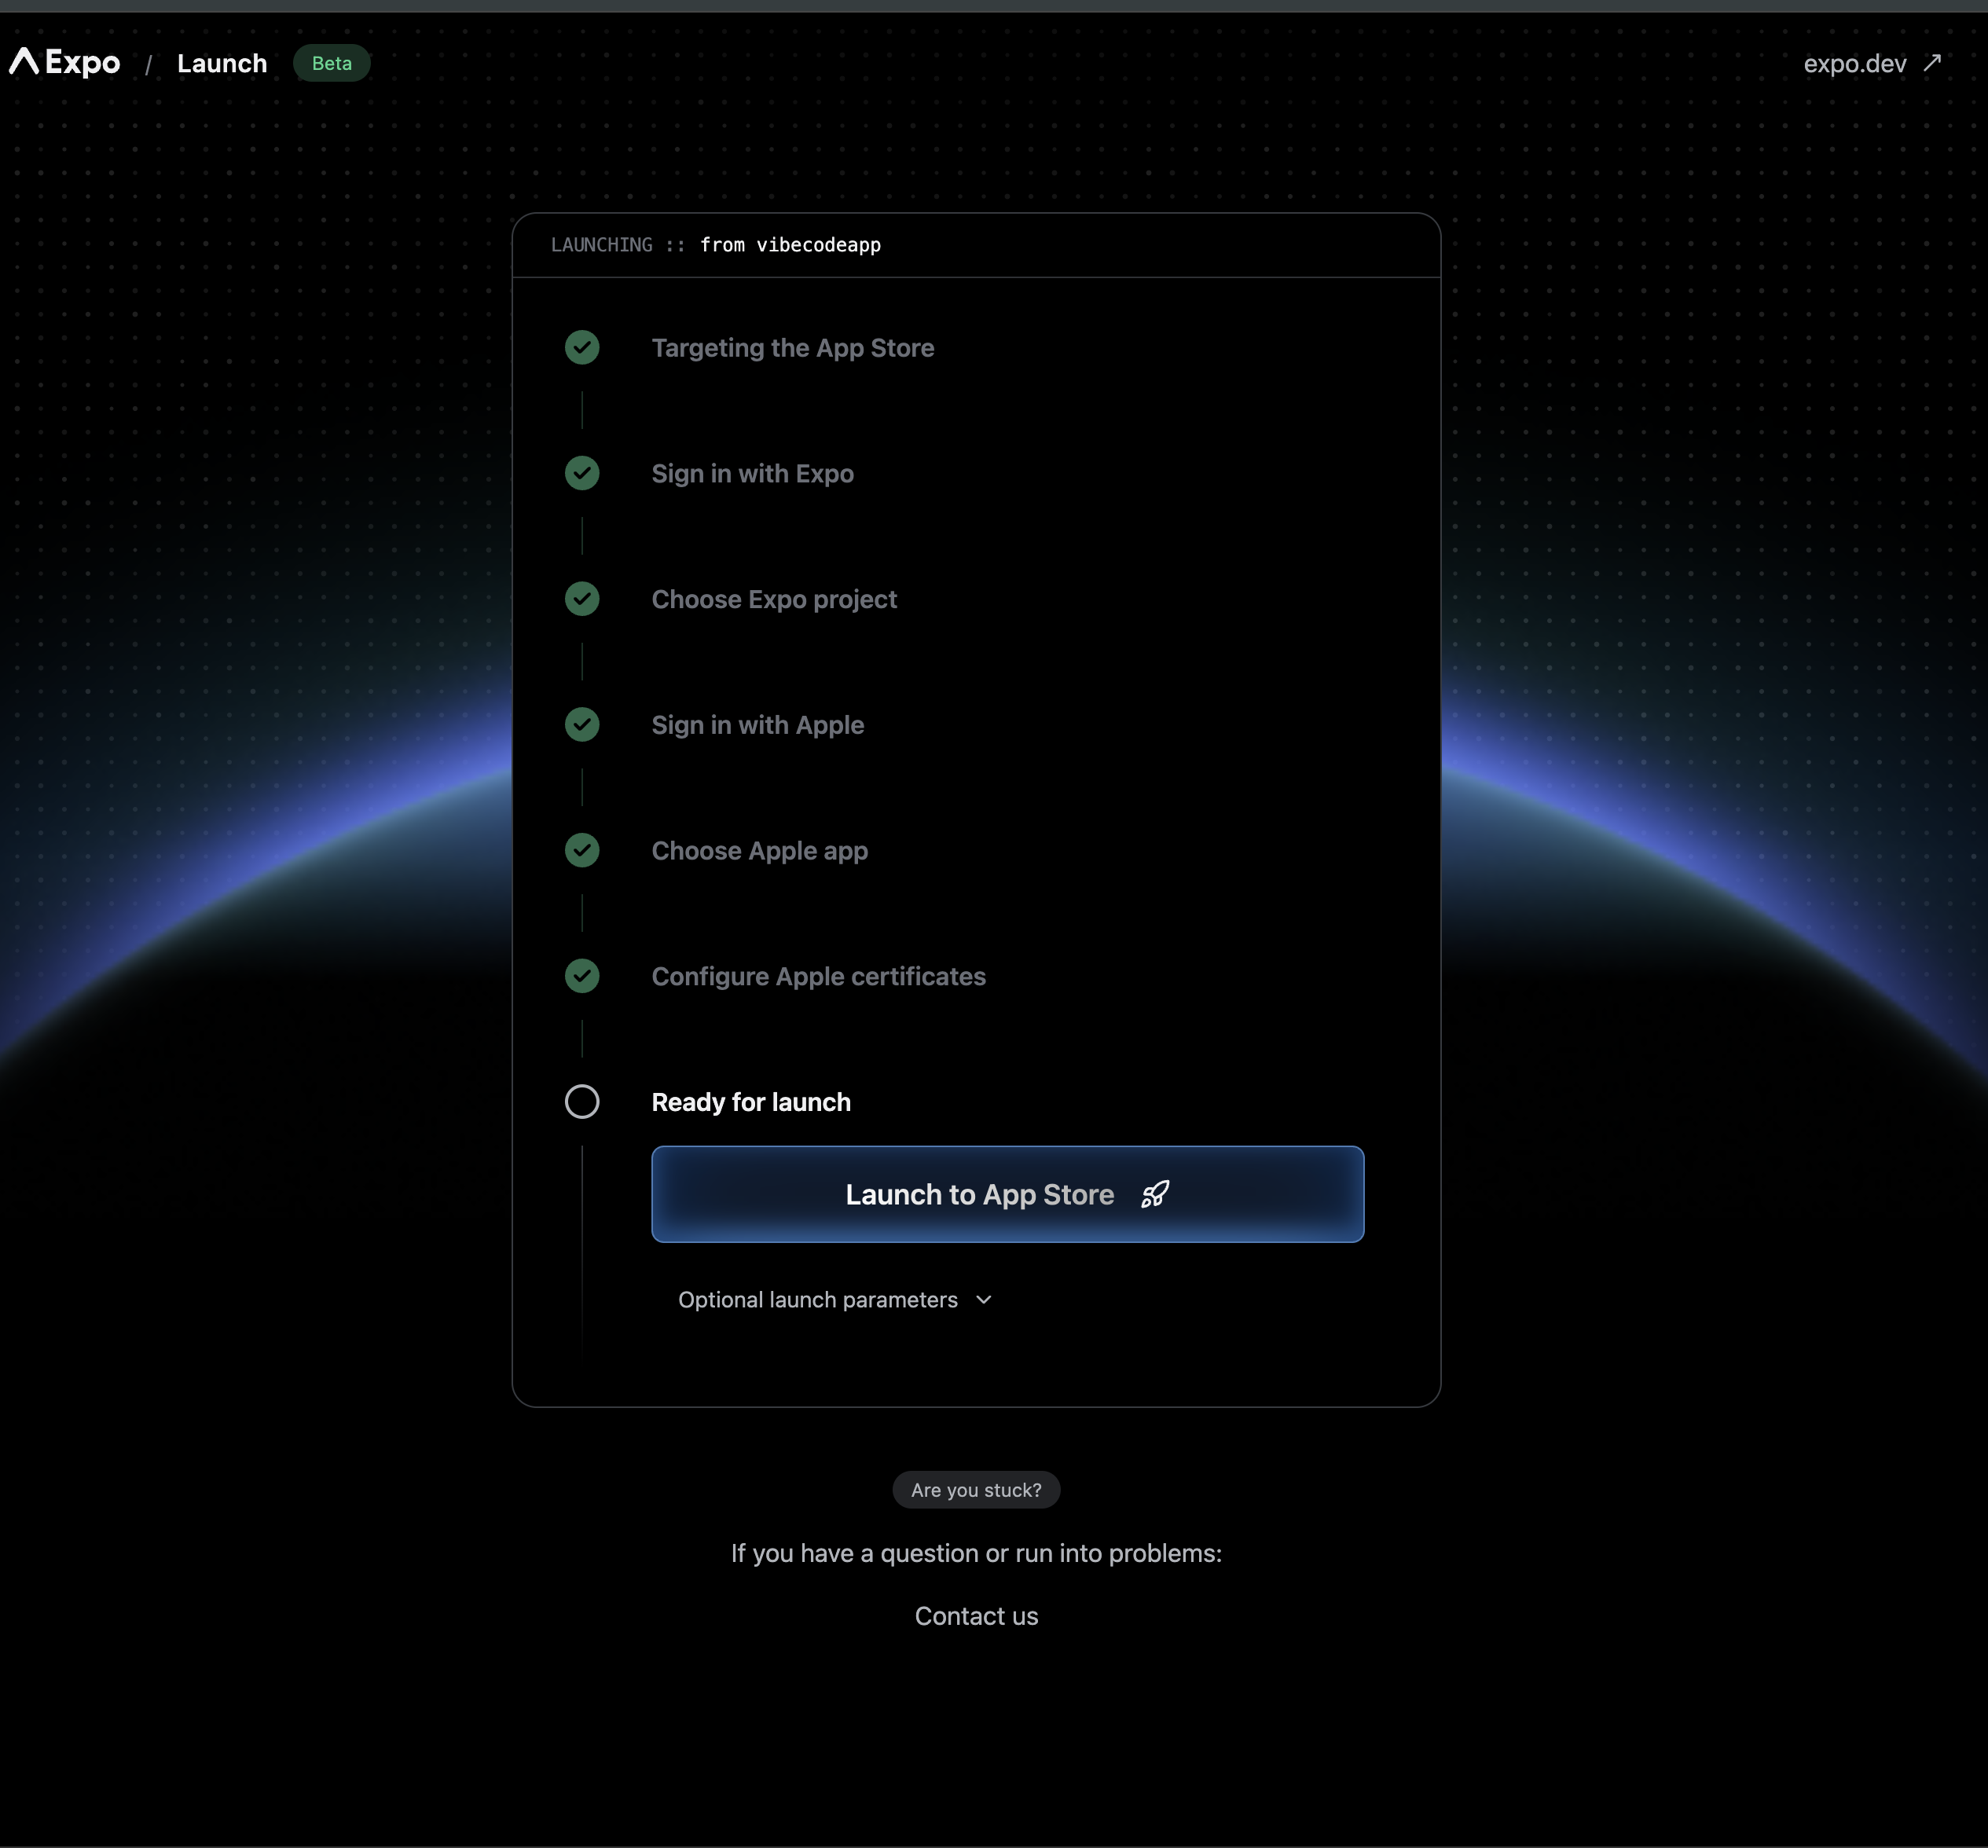
### Step 10: Sign In with Apple & Configure Certificates
Continue through the remaining Expo Launch steps:
1. **Sign in with Apple** — enter your Apple Developer credentials
2. **Choose Apple app** — select or create your app on the App Store
3. **Configure Apple certificates** — Expo handles this automatically
Once all steps show green checkmarks, click **Launch to App Store**.
**Important:** Take note of the **Project Slug** shown here (e.g., `pushpeek-4k6ff4`). You'll need it in [Part 5](#part-5-configure-your-project) when configuring your app.
### Step 10: Sign In with Apple & Configure Certificates
Continue through the remaining Expo Launch steps:
1. **Sign in with Apple** — enter your Apple Developer credentials
2. **Choose Apple app** — select or create your app on the App Store
3. **Configure Apple certificates** — Expo handles this automatically
Once all steps show green checkmarks, click **Launch to App Store**.
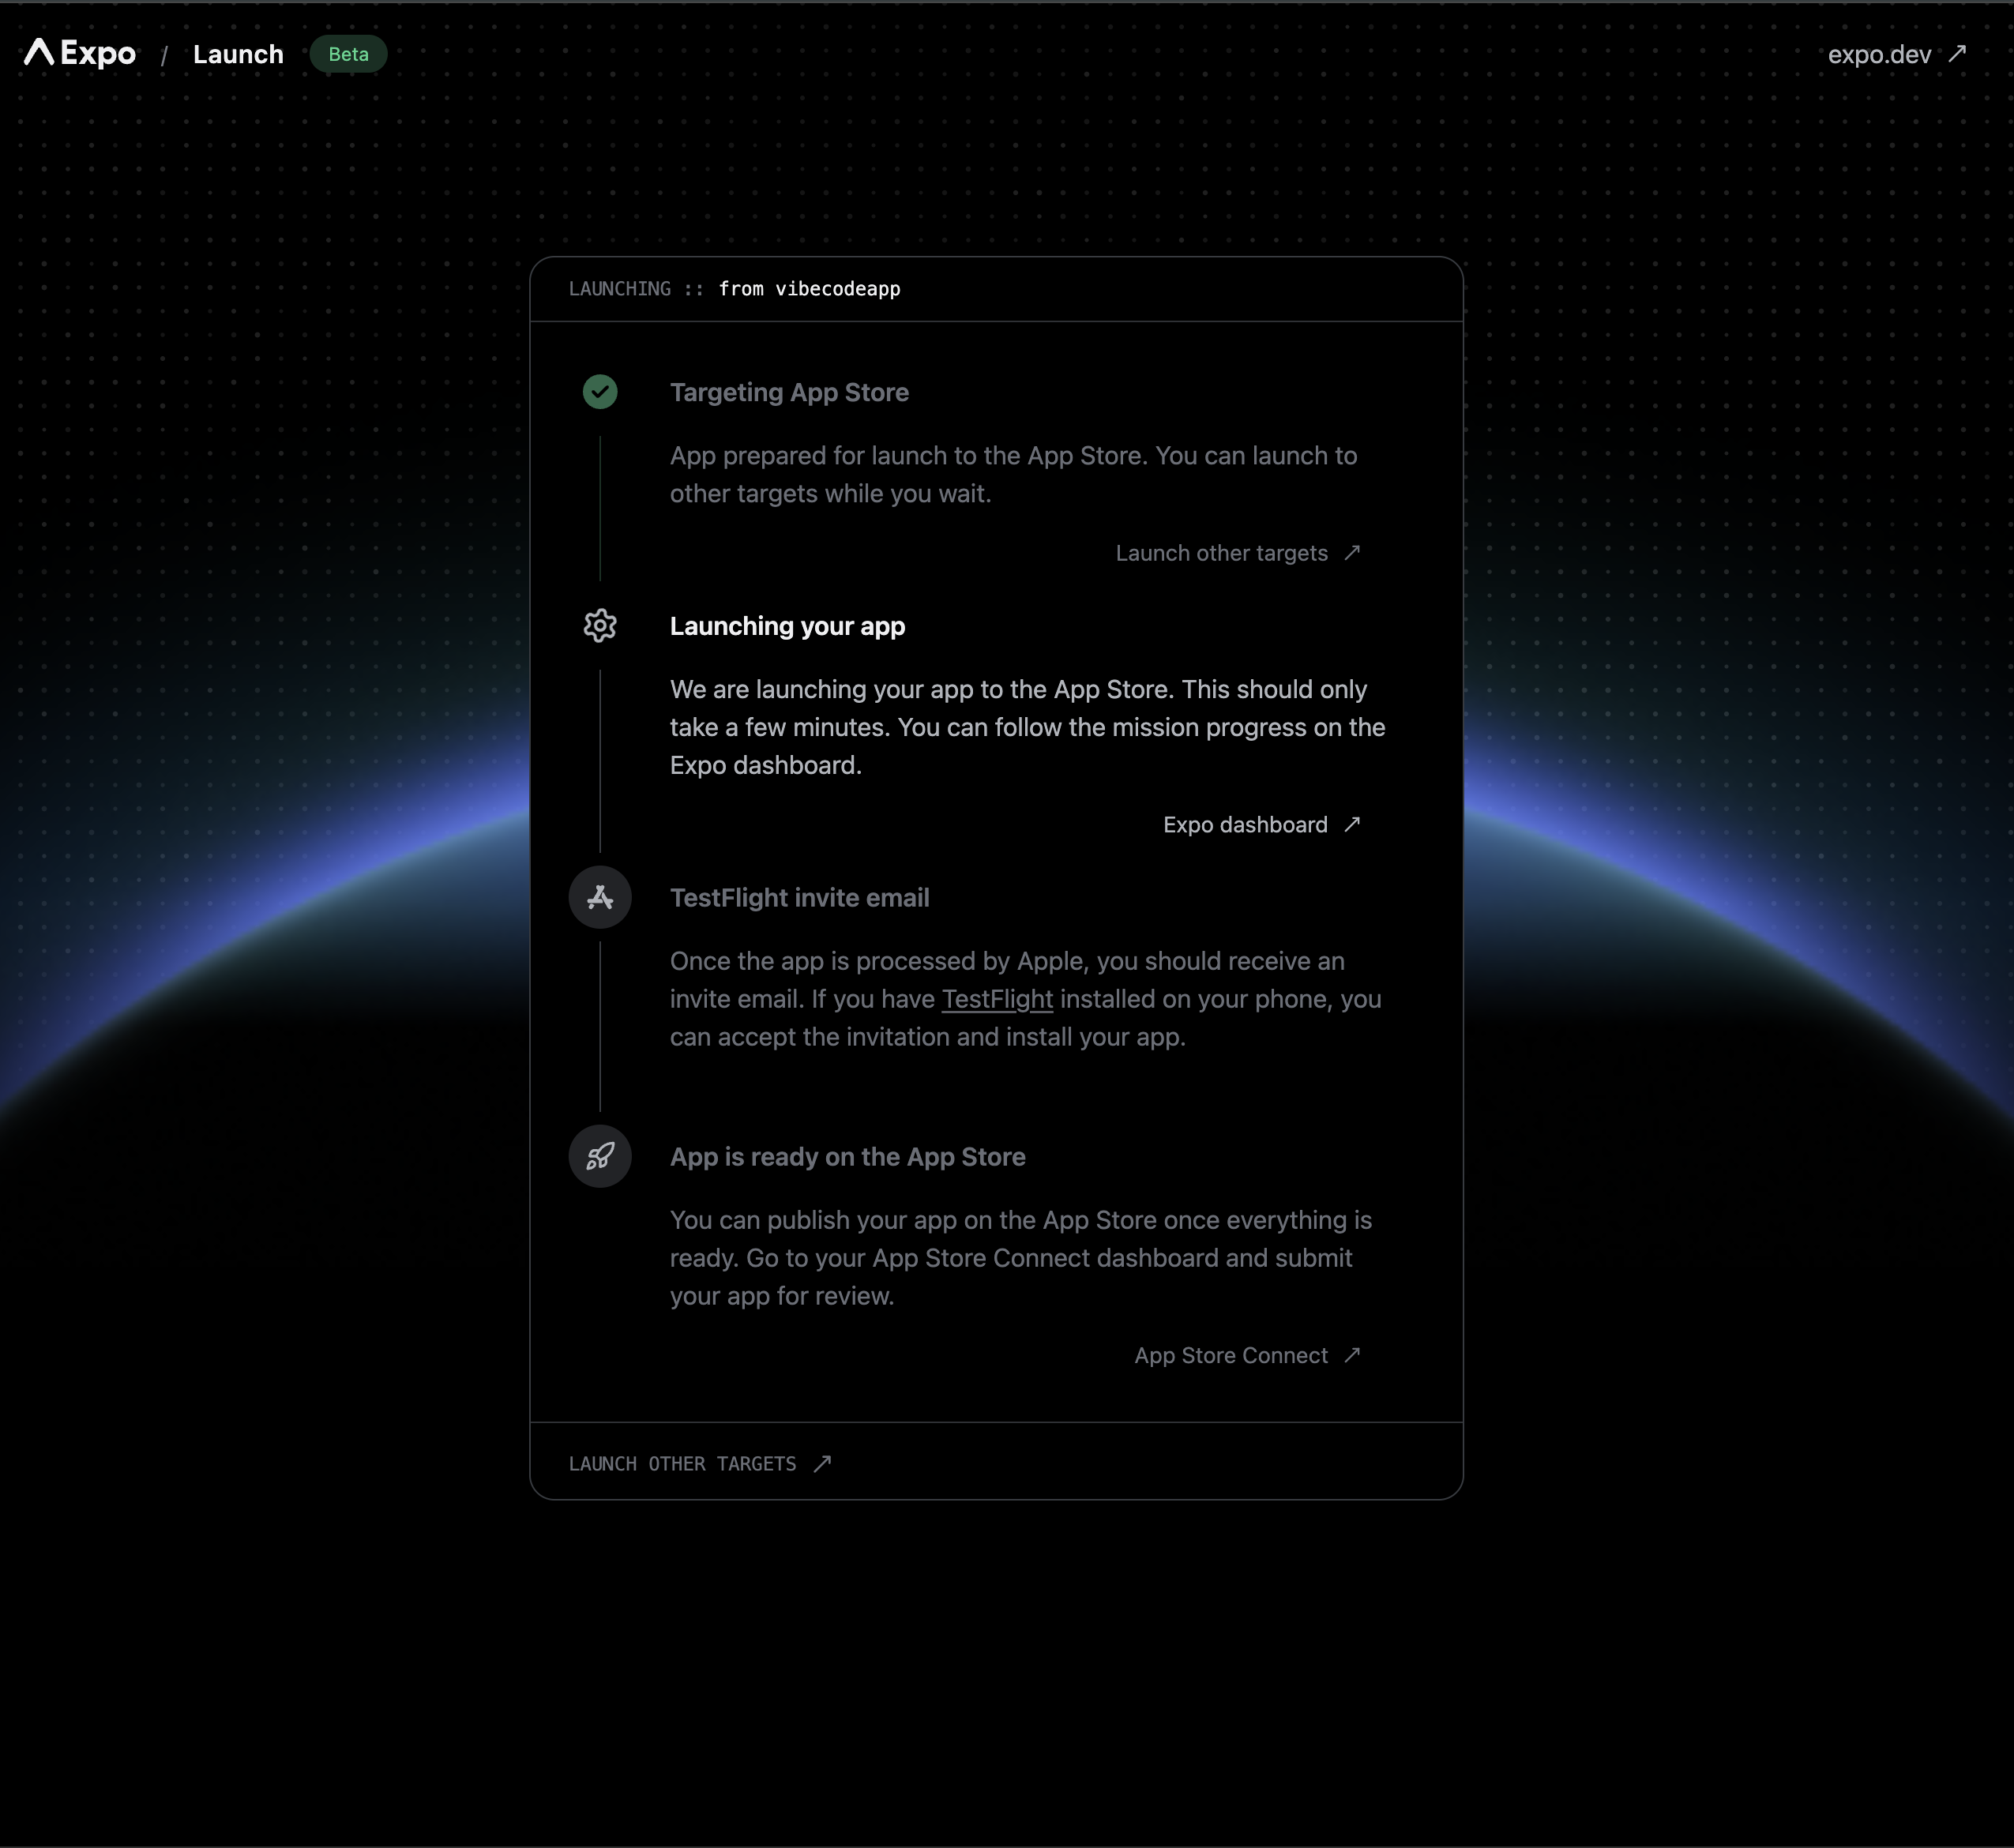
 ### Step 11: Build in Progress
After launching, you'll see a confirmation page. The build process takes about **15–30 minutes**.
### Step 11: Build in Progress
After launching, you'll see a confirmation page. The build process takes about **15–30 minutes**.
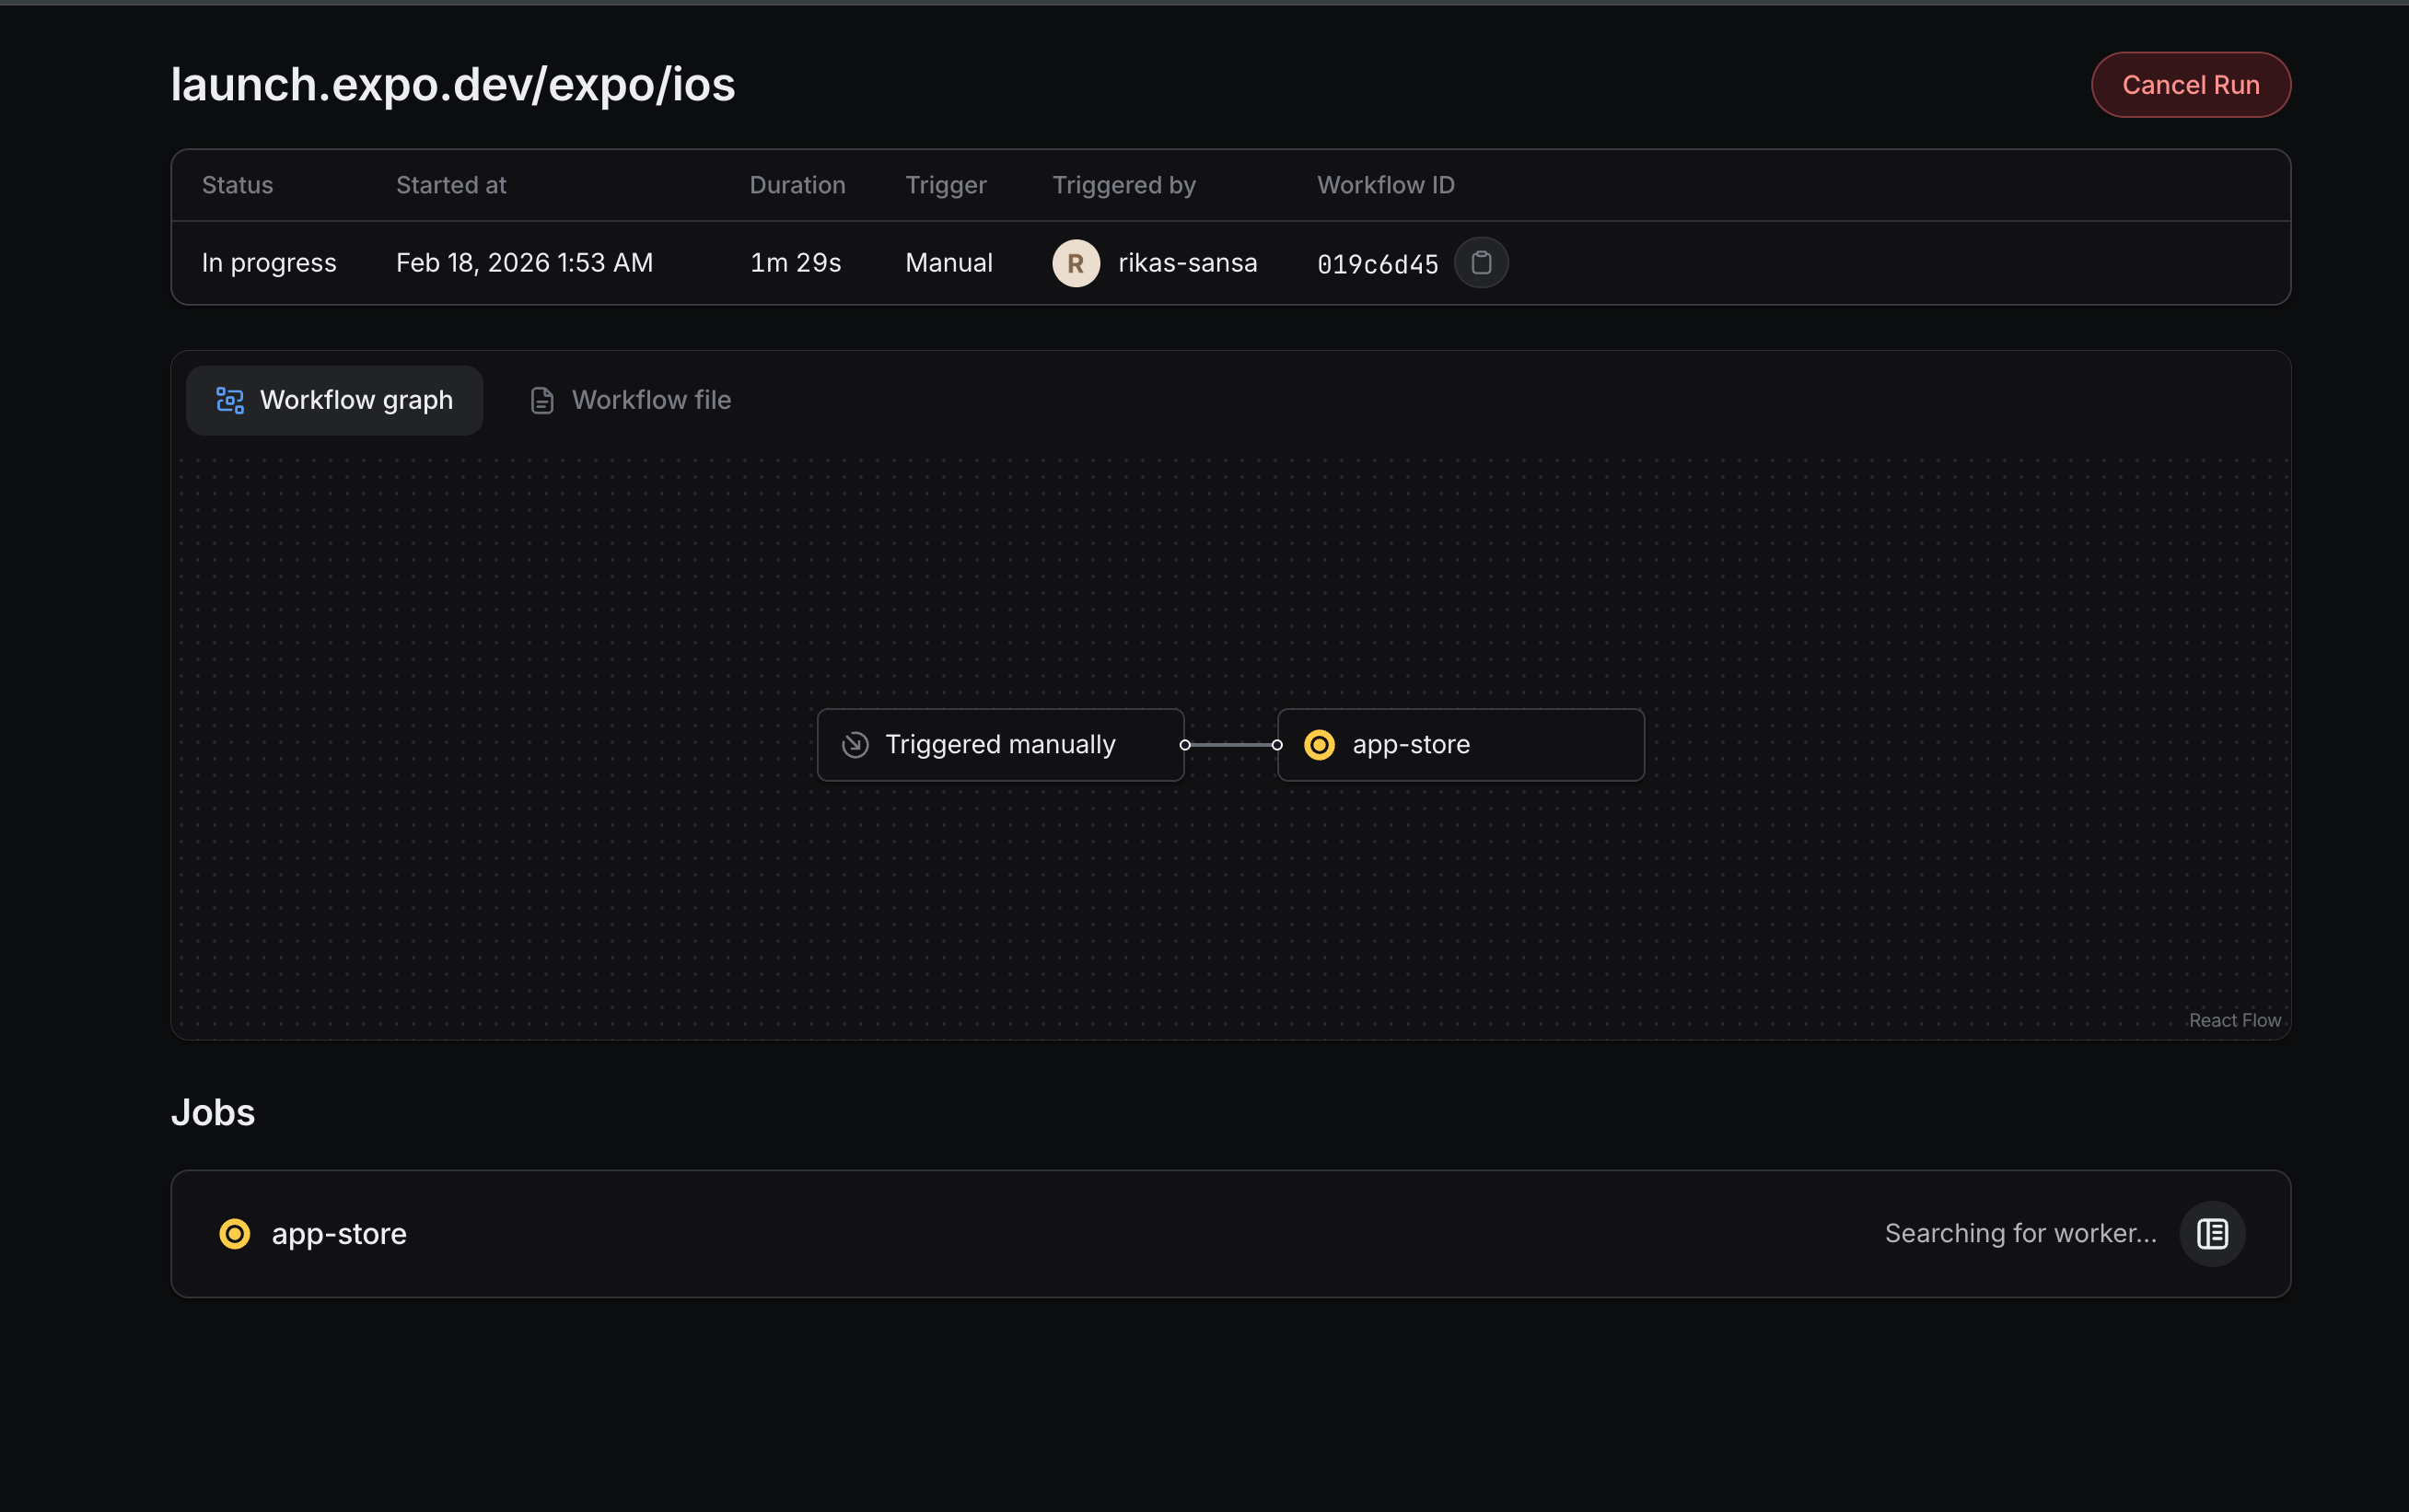
 You can track progress on the Expo dashboard:
 ### Step 12: Build Complete — Install via TestFlight
Once the build finishes, it's automatically uploaded to App Store Connect. You'll see it as **Complete** in the TestFlight section.
### Step 12: Build Complete — Install via TestFlight
Once the build finishes, it's automatically uploaded to App Store Connect. You'll see it as **Complete** in the TestFlight section.
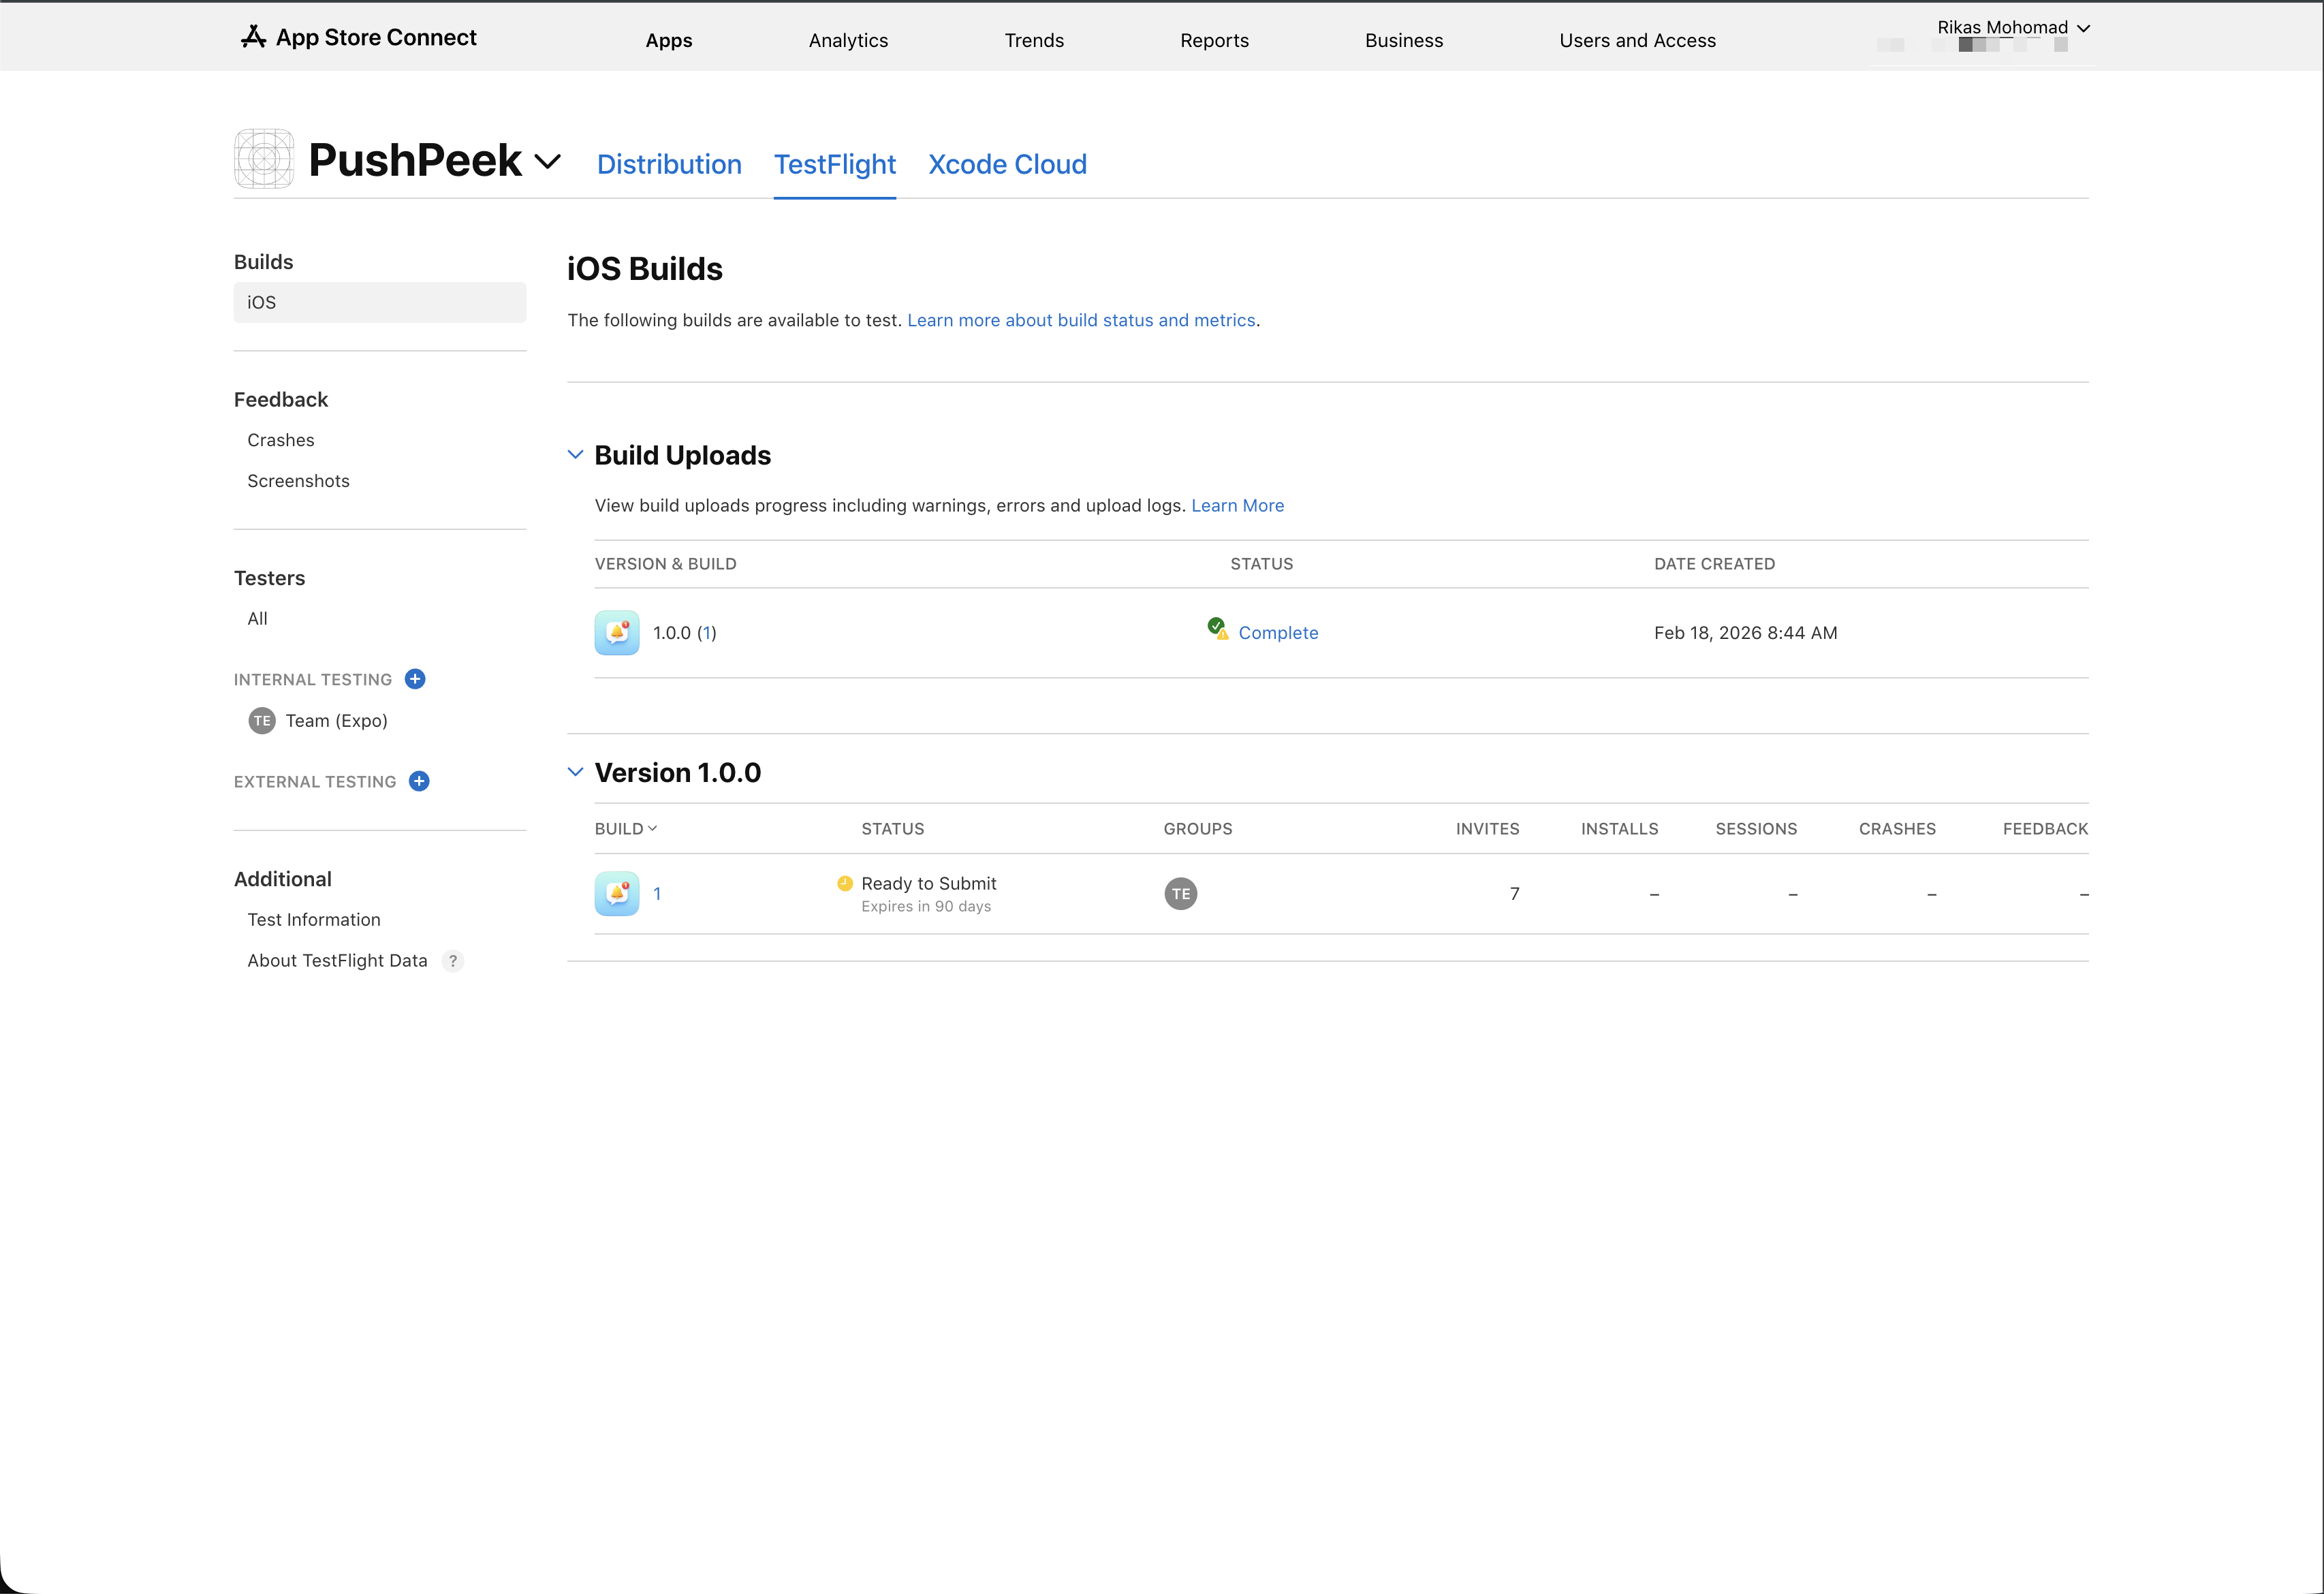 Open the **TestFlight** app on your iPhone and install the build. You now have a real native app on your device.
You should receive a TestFlight invite email. If you don't, check that your Apple ID email is added as a tester in App Store Connect under **Users and Access**.
***
## Part 3: Create an Apple Push Notification Key
Your app needs an **APNs key** (Apple Push Notifications service key) to send push notifications through Apple's servers. You create this once in the Apple Developer portal and upload it to Expo.
### Step 13: Open the Apple Developer Portal
Go to [developer.apple.com](https://developer.apple.com) and sign in. You'll see the **Account** page with Program resources.
Open the **TestFlight** app on your iPhone and install the build. You now have a real native app on your device.
You should receive a TestFlight invite email. If you don't, check that your Apple ID email is added as a tester in App Store Connect under **Users and Access**.
***
## Part 3: Create an Apple Push Notification Key
Your app needs an **APNs key** (Apple Push Notifications service key) to send push notifications through Apple's servers. You create this once in the Apple Developer portal and upload it to Expo.
### Step 13: Open the Apple Developer Portal
Go to [developer.apple.com](https://developer.apple.com) and sign in. You'll see the **Account** page with Program resources.
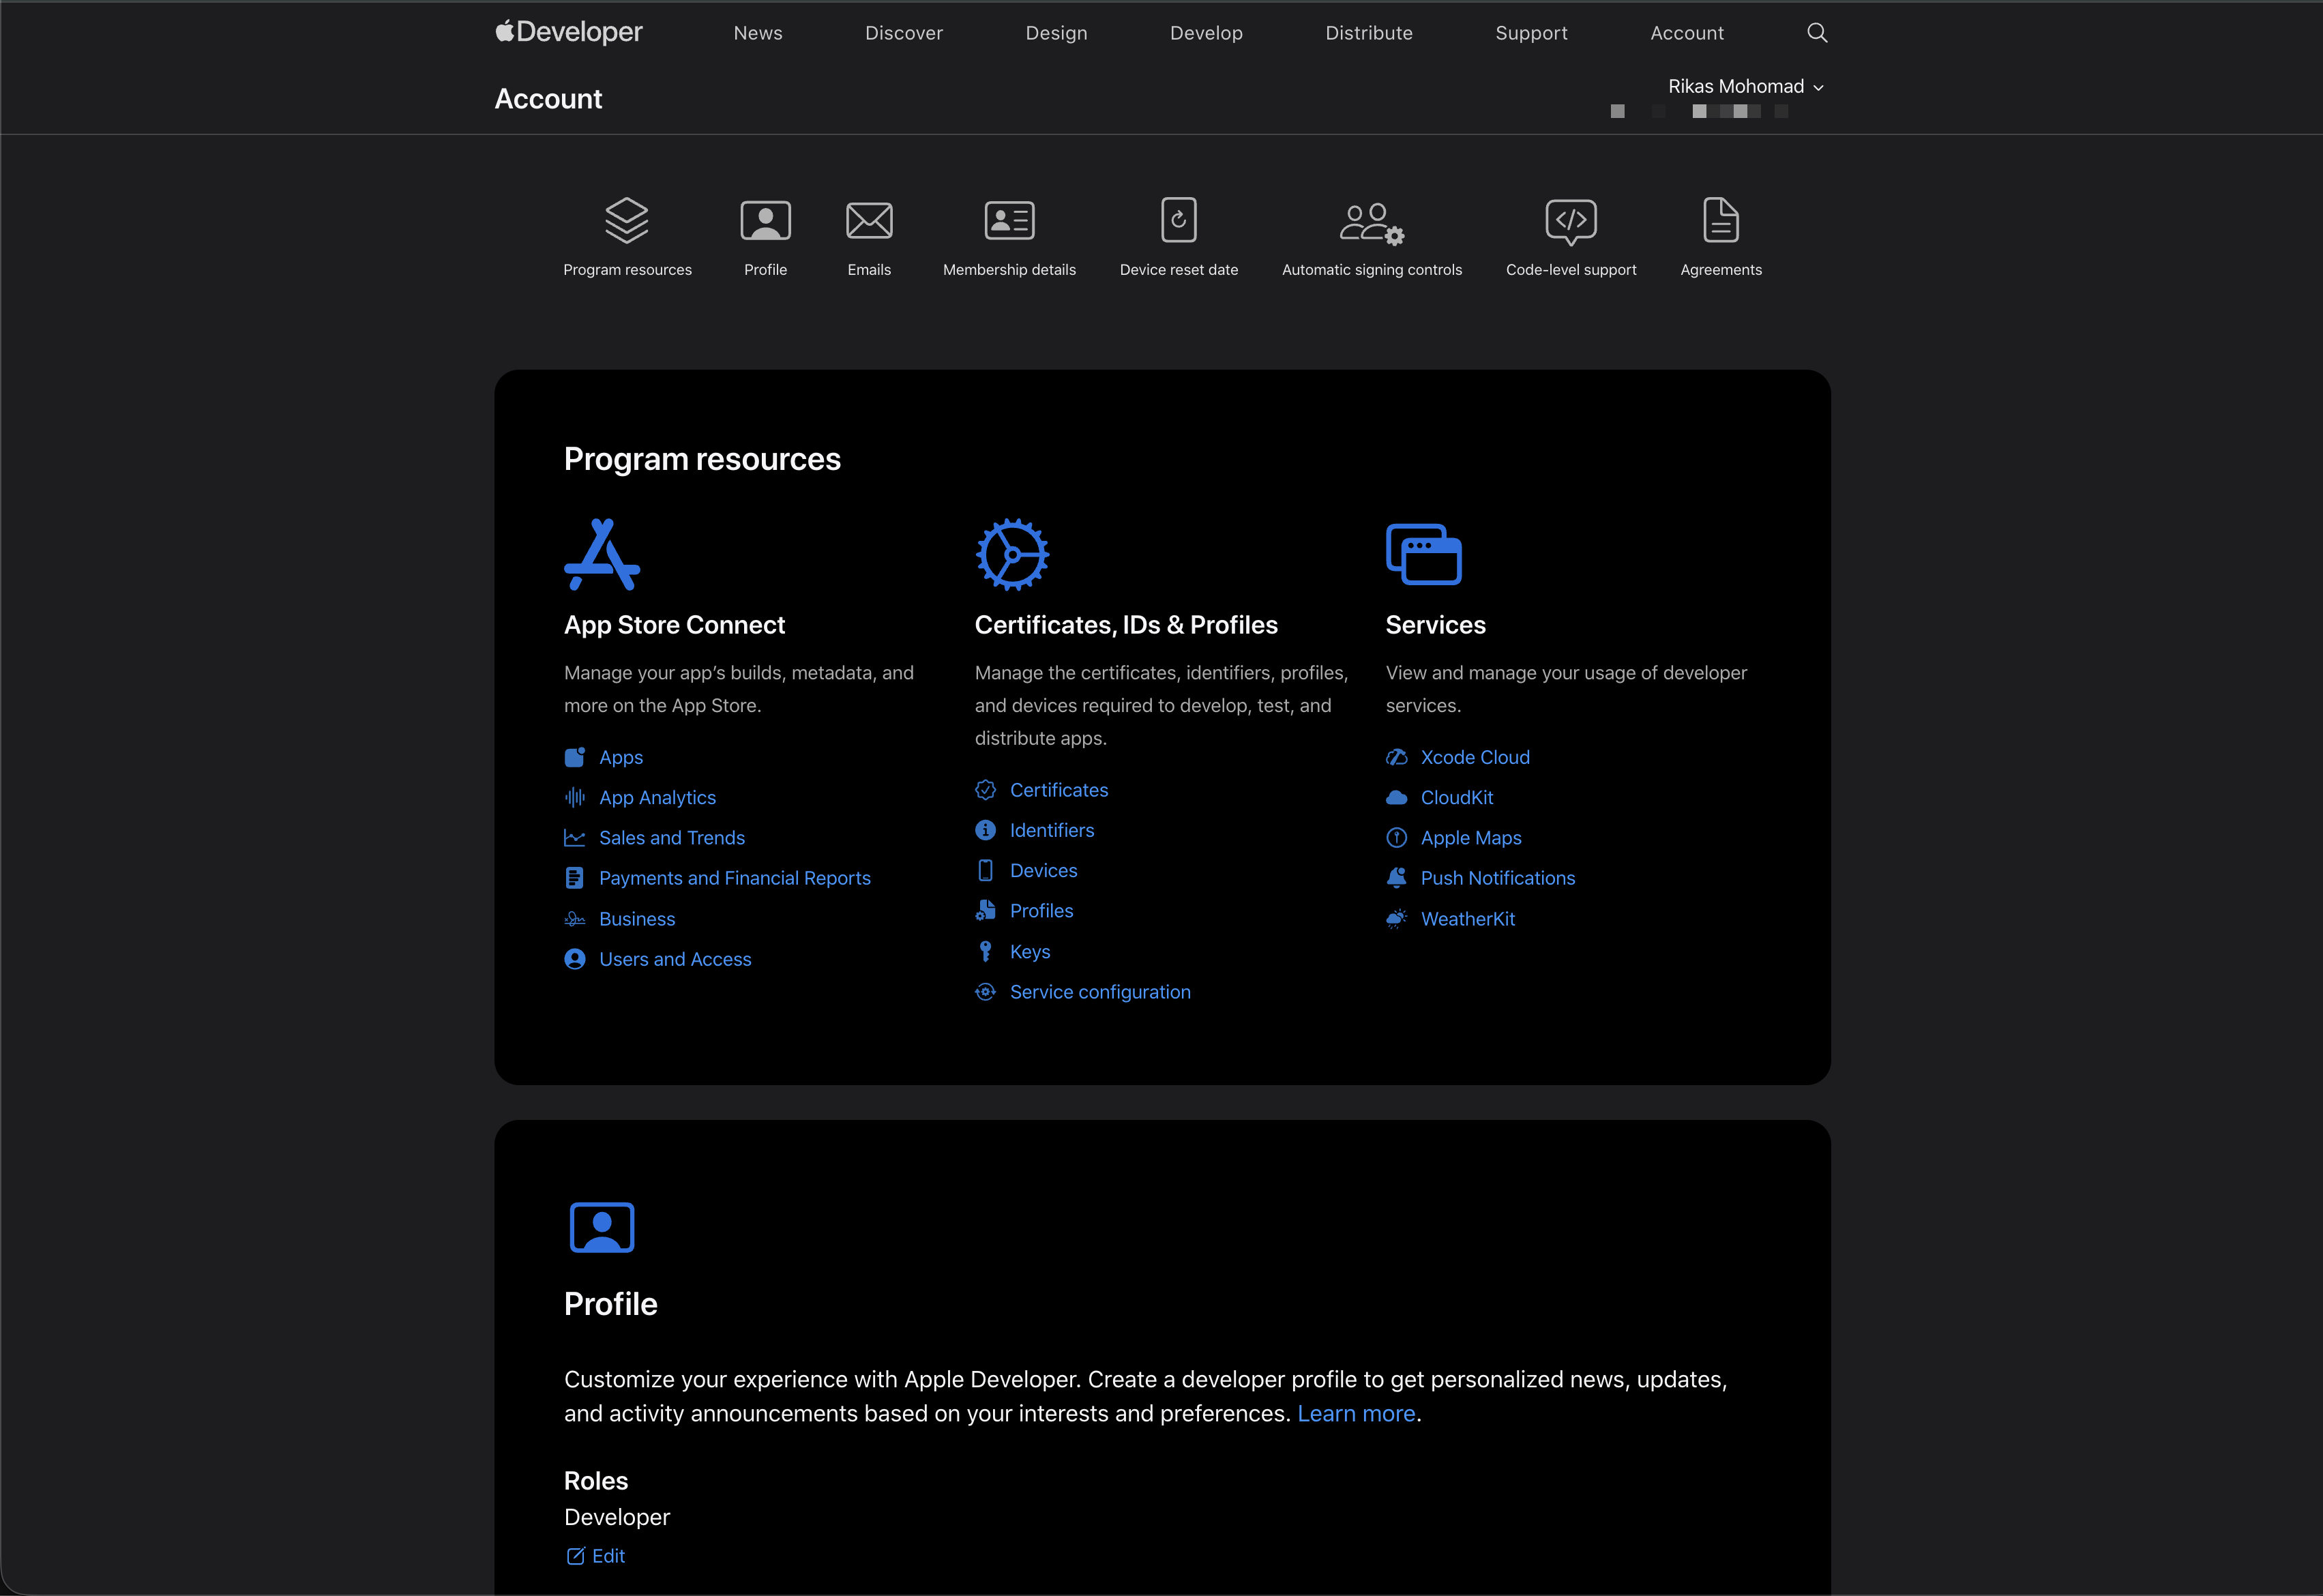 Under **Certificates, IDs & Profiles**, click **Keys**.
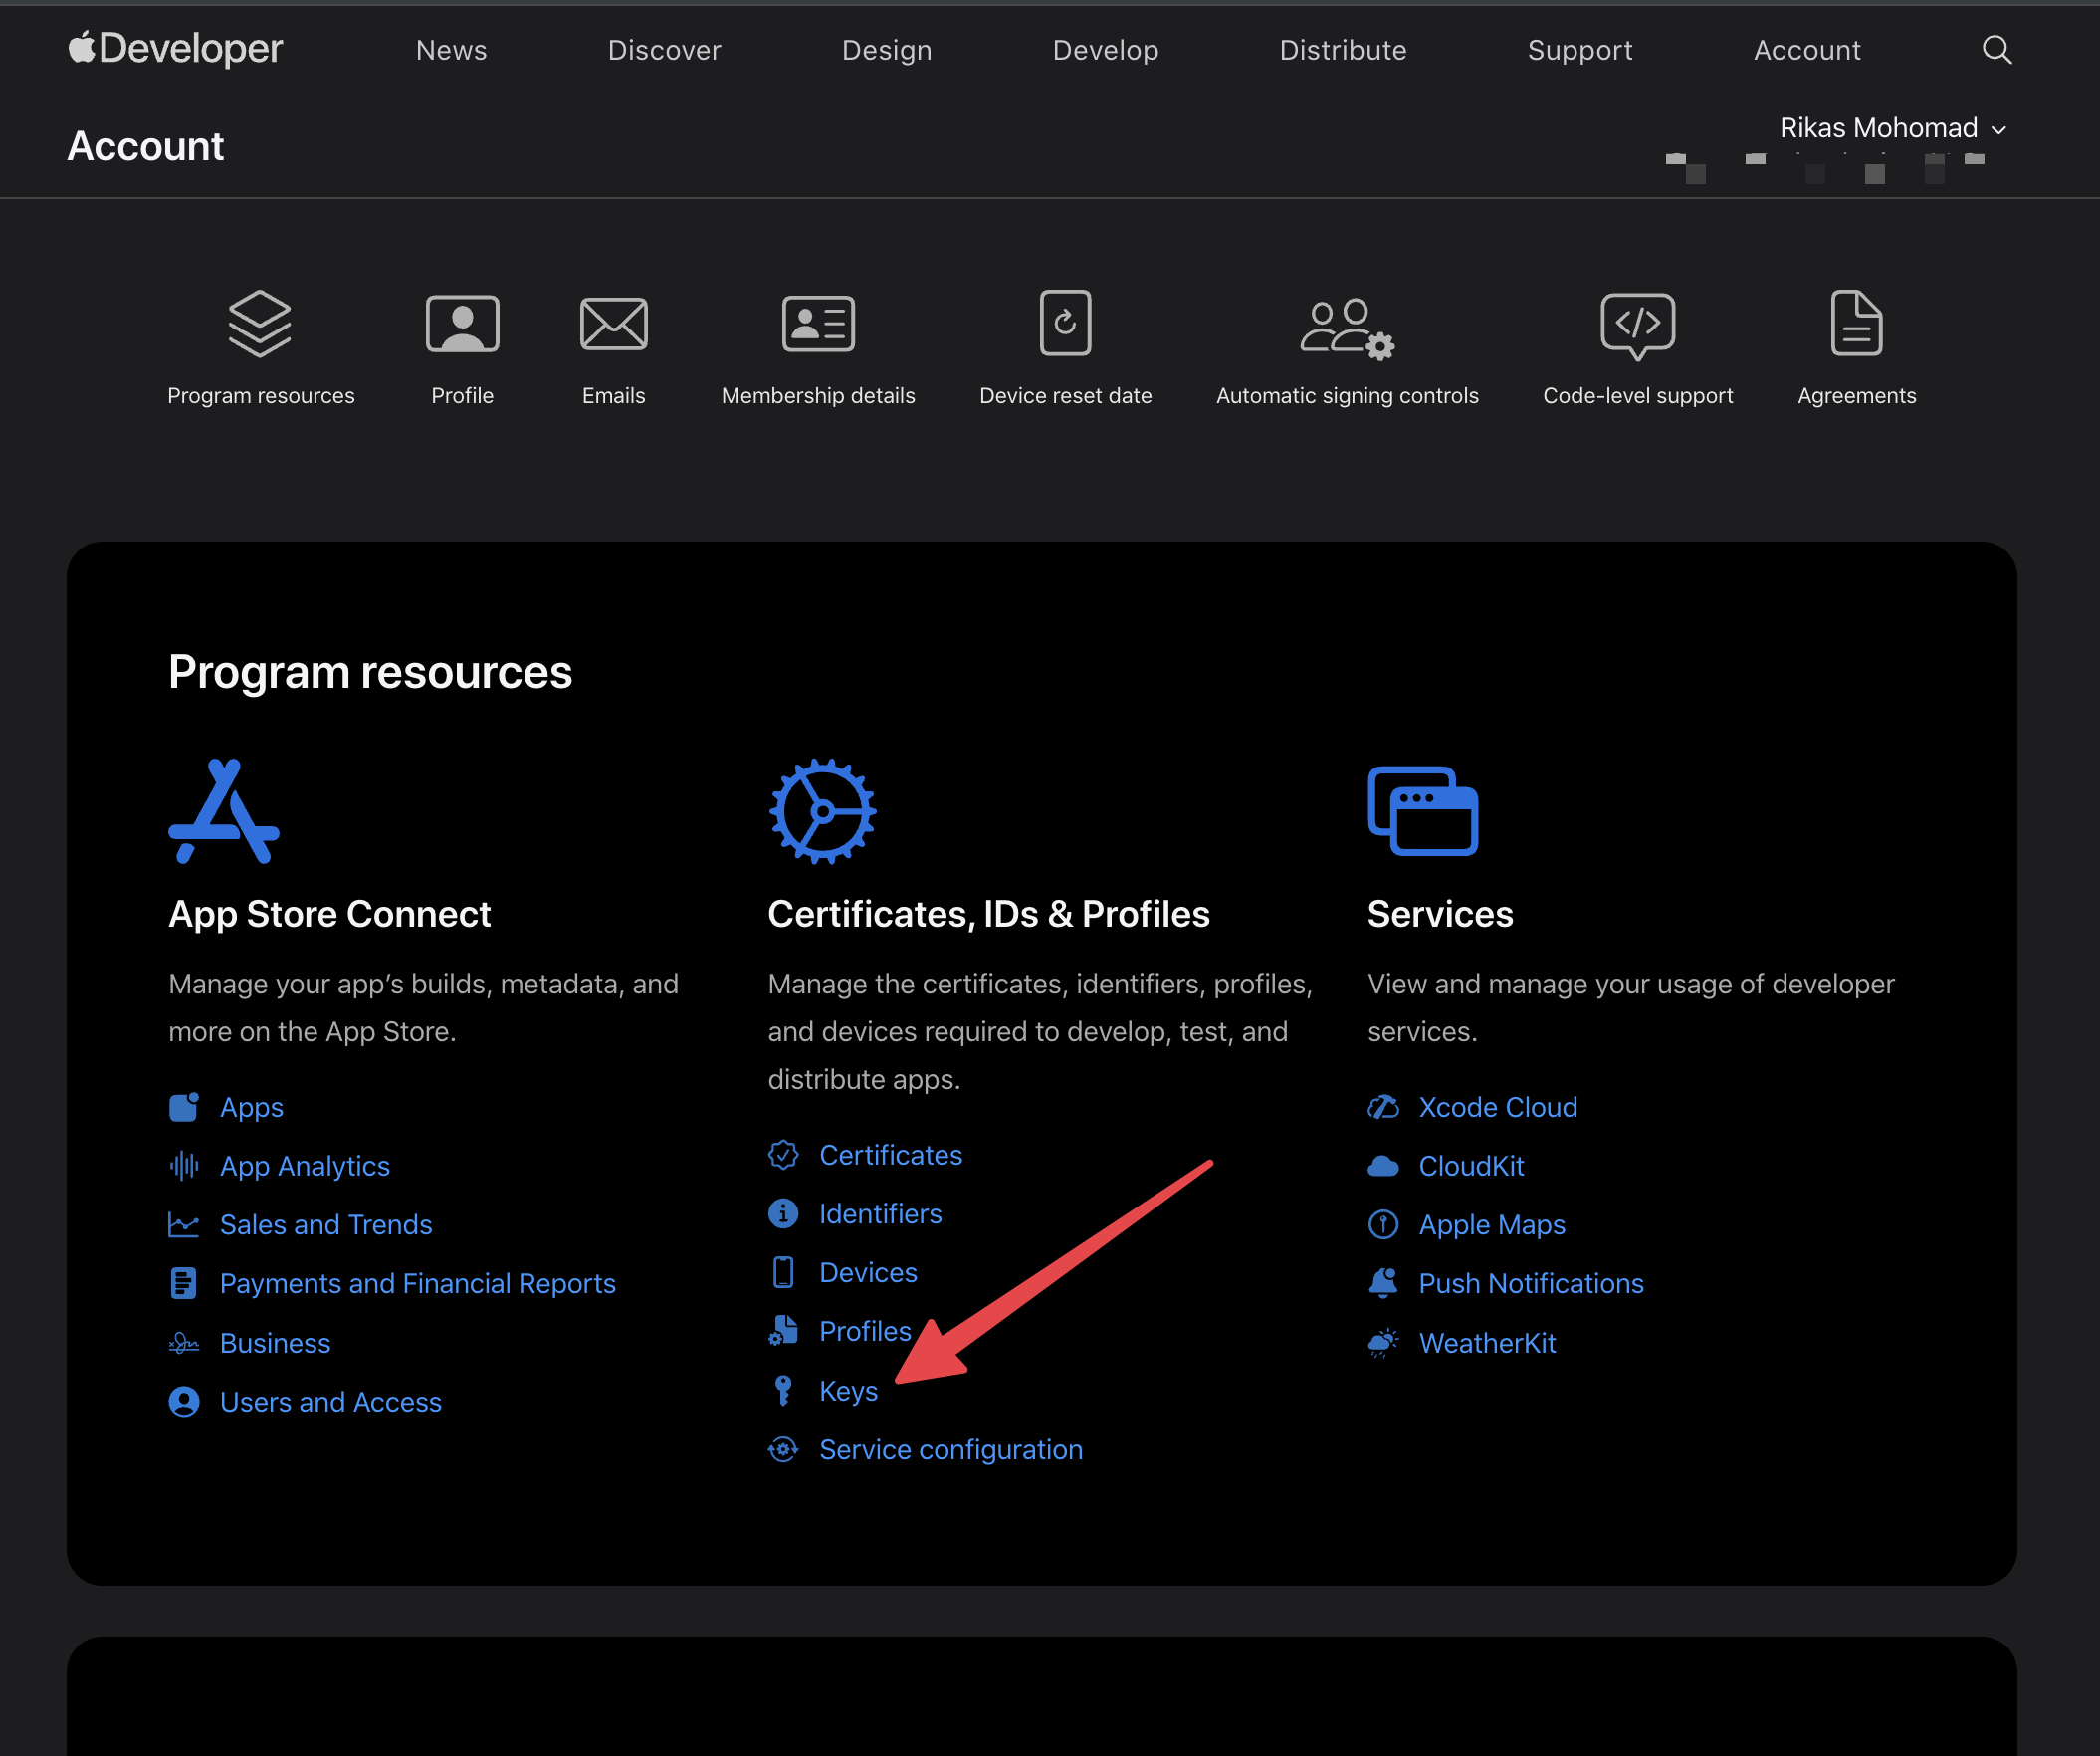 This takes you to the Keys page. Click the **+** button to create a new key.
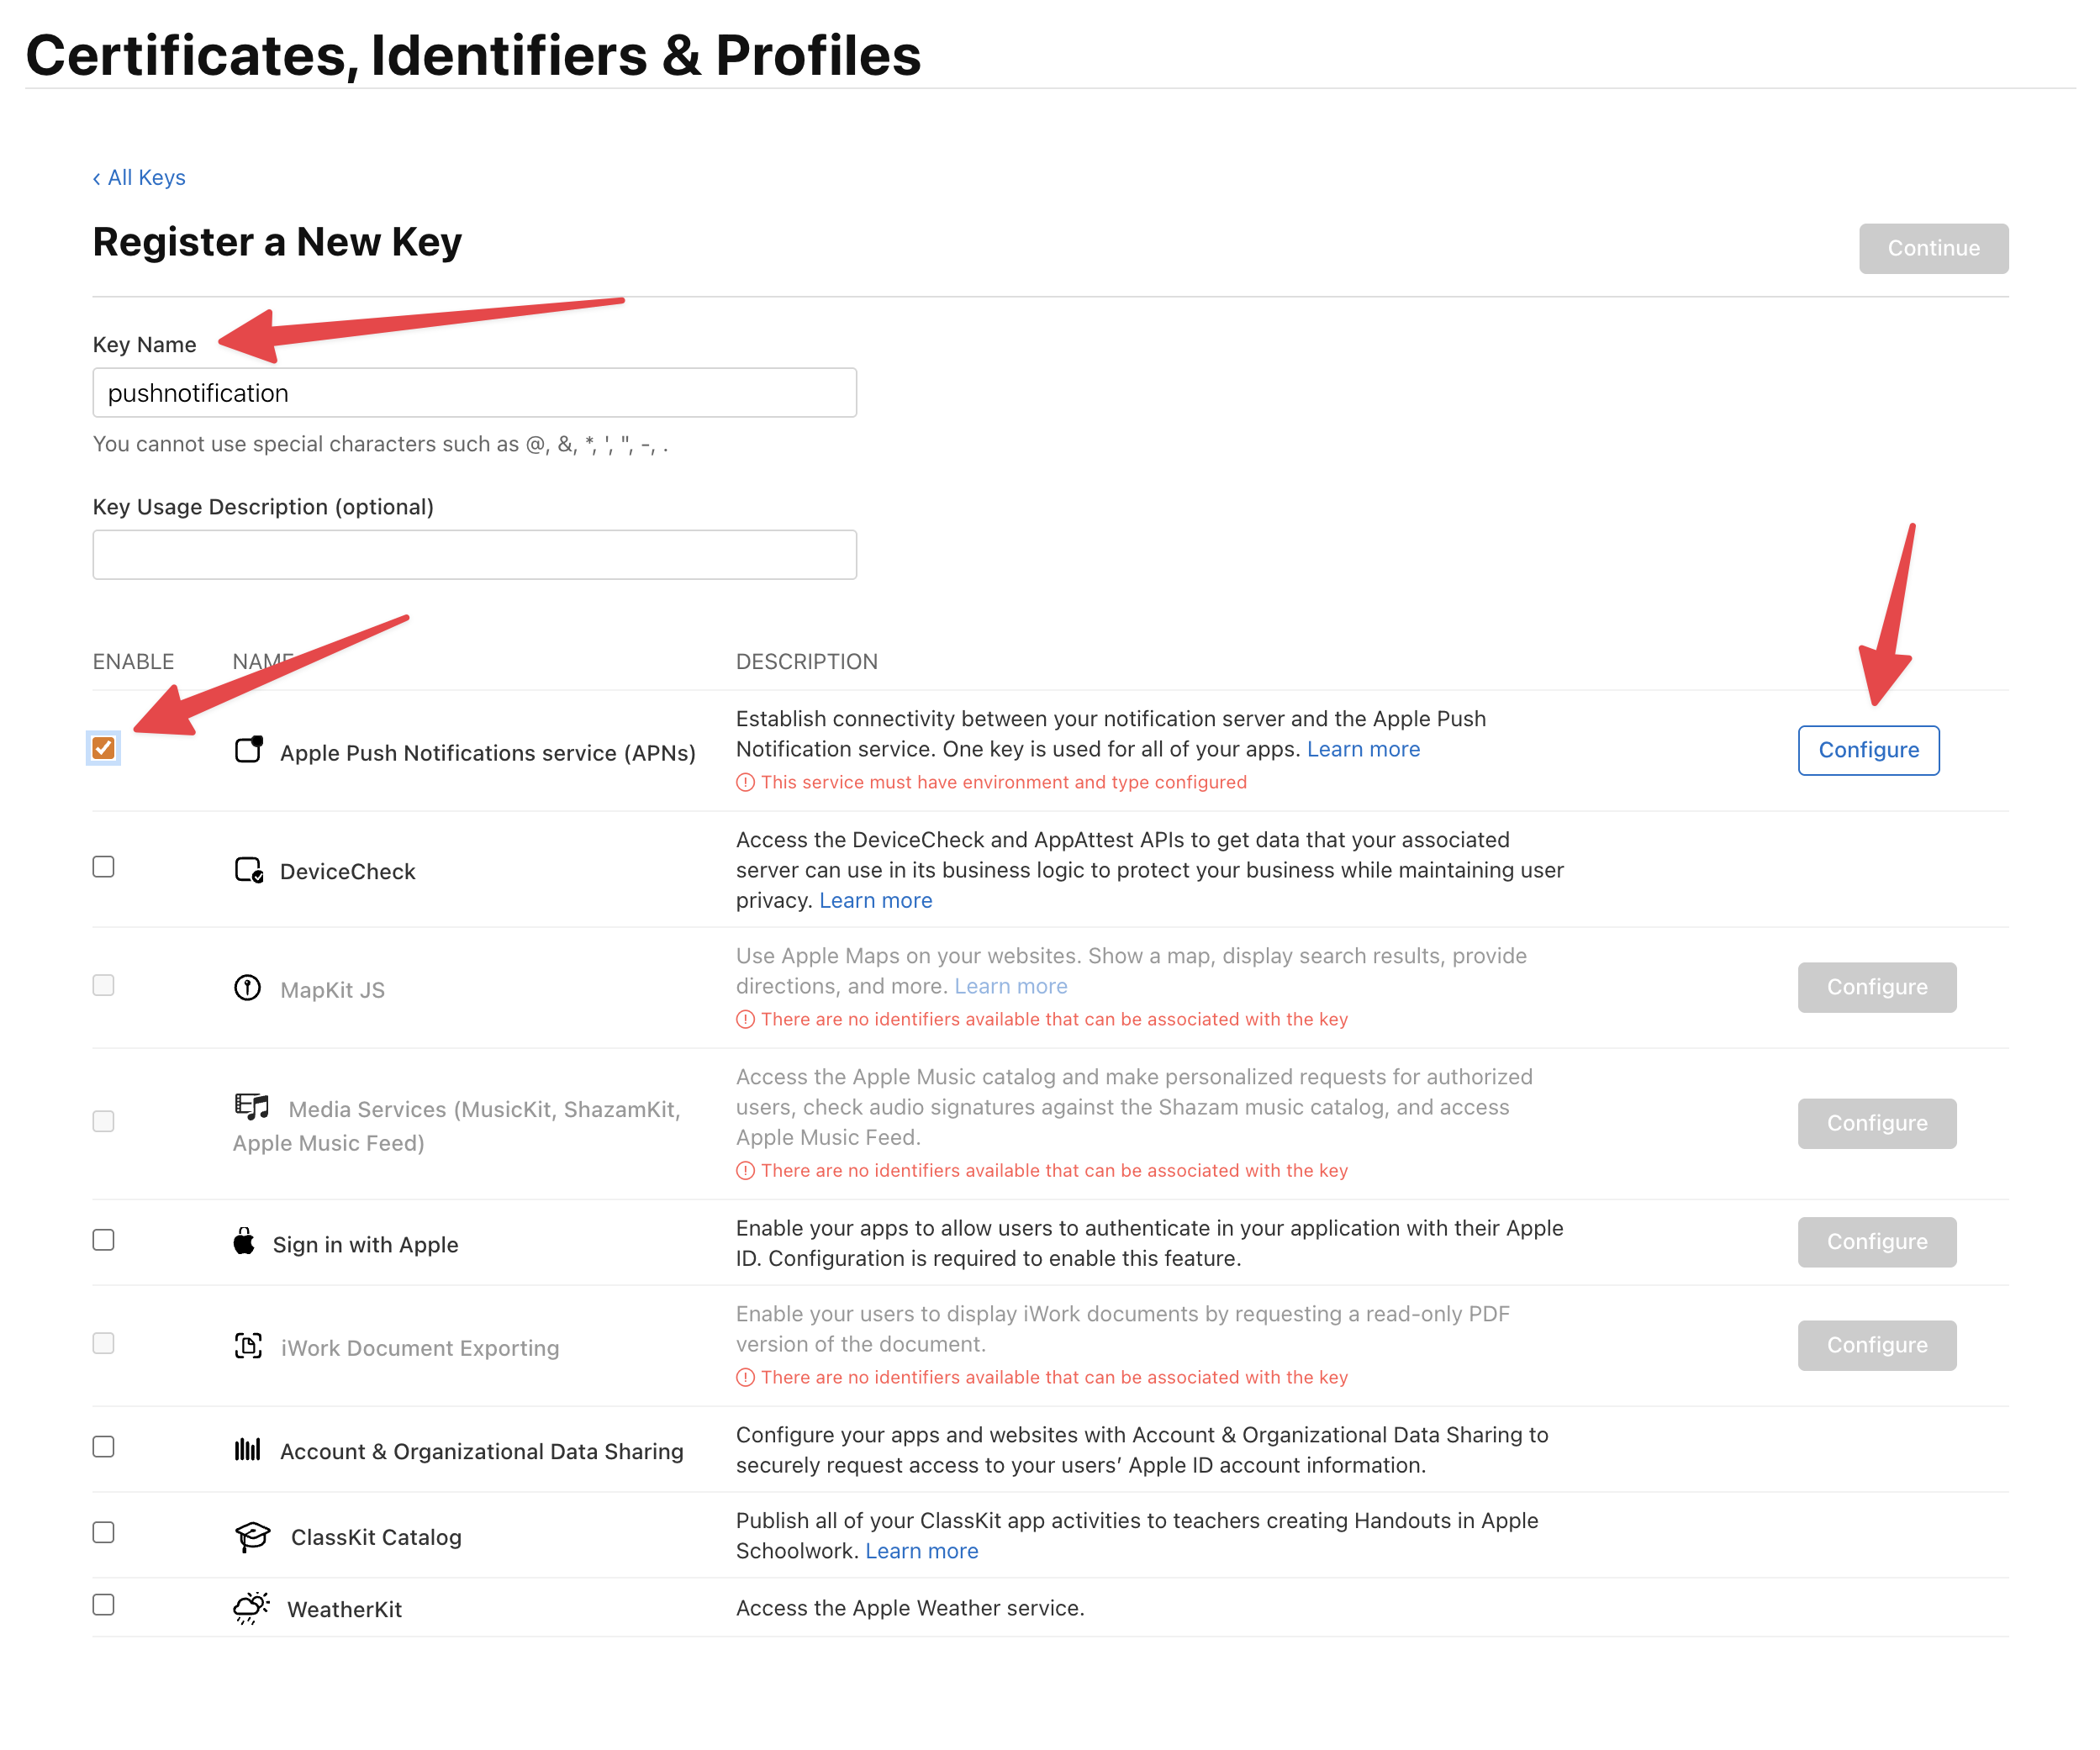
 ### Step 14: Register a New Key
Fill in the registration form:
* **Key Name** — give it a descriptive name (e.g., "pushnotification")
* **Enable** the checkbox next to **Apple Push Notifications service (APNs)**
* Click **Configure**
### Step 14: Register a New Key
Fill in the registration form:
* **Key Name** — give it a descriptive name (e.g., "pushnotification")
* **Enable** the checkbox next to **Apple Push Notifications service (APNs)**
* Click **Configure**
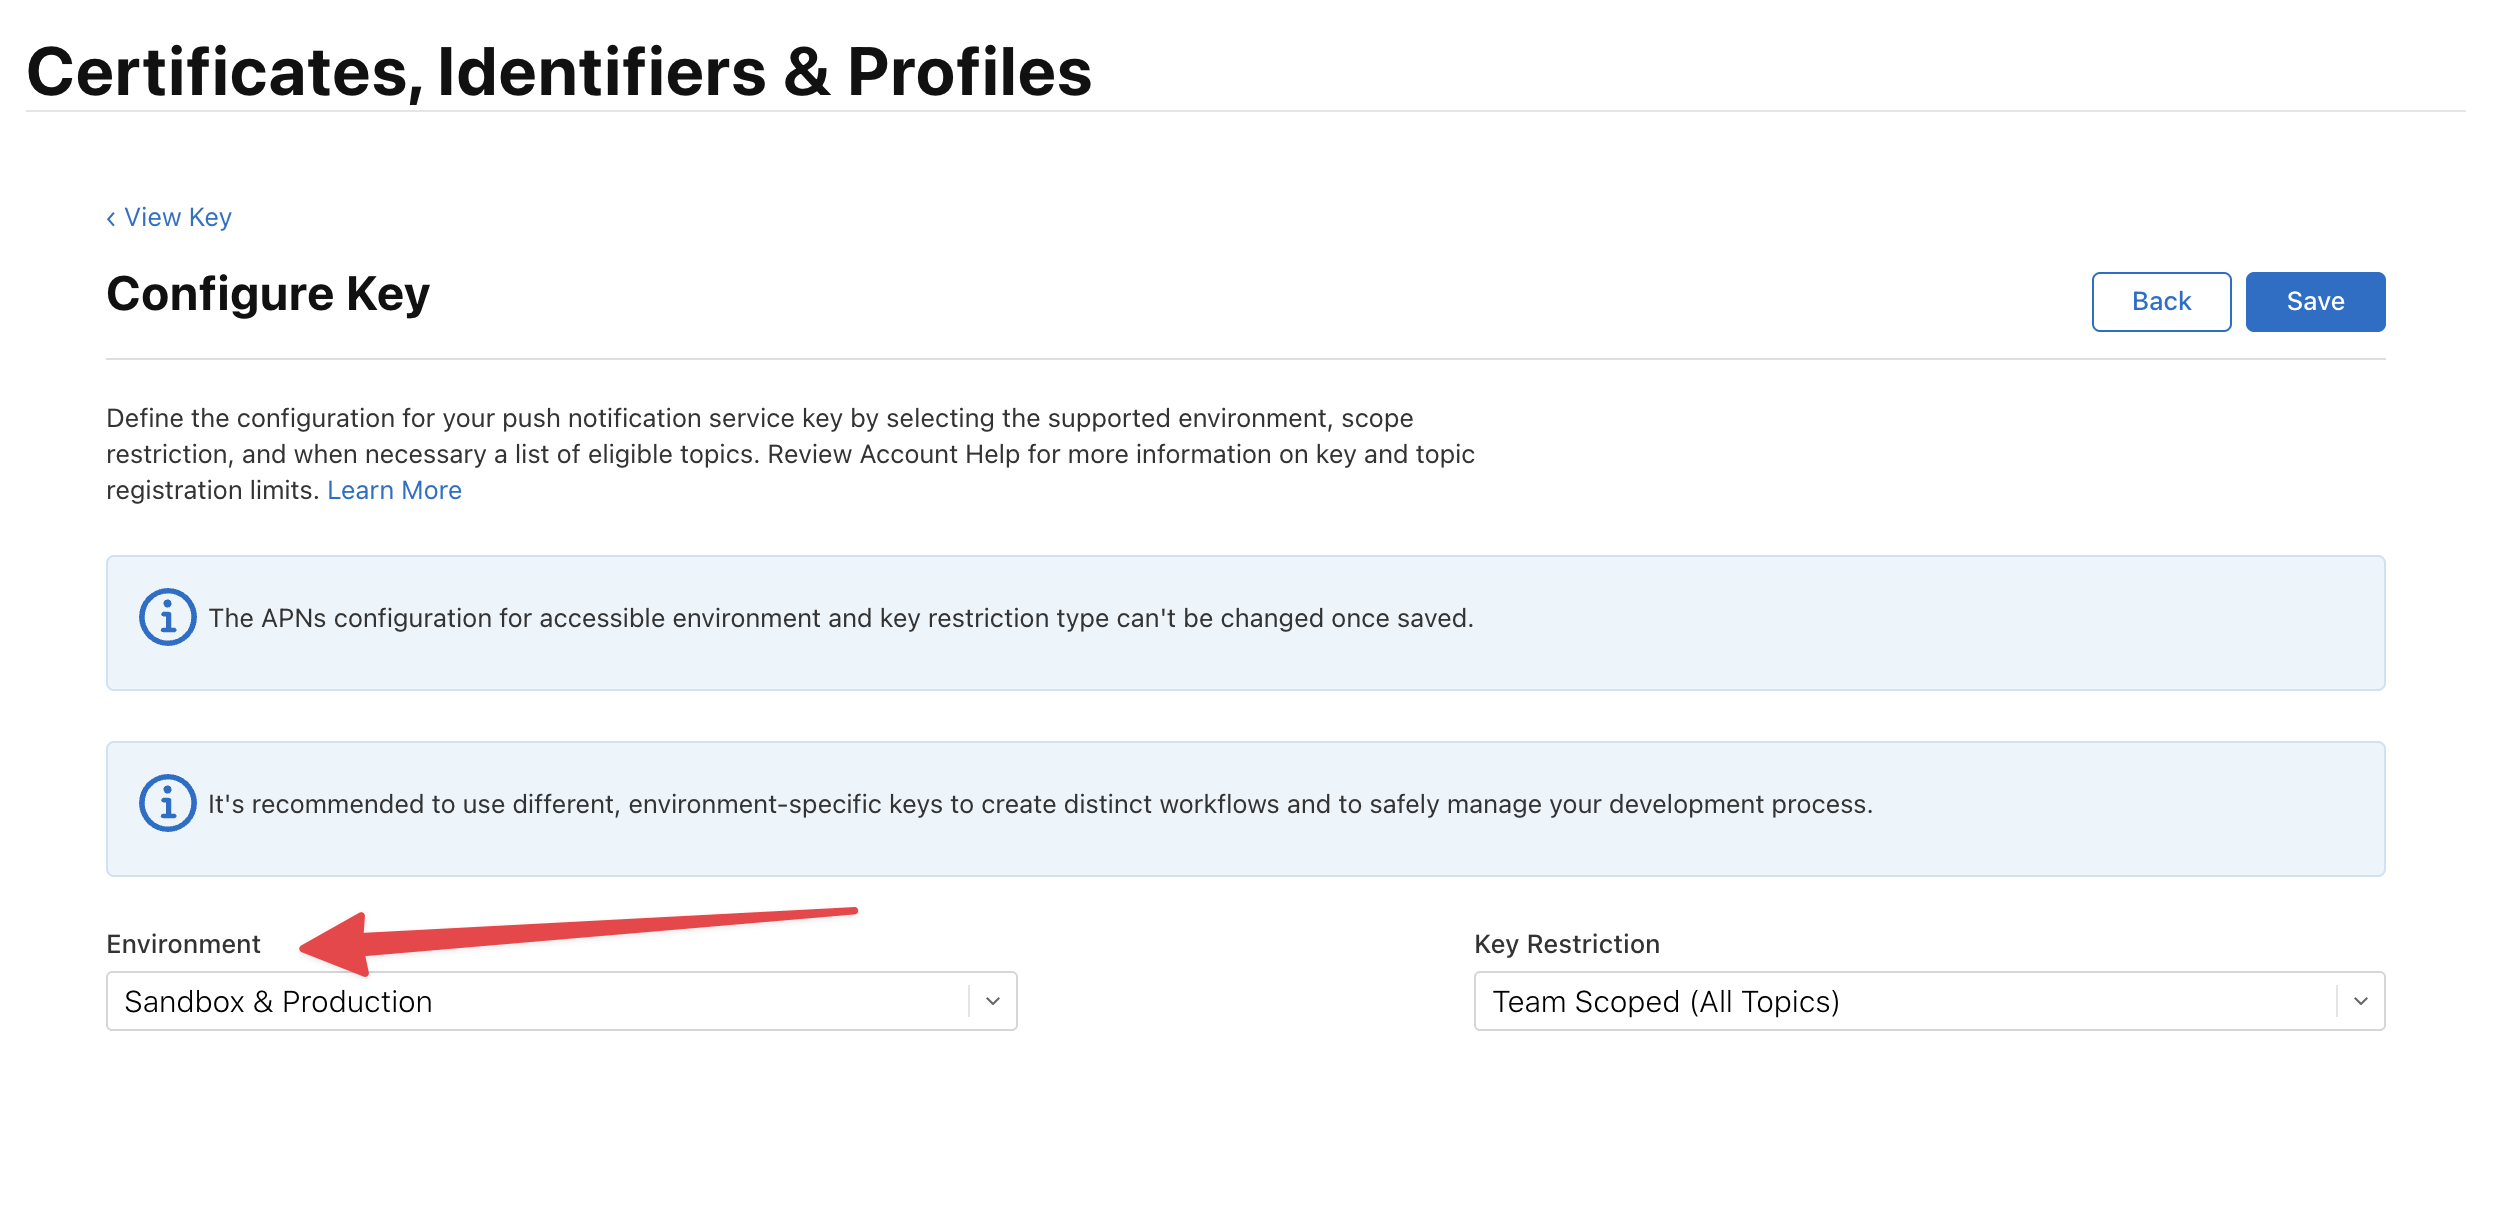
 ### Step 15: Configure the Key
On the configuration page:
* **Environment** — select **Sandbox & Production** (this is the default and what you want)
* **Key Restriction** — leave as **Team Scoped (All Topics)**
* Click **Save**, then **Continue**, then **Register**
### Step 15: Configure the Key
On the configuration page:
* **Environment** — select **Sandbox & Production** (this is the default and what you want)
* **Key Restriction** — leave as **Team Scoped (All Topics)**
* Click **Save**, then **Continue**, then **Register**
 ### Step 16: Download Your Key and Note the Key ID
After registration, you'll see a **Download** button and the **Key ID** displayed below. You need both of these.
### Step 16: Download Your Key and Note the Key ID
After registration, you'll see a **Download** button and the **Key ID** displayed below. You need both of these.
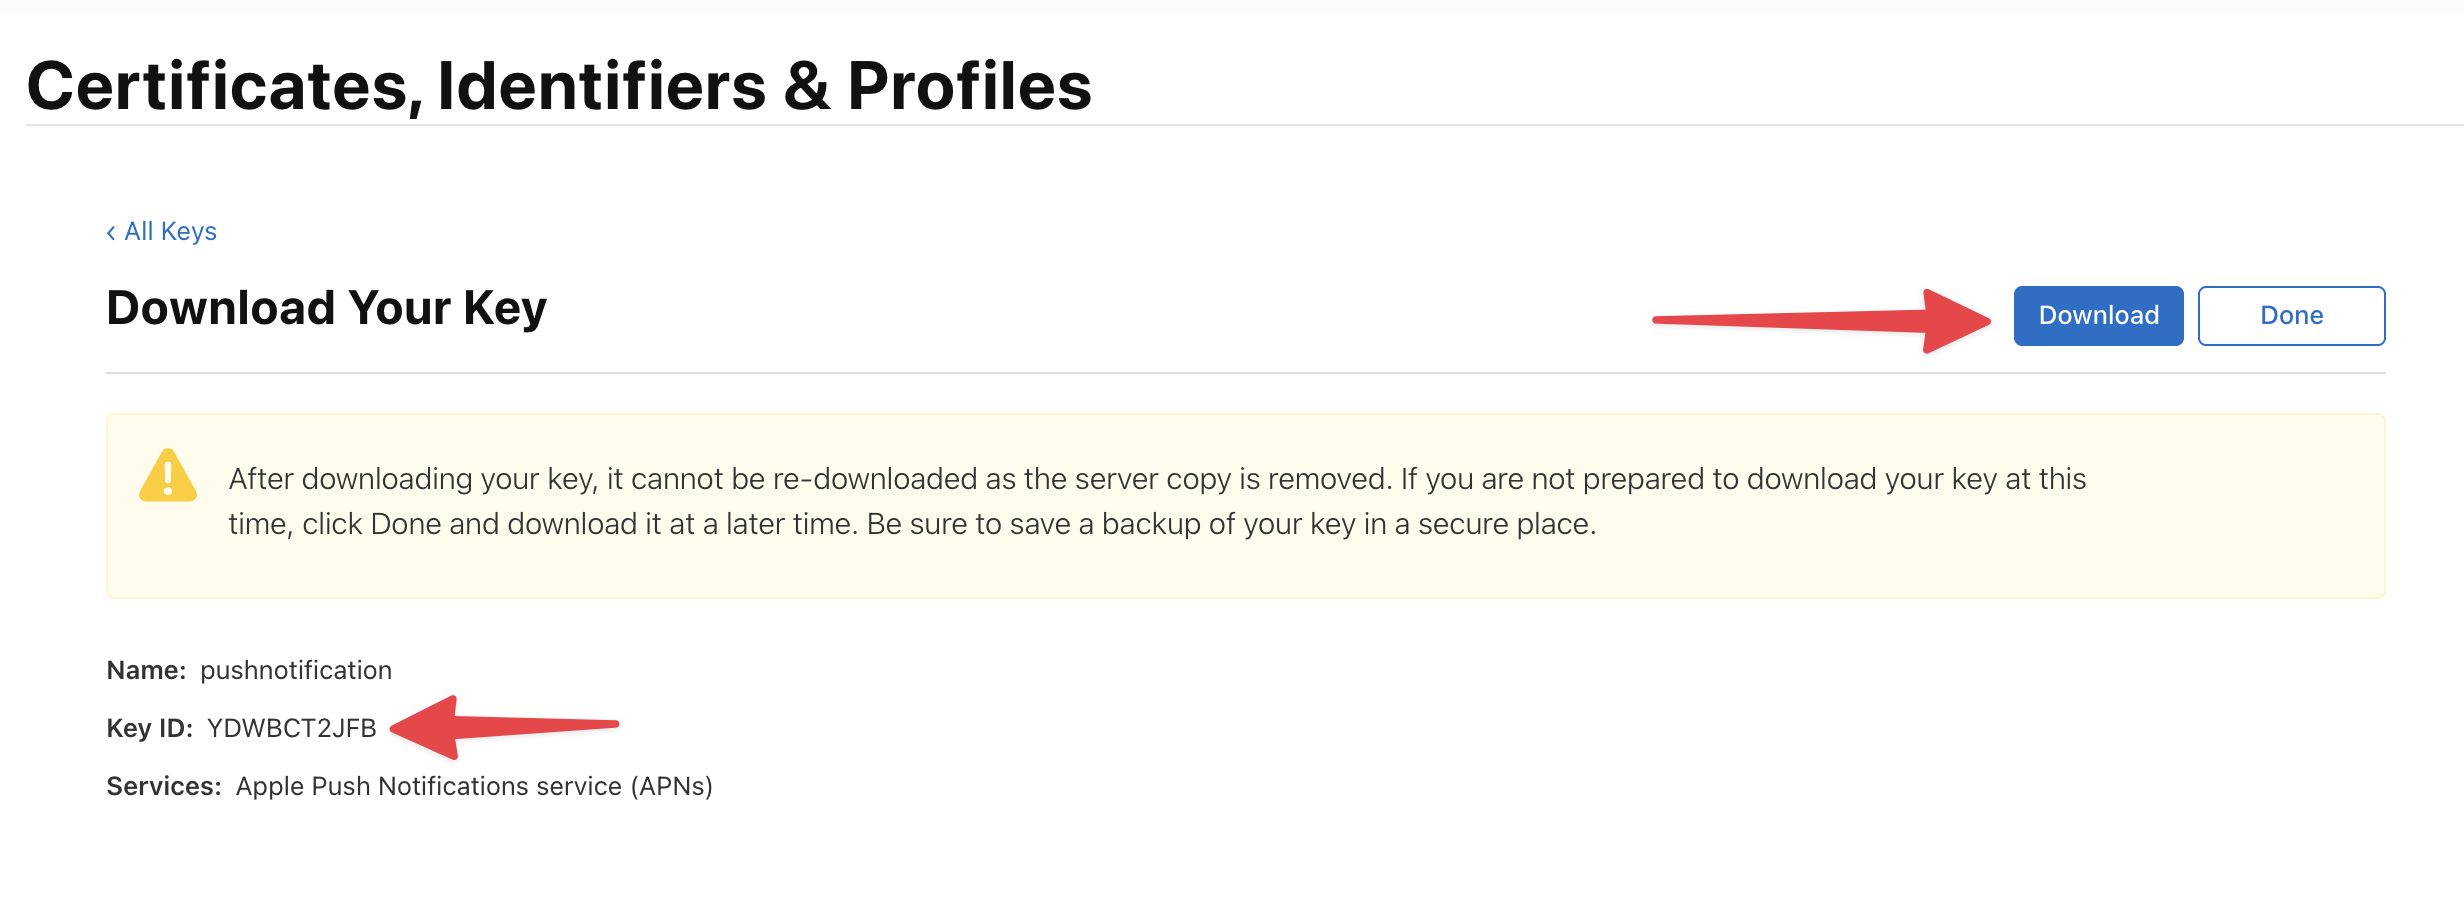 Two things to do on this page:
1. **Click Download** — you'll get a `.p8` file (e.g., `AuthKey_YDWBCT2JFB.p8`)
2. **Copy the Key ID** shown on the page (e.g., `YDWBCT2JFB`) — you'll enter this in [Part 4](#part-4-upload-push-key-to-expo) when uploading to Expo
Two things to do on this page:
1. **Click Download** — you'll get a `.p8` file (e.g., `AuthKey_YDWBCT2JFB.p8`)
2. **Copy the Key ID** shown on the page (e.g., `YDWBCT2JFB`) — you'll enter this in [Part 4](#part-4-upload-push-key-to-expo) when uploading to Expo
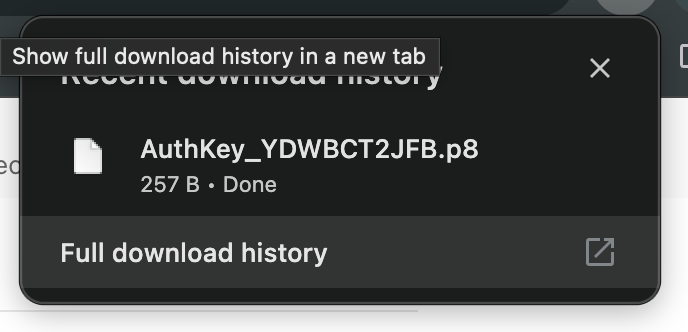 **Save both the .p8 file and the Key ID!** Apple deletes the key from their servers after you download it — you can never re-download it. If you lose the file, you'll have to create a new key from scratch. Write down or copy the **Key ID** too — you'll enter it in Expo in the next section.
***
## Part 4: Upload Push Key to Expo
Now you need to upload the APNs key you just downloaded to your Expo project, so Expo can use it to send notifications through Apple's servers.
### Step 17: Open Expo Project Credentials
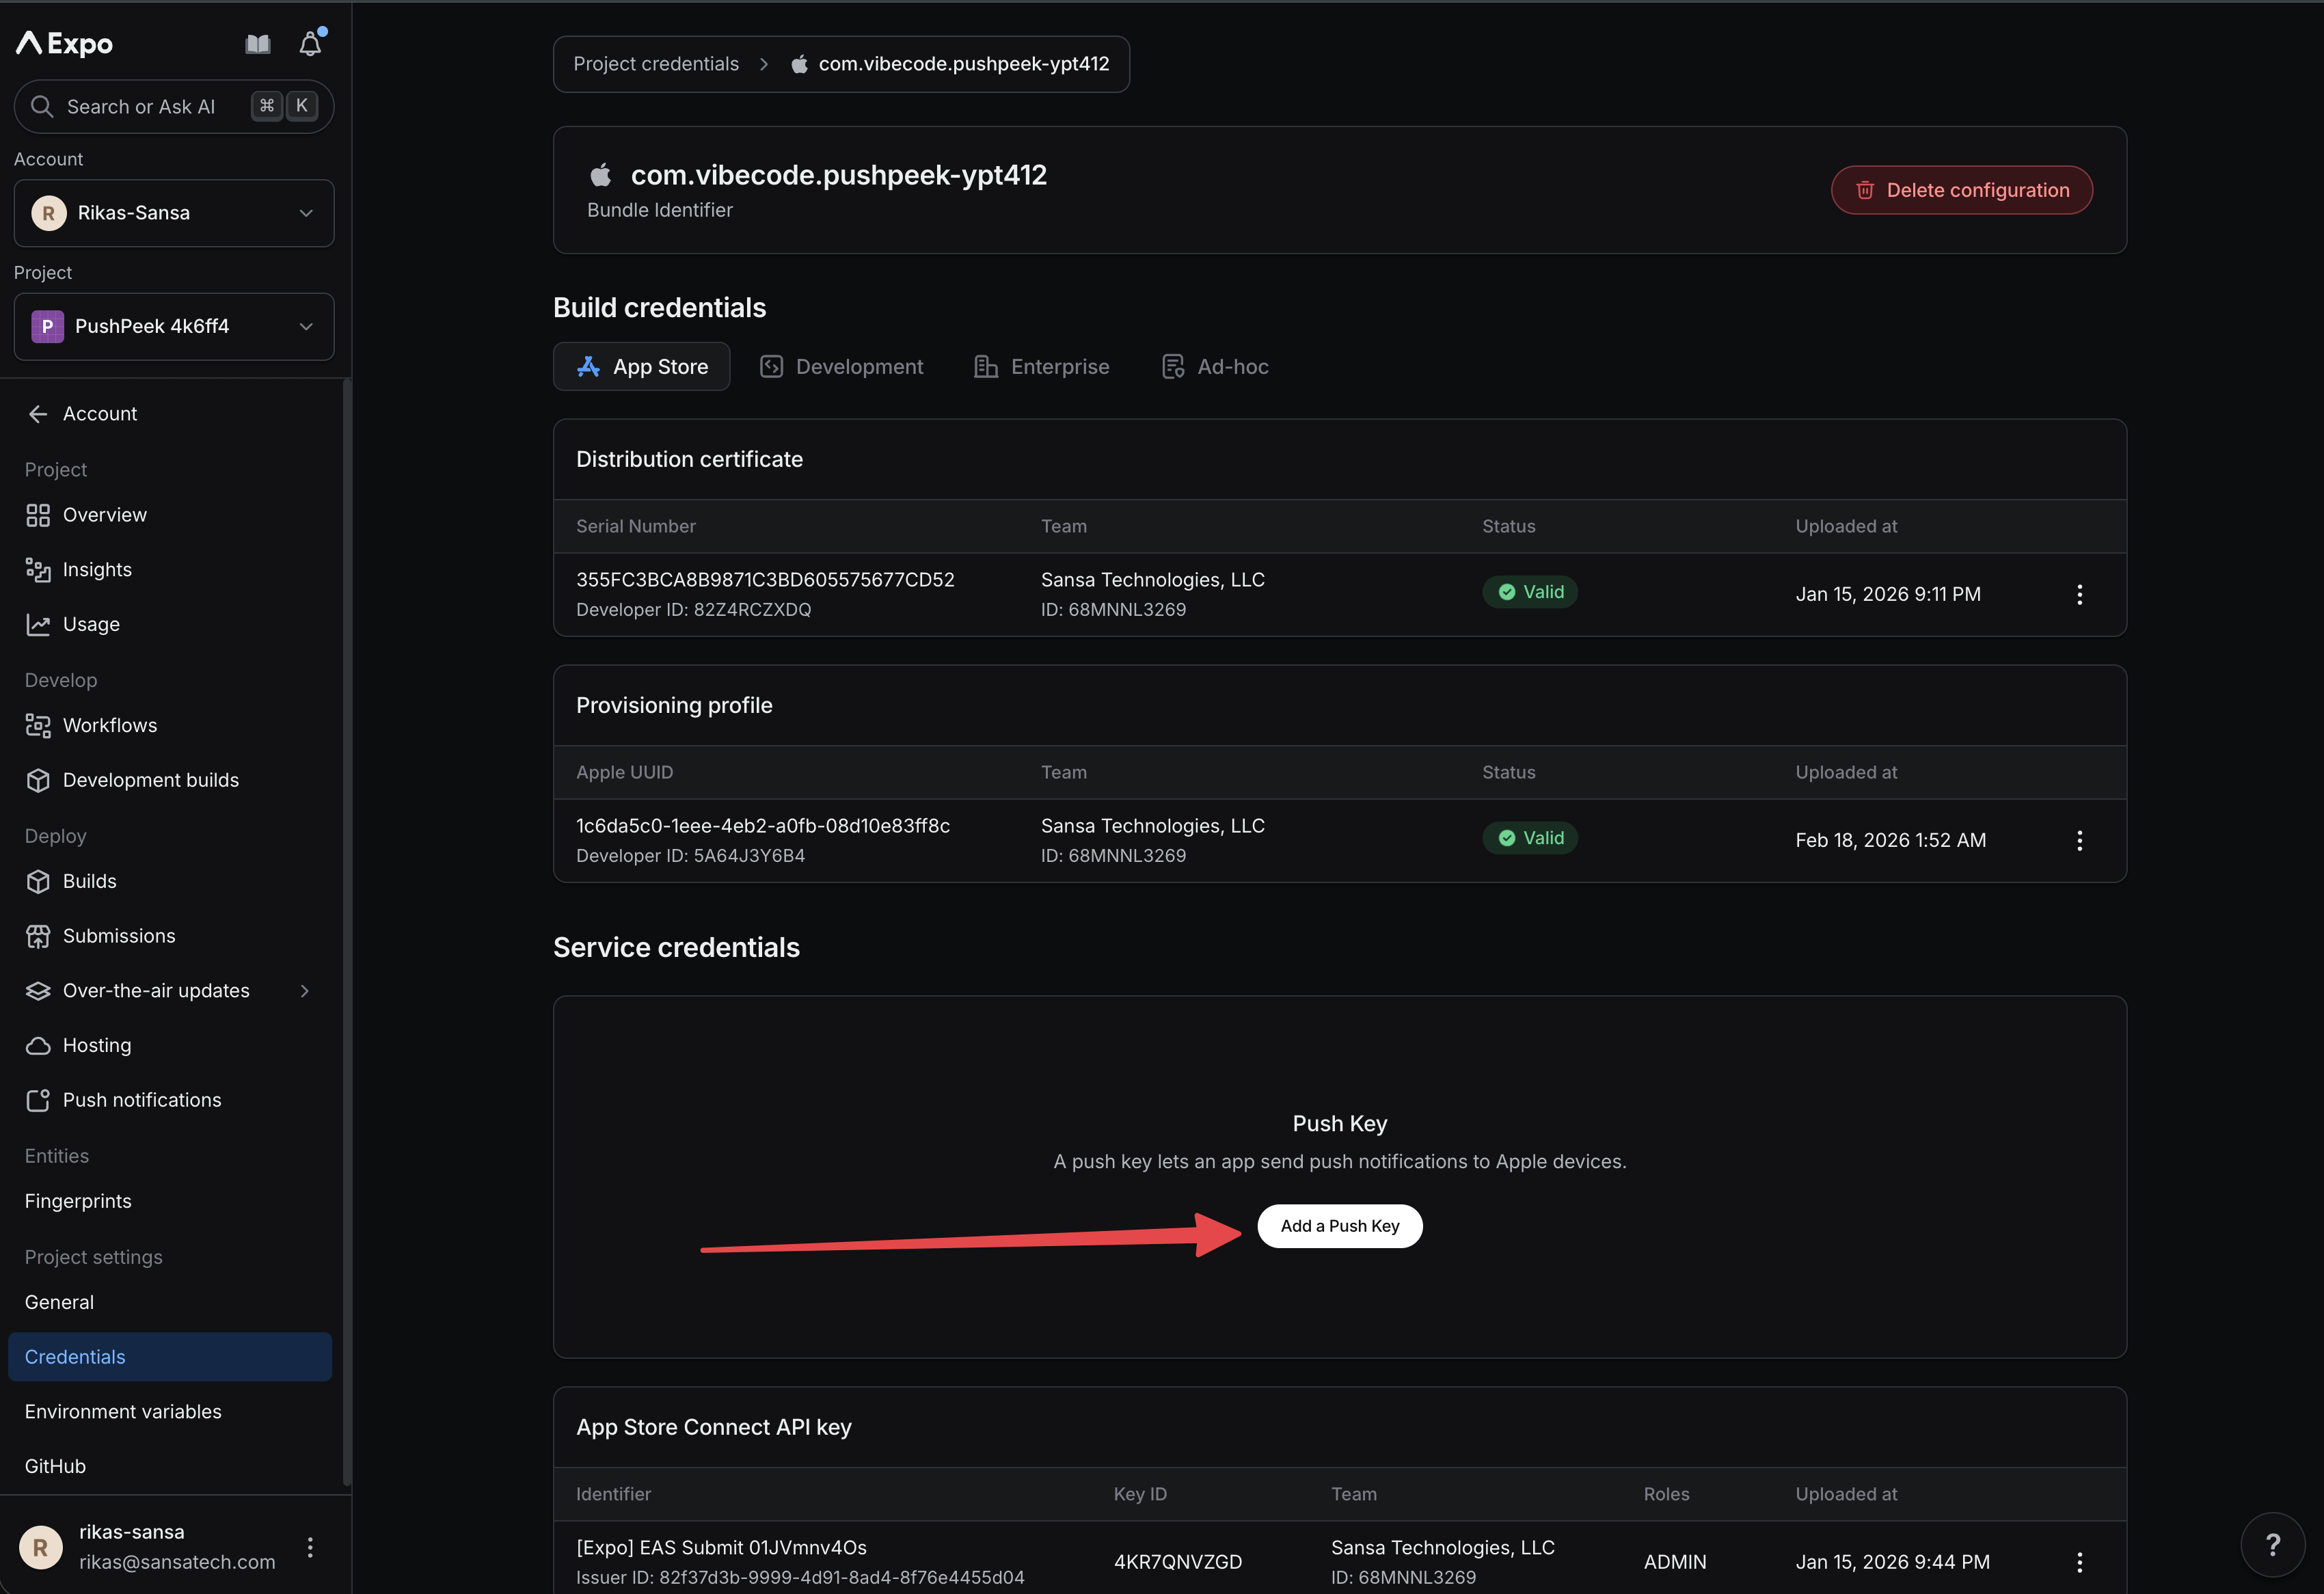
Go to [expo.dev](https://expo.dev), find your project, and navigate to **Credentials** in the left sidebar. Under **Service credentials**, you'll see a **Push Key** section. Click **Add a Push Key**.
**Save both the .p8 file and the Key ID!** Apple deletes the key from their servers after you download it — you can never re-download it. If you lose the file, you'll have to create a new key from scratch. Write down or copy the **Key ID** too — you'll enter it in Expo in the next section.
***
## Part 4: Upload Push Key to Expo
Now you need to upload the APNs key you just downloaded to your Expo project, so Expo can use it to send notifications through Apple's servers.
### Step 17: Open Expo Project Credentials
Go to [expo.dev](https://expo.dev), find your project, and navigate to **Credentials** in the left sidebar. Under **Service credentials**, you'll see a **Push Key** section. Click **Add a Push Key**.
 ### Step 18: Upload the .p8 Key File
In the "Change Push Key" dialog:
1. Click **Upload new push key**
2. Click **Upload File** and select the `.p8` file you downloaded earlier (e.g., `AuthKey_YDWBCT2JFB.p8`)
3. Enter the **Key Identifier** — this is the **Key ID** shown on Apple's download page (e.g., `YDWBCT2JFB`). This must match exactly.
4. Your **Apple Team ID** should auto-fill
5. Click **Save**
### Step 18: Upload the .p8 Key File
In the "Change Push Key" dialog:
1. Click **Upload new push key**
2. Click **Upload File** and select the `.p8` file you downloaded earlier (e.g., `AuthKey_YDWBCT2JFB.p8`)
3. Enter the **Key Identifier** — this is the **Key ID** shown on Apple's download page (e.g., `YDWBCT2JFB`). This must match exactly.
4. Your **Apple Team ID** should auto-fill
5. Click **Save**
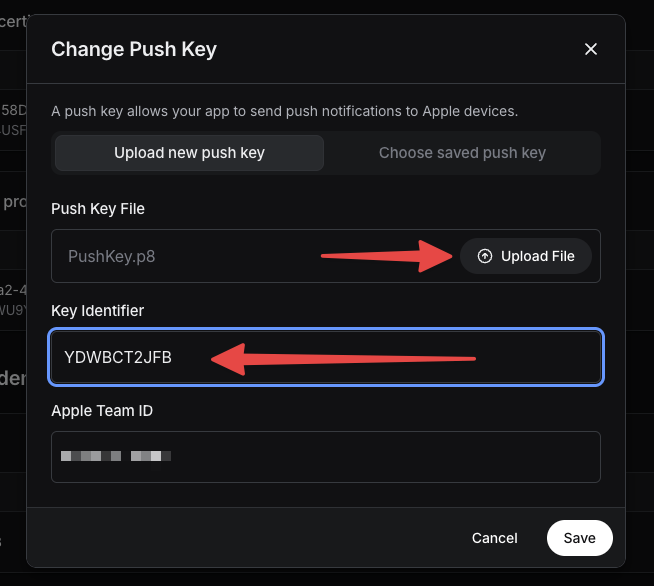 The **Key Identifier** field must contain the same Key ID shown on Apple's download page. If you didn't copy it, you can find it in the `.p8` filename itself — for example, `AuthKey_YDWBCT2JFB.p8` means the Key ID is `YDWBCT2JFB`.
### Step 19: Verify Credentials Are Complete
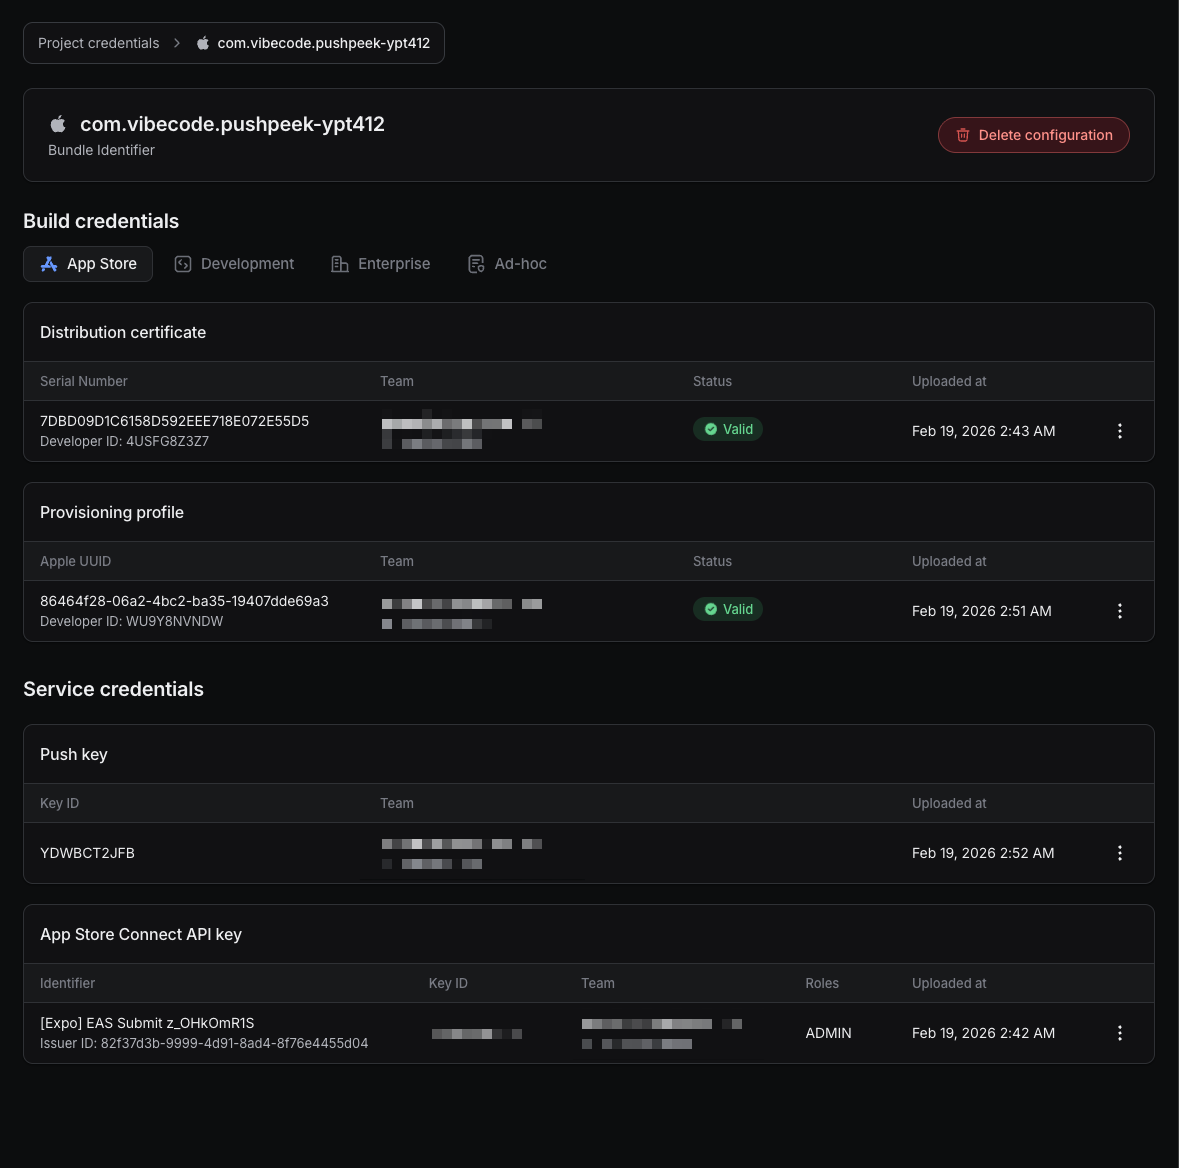
After uploading, your credentials page should show all green statuses — Distribution certificate, Provisioning profile, and **Push key** all valid.
The **Key Identifier** field must contain the same Key ID shown on Apple's download page. If you didn't copy it, you can find it in the `.p8` filename itself — for example, `AuthKey_YDWBCT2JFB.p8` means the Key ID is `YDWBCT2JFB`.
### Step 19: Verify Credentials Are Complete
After uploading, your credentials page should show all green statuses — Distribution certificate, Provisioning profile, and **Push key** all valid.
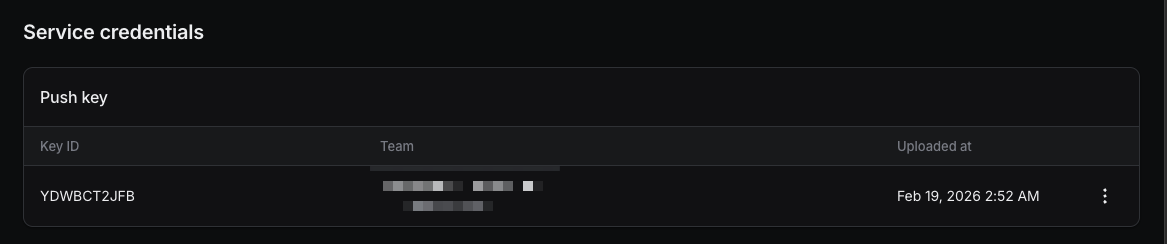
 You can verify the push key details in the **Service credentials** section:
 ***
## Part 5: Configure Your Project
Your app needs two things from your Expo project to work with push notifications: the **Project ID** (for generating push tokens) and the **Slug** (to link your app to the correct Expo project). You'll find both on the Expo dashboard and tell the AI to add them to your app's configuration.
### Step 20: Find Your Slug and Project ID
Go to your project on [expo.dev](https://expo.dev) and click the project name to open the **Project details** panel. Copy both values:
* **Slug** — your project's unique URL-friendly name (e.g., `pushpeek-4k6ff4`). This goes in the `"slug"` field of `app.json`.
* **ID** — your project's unique identifier (e.g., `1483deeb-2bd5-4944-bb83-8b26c46652b2`). This goes in `extra.eas.projectId` in `app.json`.
***
## Part 5: Configure Your Project
Your app needs two things from your Expo project to work with push notifications: the **Project ID** (for generating push tokens) and the **Slug** (to link your app to the correct Expo project). You'll find both on the Expo dashboard and tell the AI to add them to your app's configuration.
### Step 20: Find Your Slug and Project ID
Go to your project on [expo.dev](https://expo.dev) and click the project name to open the **Project details** panel. Copy both values:
* **Slug** — your project's unique URL-friendly name (e.g., `pushpeek-4k6ff4`). This goes in the `"slug"` field of `app.json`.
* **ID** — your project's unique identifier (e.g., `1483deeb-2bd5-4944-bb83-8b26c46652b2`). This goes in `extra.eas.projectId` in `app.json`.
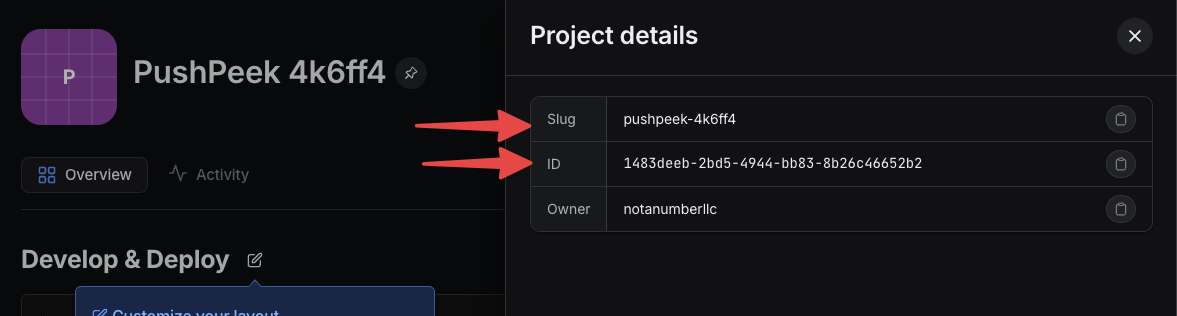 **Both values are required.** If the slug in your `app.json` doesn't match the Expo project slug, your builds will fail or push tokens won't resolve. If the Project ID is missing, token registration will fail silently.
### Step 21: Tell the AI to Configure Your App
Go back to Vibecode and send a message like this to the AI, with **both** your slug and project ID:
> "Push notifications need the Expo project ID to work. Update app.json:
>
> 1. Set the slug to **YOUR-SLUG-HERE**
> 2. Add extra.eas.projectId with my project ID: **YOUR-PROJECT-ID-HERE**
> 3. Add aps-environment: production to iOS entitlements
> 4. Add UIBackgroundModes: \["remote-notification"] to iOS infoPlist
> 5. Add expo-notifications to plugins"
Replace the values with what you copied from expo.dev.
**Both values are required.** If the slug in your `app.json` doesn't match the Expo project slug, your builds will fail or push tokens won't resolve. If the Project ID is missing, token registration will fail silently.
### Step 21: Tell the AI to Configure Your App
Go back to Vibecode and send a message like this to the AI, with **both** your slug and project ID:
> "Push notifications need the Expo project ID to work. Update app.json:
>
> 1. Set the slug to **YOUR-SLUG-HERE**
> 2. Add extra.eas.projectId with my project ID: **YOUR-PROJECT-ID-HERE**
> 3. Add aps-environment: production to iOS entitlements
> 4. Add UIBackgroundModes: \["remote-notification"] to iOS infoPlist
> 5. Add expo-notifications to plugins"
Replace the values with what you copied from expo.dev.
 The AI will update your `app.json` with all the required configuration — the slug, project ID, iOS entitlements, and notification plugin:
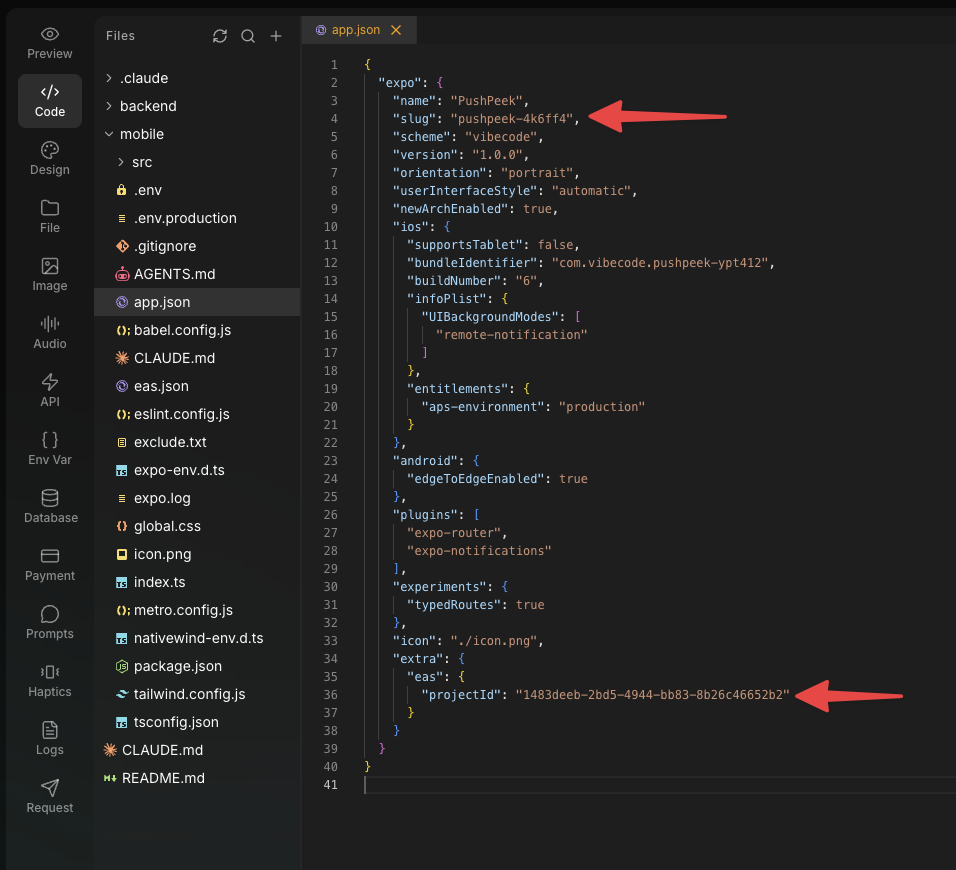 **Double-check:** Open the Code tab in Vibecode and look at `app.json`. Verify all five values are present:
* `"slug"` matches the slug from expo.dev
* `extra.eas.projectId` contains your project ID
* `aps-environment` is set to `"production"` in iOS entitlements
* `UIBackgroundModes` includes `"remote-notification"` in iOS infoPlist
* `"expo-notifications"` is listed in plugins
A mismatch or missing value is the #1 cause of push notification failures.
### Step 22: Deploy the Updated Build
After the AI updates the configuration, you need to **deploy a new build** so the changes take effect. Go through the **Submit to App Store** flow again (Share → Submit to App Store) to create a new build with the updated configuration.
Once the new build is ready, install it via TestFlight on your device.
***
## Part 6: Test Push Notifications
### Step 23: Open the App and Allow Notifications
Open your app from TestFlight on your physical device. The first time you open it, you'll see a permission prompt asking to allow notifications. **Tap Allow**.
Your app should now:
1. Request notification permissions
2. Register with Apple's push notification service
3. Display your unique **Expo Push Token** (starts with `ExponentPushToken[...]`)
### Step 24: Send a Test Notification
If your app has a send button (like the test app we built), enter a title and message and tap **Send Notification**. Within a few seconds, you should receive a push notification on your device.
**Double-check:** Open the Code tab in Vibecode and look at `app.json`. Verify all five values are present:
* `"slug"` matches the slug from expo.dev
* `extra.eas.projectId` contains your project ID
* `aps-environment` is set to `"production"` in iOS entitlements
* `UIBackgroundModes` includes `"remote-notification"` in iOS infoPlist
* `"expo-notifications"` is listed in plugins
A mismatch or missing value is the #1 cause of push notification failures.
### Step 22: Deploy the Updated Build
After the AI updates the configuration, you need to **deploy a new build** so the changes take effect. Go through the **Submit to App Store** flow again (Share → Submit to App Store) to create a new build with the updated configuration.
Once the new build is ready, install it via TestFlight on your device.
***
## Part 6: Test Push Notifications
### Step 23: Open the App and Allow Notifications
Open your app from TestFlight on your physical device. The first time you open it, you'll see a permission prompt asking to allow notifications. **Tap Allow**.
Your app should now:
1. Request notification permissions
2. Register with Apple's push notification service
3. Display your unique **Expo Push Token** (starts with `ExponentPushToken[...]`)
### Step 24: Send a Test Notification
If your app has a send button (like the test app we built), enter a title and message and tap **Send Notification**. Within a few seconds, you should receive a push notification on your device.
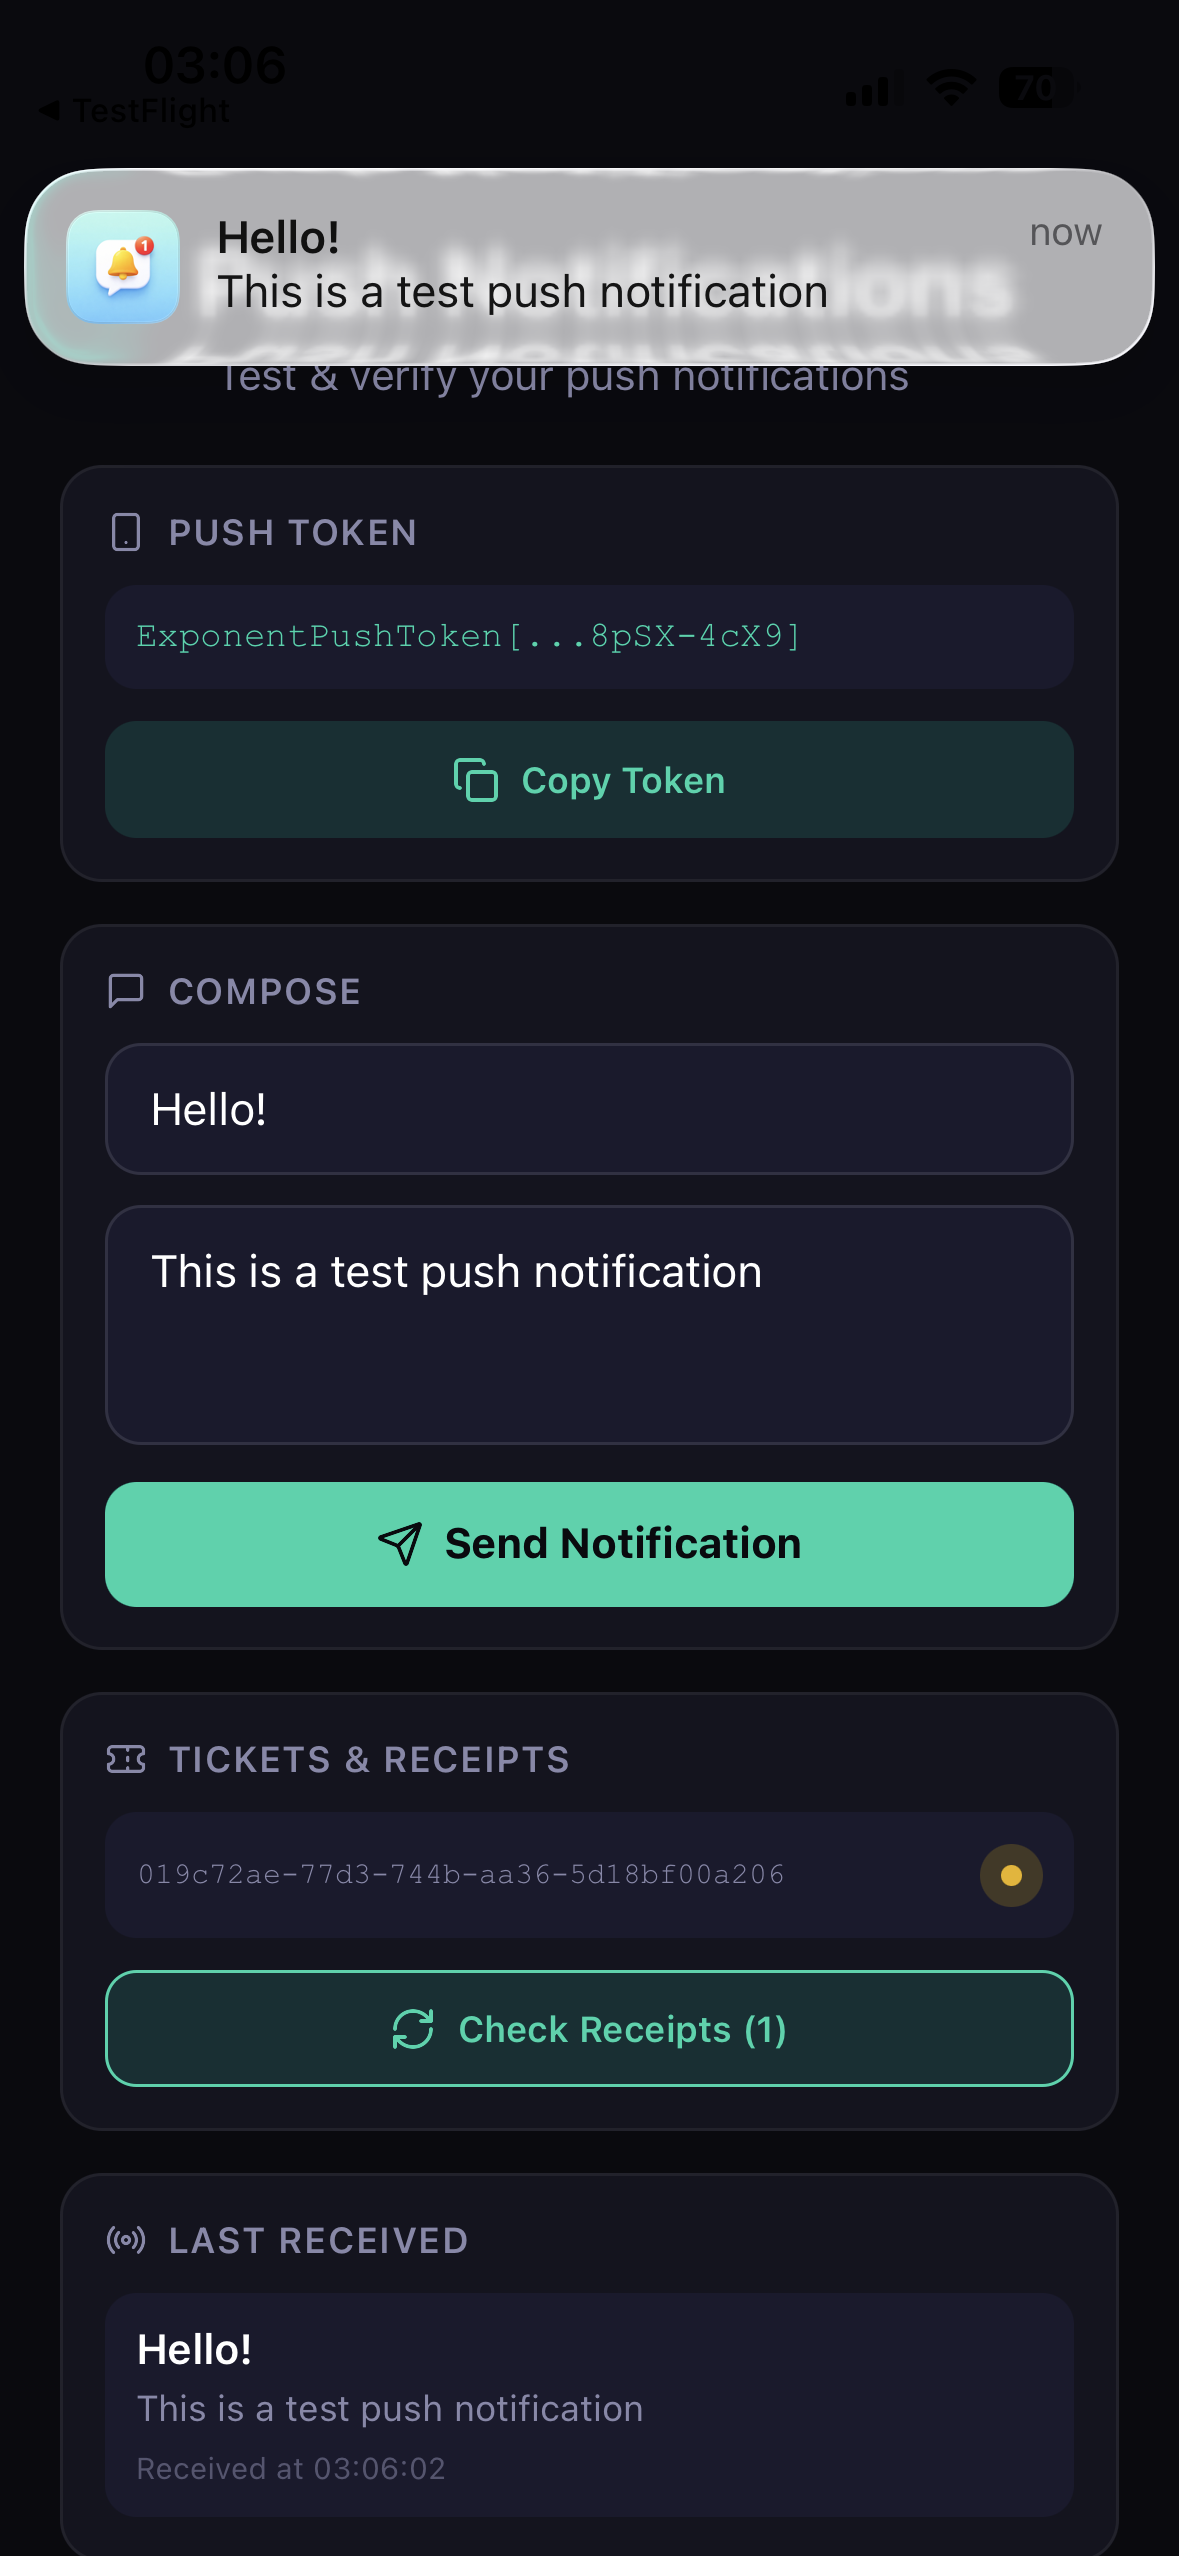 If you're building notifications into a larger app, you can also test using the [Expo Push Notifications Tool](https://expo.dev/notifications) — just paste your push token and send a test message.
**Lock your phone first!** Push notifications are most visible when the phone is locked or the app is in the background. If the app is in the foreground, the notification appears as a banner at the top of the screen.
***
## How It All Fits Together
Here's a quick summary of what each piece does and why it's needed:
| Component | What It Does | Where It Lives |
| ------------------------ | ------------------------------------------------------------------------ | ----------------------------------------- |
| **expo-notifications** | The package that handles everything on the device | Your app code |
| **Notification handler** | Tells iOS/Android to show notifications when the app is open | Top of your main file |
| **Push token** | A unique address for your device (like a phone number for notifications) | Generated at runtime |
| **APNs key (.p8)** | Lets Expo talk to Apple's notification servers on your behalf | Uploaded to Expo |
| **Key ID** | Identifies your APNs key when uploading to Expo | Apple Developer portal → Expo credentials |
| **Project Slug** | Links your app.json to the correct Expo project | `"slug"` field in app.json |
| **Project ID** | Links your app to your Expo project so tokens work | `extra.eas.projectId` in app.json |
| **Expo Push API** | The service that sends notifications to devices | `https://exp.host/--/api/v2/push/send` |
***
## Troubleshooting
### "No push token" or token is empty
* **Are you on a physical device?** Simulators can't get push tokens. You must test on a real iPhone/iPad via TestFlight.
* **Is the Project ID set?** Check that `extra.eas.projectId` is in your `app.json` and matches the ID from expo.dev.
* **Does the slug match?** The `"slug"` in your `app.json` must match the slug shown on your Expo project page. A mismatch causes token registration to fail.
* **Are permissions granted?** Go to Settings → your app → Notifications on your device and make sure notifications are enabled.
### Notifications don't appear
* **Is the notification handler set up?** The AI should have added `Notifications.setNotificationHandler()` at the top of your main file. Without it, foreground notifications are silently swallowed.
* **Are you testing from TestFlight?** Push notifications don't work in the Vibecode preview or Expo Go.
* **Is `aps-environment` set to `production`?** This must be in your `app.json` iOS entitlements for TestFlight and App Store builds.
### Notifications work in development but not in production
* Check that `aps-environment` is set to `"production"` (not `"development"`) in your `app.json`.
* Make sure you deployed an updated build after changing the configuration.
### "DeviceNotRegistered" error in receipts
The push token has expired or the app was uninstalled. Re-open the app to get a fresh token.
### Build fails after adding push notifications
Make sure you're using the correct version of `expo-notifications` for your Expo SDK version. For **Expo SDK 53**, use version `~0.31.5`. The AI handles this automatically, but if something goes wrong, tell it: "Use expo-notifications version \~0.31.5"
**Need help?** Reach out via live support chat in the app for the fastest
support. You can also join our [Discord
community](https://discord.gg/qXyWYYX5Ts) to connect with other Vibecode
builders.
***
## For Developers: Technical Details
```json theme={null}
{
"expo": {
"slug": "your-project-slug",
"plugins": ["expo-notifications"],
"ios": {
"infoPlist": {
"UIBackgroundModes": ["remote-notification"]
},
"entitlements": {
"aps-environment": "production"
}
},
"extra": {
"eas": {
"projectId": "your-expo-project-id"
}
}
}
}
```
Each field is required:
* `slug` — must match the slug from your Expo project on expo.dev. A mismatch causes build or token failures.
* `plugins: ["expo-notifications"]` — links the native module during build
* `UIBackgroundModes: ["remote-notification"]` — allows background notification delivery on iOS
* `aps-environment: "production"` — uses Apple's production push service (required for TestFlight/App Store)
* `projectId` — must match the ID from your Expo project. Required for `getExpoPushTokenAsync()` to work
```typescript theme={null}
import { Platform } from 'react-native';
import * as Notifications from 'expo-notifications';
import * as Device from 'expo-device';
import Constants from 'expo-constants';
async function registerForPushNotificationsAsync(): Promise {
if (Platform.OS === 'web') return null;
if (!Device.isDevice) return null; // Simulators can't get tokens
// Request permissions
const { status } = await Notifications.getPermissionsAsync();
if (status !== 'granted') {
const { status: newStatus } = await Notifications.requestPermissionsAsync();
if (newStatus !== 'granted') return null;
}
// Get the Expo push token
const projectId =
Constants.expoConfig?.extra?.eas?.projectId ??
Constants.easConfig?.projectId;
const tokenData = await Notifications.getExpoPushTokenAsync({ projectId });
return tokenData.data; // "ExponentPushToken[xxxxxx]"
}
```
**Pro tip:** Wrap `getExpoPushTokenAsync` in a `Promise.race` with a 10-second timeout. In rare cases (network issues, misconfigured credentials), the call can hang indefinitely:
```typescript theme={null}
const token = await Promise.race([
Notifications.getExpoPushTokenAsync({ projectId }),
new Promise((_, reject) =>
setTimeout(() => reject(new Error('Token timeout')), 10000)
),
]);
```
For production apps, you'll typically send notifications from your backend server rather than directly from the app. Here's a basic Hono endpoint:
```typescript theme={null}
// backend/src/routes/notifications.ts
app.post('/api/notifications/send', async (c) => {
const { token, title, body, data } = await c.req.json();
const response = await fetch('https://exp.host/--/api/v2/push/send', {
method: 'POST',
headers: {
'Content-Type': 'application/json',
Accept: 'application/json',
},
body: JSON.stringify({
to: token,
sound: 'default',
title,
body,
data, // optional payload for navigation
}),
});
const result = await response.json();
return c.json({ data: result });
});
```
You can also store push tokens per user in your database and send targeted notifications to specific users.
This must be called at the **top level** of your main file, **outside** any component:
```typescript theme={null}
import * as Notifications from 'expo-notifications';
Notifications.setNotificationHandler({
handleNotification: async () => ({
shouldShowAlert: true,
shouldPlaySound: true,
shouldSetBadge: false,
shouldShowBanner: true,
shouldShowList: true,
}),
});
```
Without this, notifications received while the app is in the foreground are silently ignored.
If you're building notifications into a larger app, you can also test using the [Expo Push Notifications Tool](https://expo.dev/notifications) — just paste your push token and send a test message.
**Lock your phone first!** Push notifications are most visible when the phone is locked or the app is in the background. If the app is in the foreground, the notification appears as a banner at the top of the screen.
***
## How It All Fits Together
Here's a quick summary of what each piece does and why it's needed:
| Component | What It Does | Where It Lives |
| ------------------------ | ------------------------------------------------------------------------ | ----------------------------------------- |
| **expo-notifications** | The package that handles everything on the device | Your app code |
| **Notification handler** | Tells iOS/Android to show notifications when the app is open | Top of your main file |
| **Push token** | A unique address for your device (like a phone number for notifications) | Generated at runtime |
| **APNs key (.p8)** | Lets Expo talk to Apple's notification servers on your behalf | Uploaded to Expo |
| **Key ID** | Identifies your APNs key when uploading to Expo | Apple Developer portal → Expo credentials |
| **Project Slug** | Links your app.json to the correct Expo project | `"slug"` field in app.json |
| **Project ID** | Links your app to your Expo project so tokens work | `extra.eas.projectId` in app.json |
| **Expo Push API** | The service that sends notifications to devices | `https://exp.host/--/api/v2/push/send` |
***
## Troubleshooting
### "No push token" or token is empty
* **Are you on a physical device?** Simulators can't get push tokens. You must test on a real iPhone/iPad via TestFlight.
* **Is the Project ID set?** Check that `extra.eas.projectId` is in your `app.json` and matches the ID from expo.dev.
* **Does the slug match?** The `"slug"` in your `app.json` must match the slug shown on your Expo project page. A mismatch causes token registration to fail.
* **Are permissions granted?** Go to Settings → your app → Notifications on your device and make sure notifications are enabled.
### Notifications don't appear
* **Is the notification handler set up?** The AI should have added `Notifications.setNotificationHandler()` at the top of your main file. Without it, foreground notifications are silently swallowed.
* **Are you testing from TestFlight?** Push notifications don't work in the Vibecode preview or Expo Go.
* **Is `aps-environment` set to `production`?** This must be in your `app.json` iOS entitlements for TestFlight and App Store builds.
### Notifications work in development but not in production
* Check that `aps-environment` is set to `"production"` (not `"development"`) in your `app.json`.
* Make sure you deployed an updated build after changing the configuration.
### "DeviceNotRegistered" error in receipts
The push token has expired or the app was uninstalled. Re-open the app to get a fresh token.
### Build fails after adding push notifications
Make sure you're using the correct version of `expo-notifications` for your Expo SDK version. For **Expo SDK 53**, use version `~0.31.5`. The AI handles this automatically, but if something goes wrong, tell it: "Use expo-notifications version \~0.31.5"
**Need help?** Reach out via live support chat in the app for the fastest
support. You can also join our [Discord
community](https://discord.gg/qXyWYYX5Ts) to connect with other Vibecode
builders.
***
## For Developers: Technical Details
```json theme={null}
{
"expo": {
"slug": "your-project-slug",
"plugins": ["expo-notifications"],
"ios": {
"infoPlist": {
"UIBackgroundModes": ["remote-notification"]
},
"entitlements": {
"aps-environment": "production"
}
},
"extra": {
"eas": {
"projectId": "your-expo-project-id"
}
}
}
}
```
Each field is required:
* `slug` — must match the slug from your Expo project on expo.dev. A mismatch causes build or token failures.
* `plugins: ["expo-notifications"]` — links the native module during build
* `UIBackgroundModes: ["remote-notification"]` — allows background notification delivery on iOS
* `aps-environment: "production"` — uses Apple's production push service (required for TestFlight/App Store)
* `projectId` — must match the ID from your Expo project. Required for `getExpoPushTokenAsync()` to work
```typescript theme={null}
import { Platform } from 'react-native';
import * as Notifications from 'expo-notifications';
import * as Device from 'expo-device';
import Constants from 'expo-constants';
async function registerForPushNotificationsAsync(): Promise {
if (Platform.OS === 'web') return null;
if (!Device.isDevice) return null; // Simulators can't get tokens
// Request permissions
const { status } = await Notifications.getPermissionsAsync();
if (status !== 'granted') {
const { status: newStatus } = await Notifications.requestPermissionsAsync();
if (newStatus !== 'granted') return null;
}
// Get the Expo push token
const projectId =
Constants.expoConfig?.extra?.eas?.projectId ??
Constants.easConfig?.projectId;
const tokenData = await Notifications.getExpoPushTokenAsync({ projectId });
return tokenData.data; // "ExponentPushToken[xxxxxx]"
}
```
**Pro tip:** Wrap `getExpoPushTokenAsync` in a `Promise.race` with a 10-second timeout. In rare cases (network issues, misconfigured credentials), the call can hang indefinitely:
```typescript theme={null}
const token = await Promise.race([
Notifications.getExpoPushTokenAsync({ projectId }),
new Promise((_, reject) =>
setTimeout(() => reject(new Error('Token timeout')), 10000)
),
]);
```
For production apps, you'll typically send notifications from your backend server rather than directly from the app. Here's a basic Hono endpoint:
```typescript theme={null}
// backend/src/routes/notifications.ts
app.post('/api/notifications/send', async (c) => {
const { token, title, body, data } = await c.req.json();
const response = await fetch('https://exp.host/--/api/v2/push/send', {
method: 'POST',
headers: {
'Content-Type': 'application/json',
Accept: 'application/json',
},
body: JSON.stringify({
to: token,
sound: 'default',
title,
body,
data, // optional payload for navigation
}),
});
const result = await response.json();
return c.json({ data: result });
});
```
You can also store push tokens per user in your database and send targeted notifications to specific users.
This must be called at the **top level** of your main file, **outside** any component:
```typescript theme={null}
import * as Notifications from 'expo-notifications';
Notifications.setNotificationHandler({
handleNotification: async () => ({
shouldShowAlert: true,
shouldPlaySound: true,
shouldSetBadge: false,
shouldShowBanner: true,
shouldShowList: true,
}),
});
```
Without this, notifications received while the app is in the foreground are silently ignored.